


SkinStudio 6 (Beta) Overview
Monday, October 1, 2007 by Quentin94 | Discussion: Tutorials

SkinStudio 6 (Beta) Overview
First when we open SKS6 we have the choice between "I am new..." and "I am experienced..."
We'll choose "I am experienced..." cause all options are displayed for this overview, but the great new feature with SKS6
is that we can choose as beginner the "I am new..." and left out some option like animations.
We'll choose "I am experienced..." cause all options are displayed for this overview, but the great new feature with SKS6
is that we can choose as beginner the "I am new..." and left out some option like animations.

Now the options: first one we'll choose the editor for pictures.
Here like i've Photoshop 7 i'm gonna choose it as custom editor.
We can notice some others options; like "Do not convert TGA to PNG" and "Show tree in edit windows"
interesting options cause SKS6 by default convert TGA with alpha channel to PNG with transparency so if you don't want that enable this option.
We will see the tree option later.


Now that our preferences are set, we will create a new skin. To do that simply click on "New skin" at the top left of the window.
Then we have the choice (again) between "WindowBlinds Basic" and "WindowBlinds advanced" well we take advanced cause they are more flexible.
We enter a new name like "My first WB" and press enter.
Then we have the choice (again) between "WindowBlinds Basic" and "WindowBlinds advanced" well we take advanced cause they are more flexible.
We enter a new name like "My first WB" and press enter.


For this Overview i'll use Arileen my last WB. So we'll open it at the top left of SKS6 window under "New skin" we'll press "Open skin".
A new window appear we select Arileen on the list and we'll press open.
We could press also copy to make a copy of the skin to work on it.
A new window appear we select Arileen on the list and we'll press open.
We could press also copy to make a copy of the skin to work on it.

Like Arileen has severals substyles a popup window appear where we'll choose the substyle to work on.

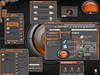
Now the skin open that's how SKS6 is displayed. First "Full Preview" of the skin.
Then "Edit Controls" with severals menus where we'll see "buttons" "toolbars"....
Then "Start Menu and Taskbar"...
....
Well lets see all of them in the following Pictures.
Then "Edit Controls" with severals menus where we'll see "buttons" "toolbars"....
Then "Start Menu and Taskbar"...
....
Well lets see all of them in the following Pictures.


We'll see Colors and fonts later.
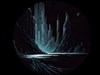
The next Picture show how looks the "Tree view" can bee useful especially at the end of the WB building to check out all the settings and see if we haven't forget something.
The next Picture show how looks the "Tree view" can bee useful especially at the end of the WB building to check out all the settings and see if we haven't forget something.

Well Now we'll open in "Edit Controls" the "Edit Button" section.
Like we can see there are displayed at the top of the new window a preview of how looks the buttons.
Under the Preview there are "Force Image Reimport press F5" to refresh the preview, "Apply" button to apply the skin to see how it looks in real,
A rollbox to choose witch states we want in the preview (here normal state but we can choose to see Mouse over or press...)
An other to choose the background color of the preview.
The search icon is to open the Zoom useful to see your skin with a new regard
Beside "Color Preview margins" checkbox we have a symbol click on it to open a new window where we can set the margins
Yes we can set them without open it. But on this new window we can resize the picture larger than in the main window.
Useful for window's borders or high pictures
At the Left side we have the different sections for this controls. Be sure to see all of them.


We have also different tabs Image (we'll see later), Glyph (an other way to make buttons like for titlebar buttons we can make a general background picture for all of them and a glyph like a X for the close button)
,Animation (where to enter the animation settings like for a start button animated), Painting margins (where to set the margins), Text (where to set the text margins, fonts and colors of the text)
Tools, Coloring mask, and Help(important that's show us the different states for the pictures we have to set.)


So from the "Help" tab we can see that the button need 5 states.
Well we'll import the picture that we have made previously.
Press "Import" button a popup appear press the browse button and choose your picture.
Here like we import a TGA with transparency and translucend and then with a Alpha channel, we'll select the checkbox "This image has transparent parts" and "this image has alpha channel".
If it was a Bmp with only transparency (and then with Magic pink) we has only select the first one.


Now that we have import a new image we'll set the image margins. Here like the picture was made in this way we'll stretch it.
A 0 stretching will looks like really weird. So we'll try different settings at the end we'll keep the best ones.
here that'll be a 7 in top/bottom/right/and Left.
Instead of stretch the picture we could also set it to "Tile the middle section", "Center Middle section",...
A 0 stretching will looks like really weird. So we'll try different settings at the end we'll keep the best ones.
here that'll be a 7 in top/bottom/right/and Left.
Instead of stretch the picture we could also set it to "Tile the middle section", "Center Middle section",...


Now we'll set the Text margins, fonts and color of the font.
Be sure to set them for all states trough the rollbox.
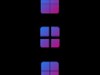
We'll create a new color, go to the "Change skin color" "create a new color" see the image it explain better than text
Back to the button in text tabs choose the new color from the rollbox. Good
Hum back the black anyway lol
Now the fonts go to "Change skin Fonts" "add new font" select the font name, the size, the decoration (bold, underline,...) press ok.
Back to the button and select the new font (like the color)
Be sure to set them for all states trough the rollbox.
We'll create a new color, go to the "Change skin color" "create a new color" see the image it explain better than text
Back to the button in text tabs choose the new color from the rollbox. Good
Hum back the black anyway lol
Now the fonts go to "Change skin Fonts" "add new font" select the font name, the size, the decoration (bold, underline,...) press ok.
Back to the button and select the new font (like the color)


New in SKS6, we can make skin for Vista too.
Look to the symbol for each XP and Vista specific section we have the XP or vista logos or both when the section is for both.
If a setting has no logos it's for XP and Vista.
On Vista the pictures for certain sections aren't build in the same way as XP
In the following case it's build with states not by buttons.
Like this one: We have to built the left and right arrow together and by states:Mouse over, Normal,...


OR we have also an other way to built the picture instead of horizontally we can built them vertically
In this case after import we have to select the checkbox "This image has frames stacked vertically
In this case after import we have to select the checkbox "This image has frames stacked vertically


Well we have seen a little part of SKS6 now go head and see all others by yourself.
I hope this will help someone a little
I hope this will help someone a little
Download the Article as PDF zipped Download the Article as PDF
the WB skin displayed in this tutorial is "Arileen"
Quentin94
Reply #2 Monday, October 1, 2007 8:48 AM
thanks and

Already added to the wiki
Reply #2 Monday, October 1, 2007 8:48 AM
Holy freakin' cow!
That's a lot of work for a beta. I know it's an evil thought. . . . but I hope half of everything changes so you have to do it all again. . . just to keep you out of trouble.
That's a lot of work for a beta. I know it's an evil thought. . . . but I hope half of everything changes so you have to do it all again. . . just to keep you out of trouble.
thanks and


Adding this to the wiki?
Already added to the wiki

Quentin94
Reply #5 Monday, October 1, 2007 12:14 PM
Reply #5 Monday, October 1, 2007 12:14 PM
thanks vStyler and Bilbo anytime If i can help i help.
I wish this will help some people to find their way on SKS6
To those who don't have adsl at the end of the tutorial there are two links to download the same article as pdf or pdf zipped
I wish this will help some people to find their way on SKS6

To those who don't have adsl at the end of the tutorial there are two links to download the same article as pdf or pdf zipped
Zoomba
Reply #6 Monday, October 1, 2007 12:22 PM
Reply #6 Monday, October 1, 2007 12:22 PM
Quentin,
Fantastic article! SKS6 needs a lot of user documentation to help new skinners, and this is a great start. I really hope you find the time to add it to the wiki
-Z

Quentin94
Reply #8 Tuesday, October 2, 2007 7:38 AM
Reply #8 Tuesday, October 2, 2007 7:38 AM
I didn't realize yesterday this article was featured
Too cool my first Featured article hehe THANKS
Little recall the same article is available as PDF
Download the Article as PDF zipped
Download the Article as PDF
Too cool my first Featured article hehe THANKS
Little recall the same article is available as PDF
Download the Article as PDF zipped
Download the Article as PDF
Please login to comment and/or vote for this skin.
Welcome Guest! Please take the time to register with us.
There are many great features available to you once you register, including:
- Richer content, access to many features that are disabled for guests like commenting on the forums and downloading skins.
- Access to a great community, with a massive database of many, many areas of interest.
- Access to contests & subscription offers like exclusive emails.
- It's simple, and FREE!
Reply #1 Monday, October 1, 2007 8:46 AM
That's a lot of work for a beta. I know it's an evil thought. . . . but I hope half of everything changes so you have to do it all again. . . just to keep you out of trouble.
Adding this to the wiki?