


Liquidox Icon Tutorial - Alien Head Icon
A tutorial by skilled skinner, PixelPirate
Tuesday, October 3, 2006 by Zoomba | Discussion: Tutorials
Today, we launched the latest in our line of premium suites; Liquidox by PixelPirate and Stardock Design. To go along with the suite, PixelPirate was kind enough to write up a very detailed tutorial on how he created the cool 3D glassy Alien head icon. It's a great read for anyone interested in the icon creation process.
Be sure to download the files for this icon, here. Includes ico, png, ai and psd files
Liquidox Icon Tutorial - Alien Head Icon
By PixelPirateFor the launch of the suite, here's a little tutorial on how I made the icons - in case you wondered or in case you want to give it a try yourself. I used Adobe Illustrator CS2 (AI) and Adobe Photoshop CS2 (PS).
Start by creating a new document in AI, make it 512 px wide and 512 px high, RGB color. Then create the shape you want to turn into an icon with the Pen Tool or Elipse Tool or Rectangle Tool etc., in this case a green alien head.
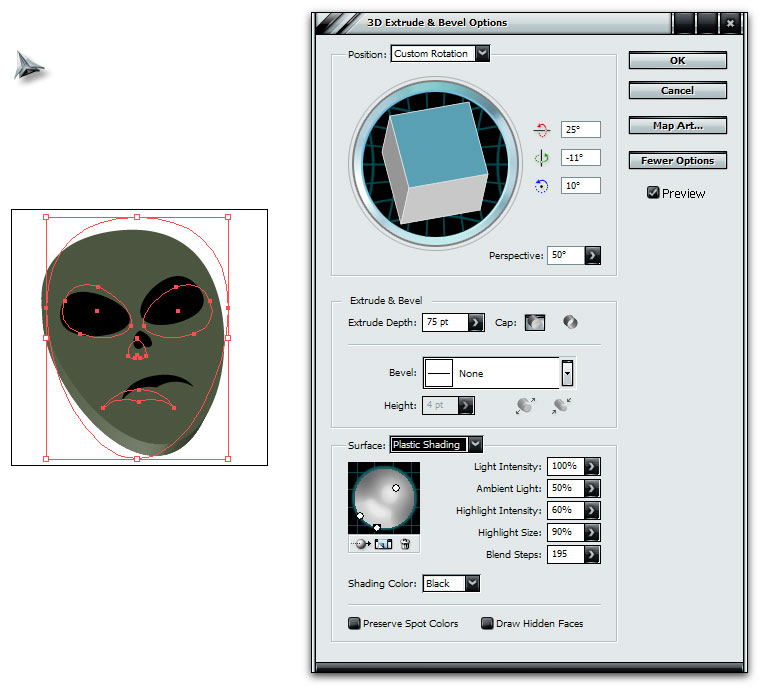
Now, we want to turn this into 3D by using the 3D Effect in AI. Make sure you select all objects on your artboard and group them by pushing ctrl+g. Then go to Effect - 3D and select Extrude & Bevel.
Click More options to expand the dialog shown below. Use the settings below, to further give the 3D look, make sure to use some perspective on your shape. Since the alien head has round curves, remember to increase the Blend steps, so the highlights gets smooth.
Now I have the base to continue to work with in PS. In AI, go to File - Export and save a .psd of the alien head. If you have multible layers, as I've had with some of the icons, remember to include layers in the .psd so you can work with those individually.
Now open the .psd up in PS so we can make it shine! The first thing you'll notice, is that the .psd isn't 512 px as it was in AI. Simply go to Image - Canvas Size and set both to 512 px. In your Layers palette, you now have a folder with the alien head. What I do, is create a white background layer, so I get a better idea of what the icon's gonna look like. I then use the Pen Tool to draw a shape under the head, that will be the shadow under the icon. Click the Path tab on the same palette, hold down control and click the path you just created to make a selection out of it.
Create a new layer on top of the white background layer and fill it with black. Go to Filter - Blur and select Gaussian Blur and use a proper value, in this case 4. Set the opacity of the layer to 75%, so the shadow isn't so dominating.
Now let's move on to the shadows and highlights of the alien. Use the Pen Tool again to draw on top of the alien to get a shape of the top surface. Create a selection of the path, create a new layer above the alien head in the folder in your Layers palette.
Select the Gradient Tool and select a black gradient that goes from 100% to 0% in opacity, and use the tool on your new layer from the top right of the head, to the bottom left. Then deselect by pushing ctrl+d. Mark your layer in the palette and push ctrl+alt+g to create a clipping mask to ensure that there aren't any pixels exceeding the shape of the alienhead.
Then create a highligt from the path as before on a new layer, set the gradient color to white and make it from the bottom left to the top right. The side looks a little flat now. The 3D effect in AI is limited to being very simple, so if you really want depth, we can add that in PS, so pick up the Pen Tool again, and draw a path that covers the side, use the gradients as before to create shadows/highlights on the side on new layers and remember to create Clipping Masks again on those layers. You should then have something like below:
Now let's move on to the glossy part. Make a selection of the path you created for the top surface, then select the Elliptical Marquee Tool. You can hold alt to substract from your selection or hold shift+alt to make an intersection on your selection, depending on where you need to place the glossy highlights. If you want to make the selection a couple of pixels smaller, go to Select - Modify - Contract. That way the glossy highlight doesn't go all the way out to the edge of the head.
Now I've created a bunch of highlight layers all over the alien's head and eyes to make it look like below. The selections are something you're gonna have to try out for yourself to fully understand how they work. For the highlights, I've used the Gradient Tool, white from 100% to 0% in opacity. You may want to alter the opacity on some of the layers, if you find the highlights you made to be too bright.
Now let's move on to the final part in PS, the sharp edge highlights. Use the Pen Tool to create strokes where you want highlights placed. I selected the parts as shown below:
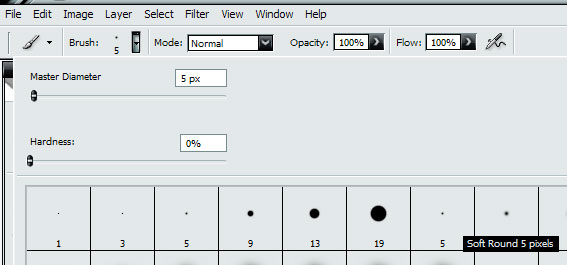
Before we continue, select the Brush Tool and set it to use the Soft Round 5 pixels brush and also make sure the color is set to white.
Now create a new layer, go to Paths, right-click the lines just drawn and select Stroke Path, then set it to Brush and check Simulate Pressure as below:
Now we have some pretty strokes all over the alien.
Then set the white background layer to be invisible by clicking the eye icon to the left of the layer in the palette and save a .png of the icon. Reopen the .png, go to Image - Image Size and set it to 256x256 px and save the .png.
All there's left to do now is convert the 256 px .png to .ico in your favorite icon creation software. I use Stardock's IconDeveloper for this and included 8 sizes; 16, 24, 32, 48, 64, 92, 128 and 256 px.
You can download the .ico, .png, .ai and .psd for this icon in the Misc Icons library here on WinCustomize to lurk some more on the creation phase.


Reply #3 Tuesday, October 3, 2006 2:41 PM

Please login to comment and/or vote for this skin.
Welcome Guest! Please take the time to register with us.
There are many great features available to you once you register, including:
- Richer content, access to many features that are disabled for guests like commenting on the forums and downloading skins.
- Access to a great community, with a massive database of many, many areas of interest.
- Access to contests & subscription offers like exclusive emails.
- It's simple, and FREE!
Reply #1 Tuesday, October 3, 2006 9:58 AM