Creating Hybrid Animated Wallpapers for DeskScapes
Tuesday, October 13, 2009 by Island Dog | Discussion: OS Customization
With DeskScapes 3 just around the corner, you have been hearing a lot about the new hybrid .dream format, which is good because it’s an awesome feature. Basically, it allows you to take static wallpapers and apply animations to it. This gives more people a chance to create animated wallpapers without having to know how to use 3D applications. It’s really easy to create subtle animations without having to render a huge video file, and it uses very little resources. It does take a bit of work to create a hybrid .dream, but it’s well worth any time spent.
What you will need:
- Static wallpaper
- DeskScapes 3
- DreamMaker (included with DeskScapes)
- Animation images or static images
- Notepad, ObjectEdit, etc.
I can’t take you through every step of creating a hybrid .dream, there are just too many variations to explore. However, this guide should give you a general idea of how to create a hybrid .dream. You can find the documentation in the DeskScapes directory (Program Files/Stardock/Object Desktop/DeskScapes), which will give you more options and parameters when writing the .hybrid file.
The .hybrid file is what tells the hybrid .dream how to act basically. It’s going to tell DeskScapes what images to use, how to use it, and the various settings that can be applied. When you first open it up, it might be overwhelming for some, but don’t worry, it’s really easy to figure out and in no time you will have yours ready. The best thing I can recommend is opening the .hybrid files from one of the included Stardock created .dreams and studying it. This will help you a lot.
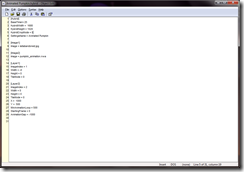
This is what a .hybrid file should look like.
Obviously this will vary depending on your animated wallpaper, but as you see this has the hybrid settings, images, layers, etc. Once again, the description of these functions are explained in the hybrid documentation, but I will cover a few just to get you started.
[Hybrid]
BaseTimer= 25
HybridWidth = 1680
HybridHeight = 1020
HybridCropMode = 0
SettingsName = Animated Pumpkin
[Image1]
Image = isitabandoned.jpg[Image2]
Image = pumpkin_animation.nwa
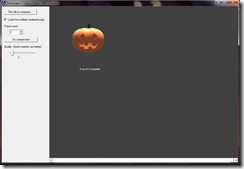
In my sample .dream I have just two images. Image 1 is my static wallpaper and Image 2 is the animation image which has been converted into a .nwa file in SkinStudio. You can use .jpg, or .png files for static images, and animations need to be in the .nwa format. NWA files are compressed animation files often used in WindowBlinds animations. There is also a stand-alone NWA encoder in which you can create .nwa files. In the screenshot below I have a simple two-frame animation of a pumpkin for this example.

Below you can see the definitions for the image layers. You can define up to 50 layers, but here I just have the two layers for my two images. Some example of the parameters you can define are the X and Y coordinates, image size, tile modes, animation settings, etc.
[Layer1]
ImageIndex = 1
Width = -0
Height = 0
TileMode = 0[Layer2]
ImageIndex = 2
Width = 0
Height = 0
TileMode = 0
X = 1000
Y = 500
MinAnimationLoop = 500
StartingFrame = 0
AnimationGap = -1000
Now that we have the basic parameters set for the .hybrid file, it’s time to pull it all together into an actual .dream file for DeskScapes. Gather all your resources and open DreamMaker. In DreamMaker you will need to fill the areas for your name, description, add a thumbnail, etc. After all that is done, open the Dream Contents tab, and select Hybrid Dream. This will give us all the options we need.

Select your .nwa file, then below that add your image resource files, finish up any needed descriptions and hit Create Dream. That should crate the .dream file and place it into the .dream folder and DeskScapes.
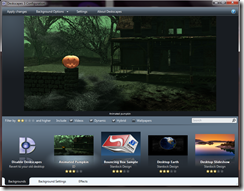
Now you should see your .dream in the DeskScapes window. If you need to make further adjustments to the .hybrid file, as I did to get the pumpkin in the correct position, you can open the extracted .hybrid file and adjust it from there. Just note you will have to repackage it if you intend to share it after that.
I hope this basics tutorial will help you get started creating a hybrid .dream. I have uploaded the example .dream on WinCustomize, so feel free to open it and look at the hybrid file to get a general idea on how it works.
Download – Animated Pumpkin Hybrid Tutorial Dream
Reply #2 Tuesday, October 13, 2009 3:48 PM
Reply #3 Tuesday, October 13, 2009 3:57 PM
SettingsName is a name that will be used to store the settings for this dream. Ideally you should set this to the dream name, though there are some rare occasions (such as having multiple different colour variants of your dream) where you may want to share settings between dreams.
Then once that is set Deskscapes will show any layers which have a LayerName line :
LayerName = "text that shows to the user"
Only add this for layers you want to be user controllable.
Reply #4 Tuesday, October 13, 2009 4:06 PM
Reply #6 Tuesday, October 13, 2009 6:26 PM
The animations were 3d models rendered as a series of pngs and then converted into nwa files.
Reply #7 Tuesday, October 13, 2009 7:56 PM
and Where do we find this in Deskscapes? is it not a separate downoad, and why does it not show up in our Object Desktop avail software list in Impulse? We have to go find it n the Deskscapes site i guess?
GigaByte69
Reply #8 Tuesday, October 13, 2009 8:22 PM
Reply #9 Tuesday, October 13, 2009 8:42 PM
I believe the background png was also a 3d scene that was rendered to a single png. I would guess it was done in Cinema 4D.
Reply #10 Tuesday, October 13, 2009 8:44 PM
What you will need: Static wallpaper DeskScapes 3 DreamMaker (included with DeskScapes) Animation images or static images Notepad, ObjectEdit, etc.
and Where do we find this in Deskscapes? is it not a separate downoad, and why does it not show up in our Object Desktop avail software list in Impulse? We have to go find it n the Deskscapes site i guess?
GigaByte69
It should be installed with Deskscapes. So the link should be in the startmenu. If not DreamMaker.exe should be in the program files folder for Deskscapes.
Reply #11 Saturday, November 19, 2011 8:09 PM
I can't see how the pumpkin is positioned over the background image. Where do you specify its location? Is that where the x and y coordinates are used?
Reply #12 Saturday, November 19, 2011 8:22 PM
Yes. If I remember correctly, the vertical alignment coordinate refers to where to put the bottom of the image from the bottom of the background, as opposed to the top of either. It's been awhile though.
Please login to comment and/or vote for this skin.
Welcome Guest! Please take the time to register with us.
There are many great features available to you once you register, including:
- Richer content, access to many features that are disabled for guests like commenting on the forums and downloading skins.
- Access to a great community, with a massive database of many, many areas of interest.
- Access to contests & subscription offers like exclusive emails.
- It's simple, and FREE!


Reply #1 Tuesday, October 13, 2009 11:23 AM