First Previous Page 2 of 2 Next Last

DX Tutorial #5: Slip Sliding Away

RomanDA's DX Tutorial Series

Sunday, August 13, 2006 by RomanDA | Discussion: DesktopX Tutorials

RomanDA's DesktopX Tutorials:
My goal is to make a set of tutorials for DesktopX. If you have ideas on what you would like to see, please email me at DXTutorials@RomanDA.org

Slip Sliding Away
After working on the GalCivII Widget Bar [ LINK ], I was using a lot of code that kept the "sliders" locked to the left side of the screen.

I was challenged to make it so they could "slide" to the top or bottom, or even to the other side of the screen.
After spending most of my Saturday afternoon trying to work this out, and its not 100% perfect, there are some issues, I was able to make it work.

The actual code was not really that bad, but it was a little convoluted.

DOWNLOAD THE
TEST WIDGET HERE

STEP 1: Setup DRAG
First lets setup the sub "ON_DRAG" so that we can pull the x/y & cursor positions.
'--- Function to handle the DRAG

Sub Object_OnDrag(x, y, newX, newY)

'--- Store the Currrent X/Y location of the object BEFORE its moved (or NOT MOVED!)
OrigL = object.Left
OrigT = object.Top

'--- Set this to False so that it will move the item's x/y by default
nomove = False

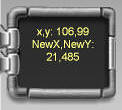
'--- Set the text in the interior object (its only so we can see what is going on,
'--- you would NOT use this in a REAL widget.
'--- This shows the x/y pos and the newx/newy pos so you can watch it change as you drag things
'--- Just for testing
desktopx.Object("Test").Text = "x,y: " & x & "," & y & VBCrLf & "NewX,NewY: " & newX & "," & newY

STEP 2: Determine the Edges of the Screen
It took me a long time to work out the following SIMPLE code.
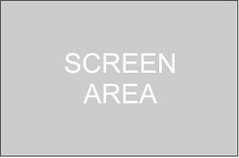
If this is your normal screen in my case ill use 1600x1200
just to have something to use for reference.
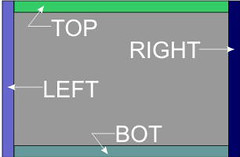
In this case I'm using the width of the Widget and height of the Widget for this "border".

oTop is the Height of the object
oLeft is the Width of the object
oBot is the Height of the screen minus the object height
oRight is the Width of the screen minus the object width

'--- Set the Top/Left/Bot/Right margins for us to be able to tell
oTop = object.Height
oLeft = object.Width
oBot = system.ScreenHeight-(oTop)
oRight = system.ScreenWidth-(oLeft)
STEP 3: Setting the Screen Position
Now that we have the height/width areas designated, we need to setup a "test" to see where the cursor is.

In this case I used TOP/BOT/LEFT/RIGHT, you could re-arrange these to change what supersedes things.
What I mean is if you drag the object near the TOP it would override the LEFT border, as the cursor can only be in 1 "area" at a time.
Im sure there is a way to make this work a little better, but this works for now.

'--- By using these "areas" we set the current POSITION of the object on the screen
If System.CursorY <= oTop Then ScreenPoz = "TOP"
If System.CursorY => oBot Then ScreenPoz = "BOT"
If System.CursorX <= oLeft Then ScreenPoz = "LEFT"
If System.CursorX => oRight Then ScreenPoz = "RIGHT"

'--- We add the Position to the test text string, again just to show what area of the screen your in.
'--- again this is just for testing purposes.
desktopx.Object("Test").Text = desktopx.Object("Test").Text & VBCrLf & ScreenPoz


STEP 4:
Dragging things around
We now have our 4 screen "areas"; TOP/LEFT/BOT/RIGHT
We can now use a SELECT CASE in order to handle the 4 states and an "ELSE".

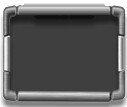
In order to keep the "LOOK" of this widget, we will ROTATE the object to keep the "rail" aimed at the edge of the screen.

'--- Select CASE on the ScreenPosition

Select Case ScreenPoz
'--- LEFT Position process
Case "LEFT"

'--- Set the Rotation for the object to 0 (in this case 0 is left)
object.Rotation = 0

'--- FORCE the LEFT position to 0
'--- this keeps the object's LEFT POSITION LOCKED to 0
Object.Left =0

'--- if the Y (up and down) position is less then 0
'--- it will stop the top at 0
'--- this keeps you from scrolling the object up past the top of the screen.
'---
It sets the noMove to True (stops the script from moving the position)
If newY <= 0 Then
Object.Top = 0
nomove = True
End If

'--- set TEMP to the screen height minus the object height
'--- This sets the MAX Y position to stop you from
'--- moving the object OFF the screen
'--- It also sets the noMove to True

temp = system.ScreenHeight-object.Height
If newY => temp Then
Object.Top = temp
nomove = True
End If

'--- if noMove <> True then go ahead and move the object's top to the newY position.
If nomove = False Then Object.Top = newY


STEP 5/6/7: Things keep dragging on and on.
We now have our 4 screen "areas"; TOP/LEFT/BOT/RIGHT
We can now use a SELECT CASE in order to handle the 4 states and an "ELSE".

In order to keep the "LOOK" of this widget, we will ROTATE the object to keep the "rail" aimed at the edge of the screen.

'--- RIGHT Position process
Case "RIGHT"

'--- Set the Rotation for the object to 180 (in this case 180 is right)
object.Rotation = 180

'--- FORCE the LEFT position to Screenwidth - object.width
'--- this makes the object LOCK to the right side of the screen
Object.Left =system.ScreenWidth-object.Width

'--- Move the inside text to a position to keep it from being
'--- off the edge of the object.
'--- This would also be used to move things you had inside the widget.
desktopx.Object("Test").top = 25
desktopx.Object("Test").left = 22

'--- if the Y (up and down) position is less then 0
'--- it will stop the top at 0
'--- this keeps you from scrolling the object up past the top of the screen.
'---
It sets the noMove to True (stops the script from moving the position)
If newY <= 0 Then
Object.Top = 0
nomove = True
End If

'--- set TEMP to the screen height minus the object height
'--- This sets the MAX Y position to stop you from
'--- moving the object OFF the screen
'--- It also sets the noMove to True

temp = system.ScreenHeight-object.Height
If newY => temp Then
Object.Top = temp
nomove = True
End If

'--- if noMove <> True then go ahead and move the object's top to the newY position.
If nomove = False Then Object.Top = newY

'--- TOP Position process
Case "TOP"

'--- Set the Rotation for the object to 90 (in this case 90 is DOWN)
object.Rotation = 90

'--- FORCE the TOP position to 9 (this could change on your widget)
'--- the 9 is because its being Rotated and its not a perfect square
'--- this makes the object LOCK to the top of the screen
object.top = 9

'--- Move the inside text to a position to keep it from being
'--- off the edge of the object.
'--- This would also be used to move things you had inside the widget.
desktopx.Object("Test").top = 20
desktopx.Object("Test").left = 28

'--- if the X (left/right) position is less then 0
'--- it will stop the left at 0
'--- this keeps you from scrolling the object left past the edge of the screen.
'---
It sets the noMove to True (stops the script from moving the position)
If newX <= 0 Then
Object.Left = 0
nomove = True
End If

'--- set TEMP to the screen width minus the object width
'--- This sets the MAX X position to stop you from
'--- moving the object OFF the screen
'--- It also sets the noMove to True

temp = system.ScreenWidth-object.Width
If newX => temp Then
Object.Left = temp
nomove = True
End If
'--- if noMove <> True then go ahead and move the object's top to the newY position.
If nomove = False Then Object.Left = newX

'--- BOTTOM Position process
Case "BOT"

'--- Set the Rotation for the object to -90 (in this case -90 is UP)
object.Rotation = -90

'--- FORCE the TOP position to the screen height minus the object height minus 9 (this could change on your widget)
'--- the 9 is because its being Rotated and its not a perfect square
'--- this makes the object LOCK to the bottom of the screen
object.top = system.ScreenHeight-object.Height-9

'--- Move the inside text to a position to keep it from being
'--- off the edge of the object.
'--- This would also be used to move things you had inside the widget.
desktopx.Object("Test").top = 20
desktopx.Object("Test").left = 22

'--- if the X (left/right) position is less then 0
'--- it will stop the left at 0
'--- this keeps you from scrolling the object left past the edge of the screen.
'---
It sets the noMove to True (stops the script from moving the position)
If newX <= 0 Then
Object.Left = 0
nomove = True
End If

'--- set TEMP to the screen width minus the object width
'--- This sets the MAX X position to stop you from
'--- moving the object OFF the screen
'--- It also sets the noMove to True

temp = system.ScreenWidth-object.Width
If newX => temp Then
Object.Left = temp
nomove = True
End If
'--- if noMove <> True then go ahead and move the object's top to the newY position.
If nomove = False Then Object.Left = newX

'--- If the cursor is outside of the Top/Left/Bot/Right areas
'--- DON'T MOVE IT!!
'--- This uses the original top/left that we saved at the beginning of the sub.
'--- If you don't use this the object can move all over.
Case Else
object.Left = OrigL
object.Top = OrigT

'--- End the CASE Select
End Select

'--- End the Sub
End Sub

This is just PART of what would be needed to be able to move an entire widget around the screen.

You would also want to setup some sort of code to save the position, also you would want to setup something to store the default top/left/right/bot position.

Also, if you have items inside the widget (IE A CLOCK or a CALENDAR or a WEATHER OBJECT) you would have to have code for every object in there to move it around.

Good Luck, and happy DXing,

Enjoy,
RomanDA
AKA: David A. Roman
http://romanda.wincustomize.com
http://www.romanda.org
DXTutorials@RomanDA.org

DX Tutorial #2: Using MouseOver to hide/show objects

RomanDA's DX Tutorial Series

Wednesday, April 26, 2006 by RomanDA | Discussion: DesktopX Tutorials

RomanDA's DesktopX Tutorials:
My goal is to make a set of tutorials for DesktopX.  If you have ideas on what you would like to see, please email me at DXTutorials@RomanDA.org

MouseOver DX Controls:
  How to use a transparent area and mouseover to show/hide items.
This could easily be modified to use for a DROP DOWN, or SLIDE OUT menu system.

Click HERE to download the working widget first!

Master Background Transparent Background Item Frame
MasterBack transparentback Area1,2,3,4

The trick to using these is in the ADVANCED properties in DX!
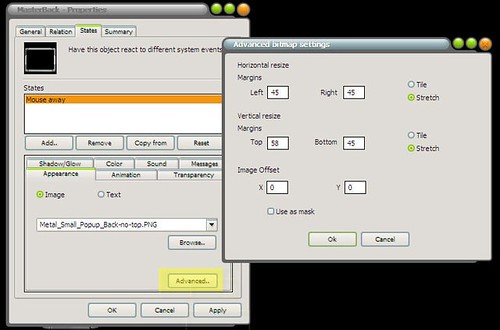
By using these setting you are able to "stretch out" the Background and still keep its shape and look.
The Left/Right/Top/Bottom are in PIXELS.  You have to know the position of things in your images to be able to use the correctly.

I used the same ADVANCED settings to take the very small Item Frame and make it into the bars you see in the working widget.
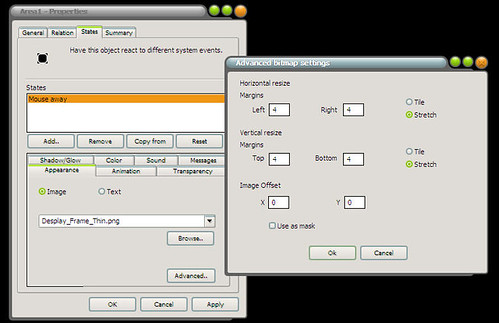
This is a great part of DX, it allows you to have a REALLY small png file and use it to make just about any sized bar.

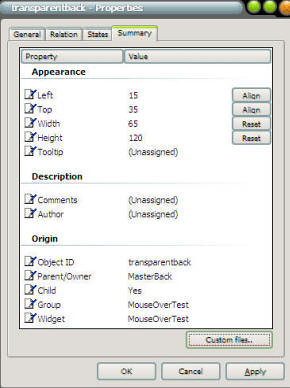
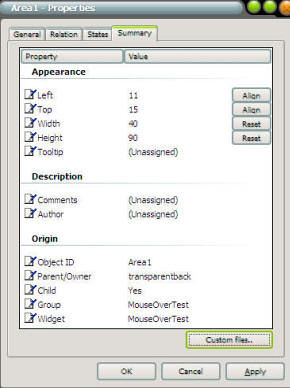
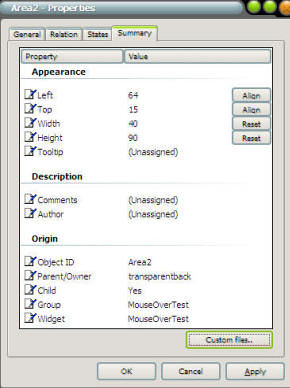
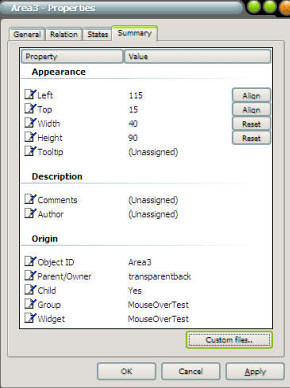
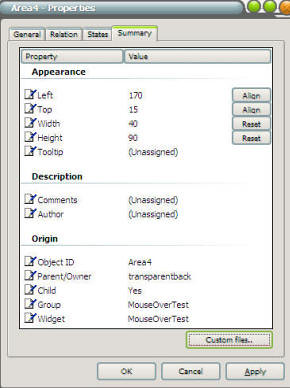
Use these setting below to work out the height/width/top/left/and parent/child relationships:
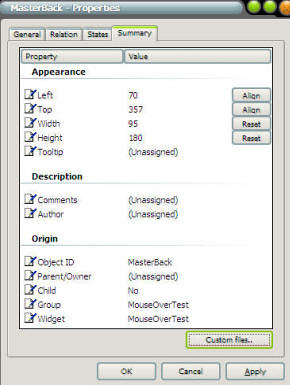
MasterBack transparentback area1
area2 area3 area4
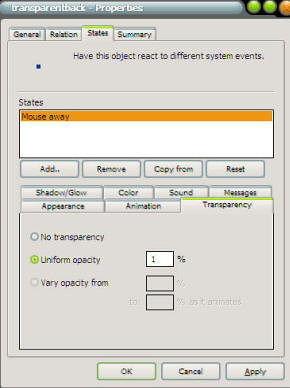
You need to change the Transparency on
transparentback item.

This makes this item nearly invisible.

DO NOT EVER SET IT TO 0 for the opacity!!

I have had DX BLOW UP on me simply by setting this to 0.
This will be the "container" for the AREA(1,2,3,4) items.
<----------


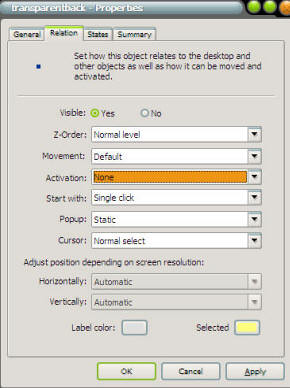
In the properties of the transparentback as well as
all of the areas you need to change the "activation"
to "NONE" this makes the mouse ignore these areas.

This would need to be a little different if you are wanting
the areas to be "buttons" in a menu system.
BUTT, if your doing that setup, you should use a
mouse over, i would make a btn you CLICK to show
the menu then click to Hide it!  ----------------------->

So now you have all the parts.  and hopefully you have them all put together right.

The way this works is as follows:

  • The AREAS(1/2/3/4) reside on top of the transparentback object.
  • transparentback object resides on top of the MasterBack object.
  • The Script we will create will make the transparentback's width/height match the MasterBack (- a little to make it reside INSIDE)
 
STEP 2: Let's look at the scripts:
  Ok, now that we have the objects made, lets play with some scripts.
The only object that has a script is MasterBack.

Click the PROPERTIES of MasterBack then click on ""NEW" for the script.

 
Dim MinW,MaxW
MinW = 100
MaxW = 250

Sub Object_OnScriptEnter
     object.width = MinW
     desktopx.Object("transparentback").top = 35
     desktopx.Object("transparentback").left = 15
     desktopx.Object("transparentback").width = object.width-30
     desktopx.Object("transparentback").height = object.height-60
End Sub

The above script is designed to set the default size of the MasterBack to its Min Size.
You could easily change the MinW (minimum width) and MaxW (maximum width) to be whatever settings you want.
It also sets the top/left/height/width of the transparentback object to match the size of the MasterBack object.

Sub Object_OnMouseEnter
    Call Grow
End Sub

Sub Object_OnMouseLeave
    Call Shrink
End Sub

The above scripts are to handle the mouse over/leave states.
I have them call sub functions so i could keep track of what it was doing.  It could easily be changed to work without these sub functions.

Function Shrink
    object.KillTimer 200
    object.SetTimer 100,10
End Function

Function Grow
     object.KillTimer 100
     object.SetTimer 200,10
End Function

These functions start and stop the "grow" and "shrink" function of the widget.
You can make it grow/shrink faster or slower by changing the ,10 in the SETTIMER function.
The 10 is 10 ms.  If you want it to be slower make it 20 or 30, faster would be 5, 2.

Sub object_ontimer100
     If object.width => MinW Then
          object.width = object.width - 5
          desktopx.Object("transparentback").width = object.width-30
     Else
          object.KillTimer 100
     End If
End Sub

Sub object_ontimer200
     If object.width <= MaxW Then
          object.width = object.width + 5
          desktopx.Object("transparentback").width = object.width-30
     Else
          object.KillTimer 200
     End If
End Sub

These are really pretty simple "grow" and "shrink" functions.
object_ontimer100 Shrinks the MasterBack width down by 5 pixels at a time until it reaches the MinW value.
It also changes the transparentback object's width as well.
By making the transparentback shrink at a smaller size than the MasterBack it looks like the AREA(1/2/3/4) objects are being hidden.

object_ontimer200 does the same thing only in reverse.  It makes the object GROW at 5 pixels at a time until it hits the MaxW value.

Once they reach their set values, they KILL the timer so it stops trying to shrink or grow.
I also added this code in the shrink/grow functions to be sure it doesn't get stuck in a loop.

 
In Conclusion
  This is a really simple way to have a container that shows and hides objects placed inside it.  I have used this for my GalCiv II Drive Meter widget.

I know this seems simple, but it took me a while to figure this out.  I hope by posting this article and the widget that I can help other people who are attempting to learn DX.  The potential for DX is amazing.

Please let me know if you have problems, comments, or questions with this.

 
Enjoy,
RomanDA
AKA: David A. Roman
http://romanda.wincustomize.com
http://www.romanda.org
DXTutorials@RomanDA.org


web-wc01