


Learning DX Step-By-Step - #11
Animation Station
Wednesday, June 6, 2007 by RomanDA | Discussion: DesktopX Tutorials

 |
|
| Step-by-Step Tutorials |
#11 - Animation |
|
A series by RomanDA |
|
Listing of other DX Tutorials:
Click here
Today's Lesson: "Animation"
Ok, So.. I lied. Well I
didn't Lie, I really was done, but this one was really simple and I saw some
people asking about this, and I had just finished making just this thing.
I figured why not.
So call it a bonus for me becoming a Master.. or call it, I was bored.
We will be Using the SCRIPTED Animation check you have seen in the Object "Animation" tab.
For this and all the Step-By-Step DX Tutorials you will need to purchase DesktopX for $14.95 from Stardock.
Lets get started.
STEP 1 - Create the objects
We are going to make a single object here, but its more complicated then normal.
First thing you have to do is make a PNG that has multiple images inside it. There are a LOT of ways to make this kind of PNG.
I have used FLASH to export a
series of images, then they all need to be complied into one image.
Like this:
![]()
The trick with the frames
(objects) in this kind of image is that the need to be EXACTLY The same size,
and they have to be spaced EXACTLY the same as well.
In this case the image has 4 frames, I numbered them for you so you will be able
to see the animation in action.
Create a NEW object, call it
"TEST" or whatever.
You can (save-as) the above image, and use it for testing. The Catch here
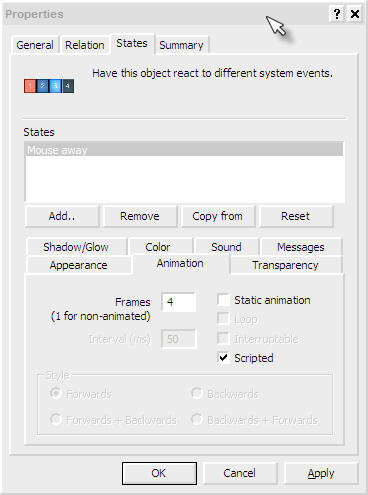
is make sure you change the ANIMATION TAB in the STATES tab of the properties to
show:
(4) Frames, and SCRIPTED is checked.
STEP 2 - Moving Ahead - Add a Script
Create a SCRIPT on the object we just created.
| ANIMATION Code | |
Function Object_OnLButtonUp(x, y, Dragged) |
|
Lets look at the above script.
First we use the same function we use all the time to handle click:
| ANIMATION Code | |
Function Object_OnLButtonUp(x, y, Dragged) |
|
Here is the main part of the
script. The script looks at the object to see what its Current Frame is.
CurFrame = object.CurrentFrame + 1
This is based on 0-3 not 1-4, even though there are 4 frames in the
animation. We START at 0 not 1!!!!
Then we check to see if CurFrame
its less than < the max number of frames (4 frames of animation).
If so, then we make the current frame the new CurFrame.
Or else the object's CurrentFrame is set to 0 (the first frame of the animation).
| ANIMATION Code | |
CurFrame = object.CurrentFrame + 1 |
|
CONCLUSION
So, that's about it. you
click on the object, and it changes the current frame up 1 each time till it
gets to the last frame, then it goes back to 0.
I used this in something I'm working on right now.
I hope you took the time to enter the code (not just copy/pasted the entire thing) so you could work thru the tutorial step-by-step and see how things work.
This one was very simple, but I know I didn't know how to use this till I had to, so I hope it helps everyone out.
This REALLY will be my last tutorial for a while. I hope you have enjoyed this step into DX.
|
Enjoy, RomanDA AKA: David A. Roman http://romanda.wincustomize.com |
Learning DX Step-By-Step - #10
Hide & Seek
Thursday, May 31, 2007 by RomanDA | Discussion: DesktopX Tutorials
|
|
|
| Step-by-Step Tutorials |
#10 - Hide & Seek |
|
A series by RomanDA |
|
Listing of other DX Tutorials:
Click here
Today's Lesson: "Hide & Seek"
This will be the last in this series
of Tutorials. I hope you have enjoyed them, and managed to get something out of
them.
In this lesson we will do some basic DX operations on one object from another.
We will cover the following:
- HIDE/SHOW one object by clicking on another
- SLIDE/HIDE one object by clicking on another
- EXPAND/SHRINK one object by clicking on another
For this and all the Step-By-Step DX Tutorials you will need to purchase DesktopX for $14.95 from Stardock.
Lets get started.
STEP 1 - Create the objects
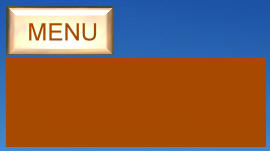
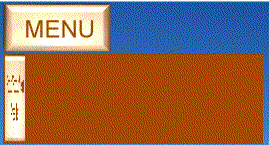
For this tutorial we will be using 3 objects: (right click and SAVE the images to your pc)
| Mask |
|
| Button |
|
| Target |
 |
- Create 3 objects. (look at the old tutorials for info on how to do this)
- Create an object called Mask
- width: 260
- height: 90
- Group Tutorial10
- Widget Tutorial10
- NOTE: we will later change the transparency to 0, but for now we want to see how the mask makes things work.
- Create an object called Target
- Make its PARENT object MASK
- place it at 0,0 for top/left.
- Group Tutorial10
- Widget Tutorial10
- Create an object called Button
- place it above the TARGET/MASK object (like you see in the table above, just above it)
- Widget Tutorial10
- NO GROUP!!!!
- We will make a VERY simple script on Button to hide/show Target.
STEP 2 - Add a simple HIDE/SHOW Script
Add the following script to Button:
| BUTTON Code | |
Function Object_OnLButtonUp(x, y, Dragged) |
|
Lets look at the above script.
Its VERY simple, we look at the Visibility of Target and see if its True
(is it visible), if so, we HIDE it (False), if its Hidden (False) we Show it (True).
| BUTTON Code | |
If desktopx.Object("Target").visible = True Then 'is Target Visible? |
|
That's all there is to it.
SAVE the code.
Click Button to see how it toggles Target on/off.
The MASK will stay there, but that's ok for now, we will play with that NEXT.
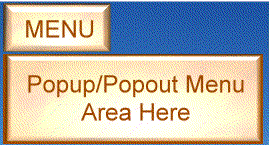
Here is what you will see:
| Normal View | CLICKED |
 |
 |
STEP 3 - Sliding Target
Now, lets change things up. Lets make the TARGET SLIDE up into the menu. We do this by making a script that has a few Timers (in order to slow up the sliding).
The script is a modified version of my script I used in another tutorial. The basics are this.
- The
Function Object_OnLButtonUp(x, y, Dragged)is the button being pressed (well released)
Inside here we look at the TOP position of the TARGET.
If the TARGET's top is = 0 this means its being shown and is at the normal position, so we want to HIDE it (Timer 200).
If not then we want to SHOW it (Timer 100).
We kill the timer just to be sure, then we set the correct timer to start. - In the timers we simply look
to see if the top is at 0 or at -90 (shown / hidden).
All we do to HIDE the TARGET is to move it 5 spaces at a time UP - Because we have the TARGET's parent as a MASK it will move up past the Visible area the mask shows, so it will look like its vanishing.
- In the Timer we keep moving it UP until it reaches -90 (the object it 88 pixels tall), then we kill the timer.
- When we click the button again it sees the TARGET.top position is -90 and it SHOWS it by doing the opposite as it does to SHOW it.
- We move it DOWN 5 pixels at a time till its back to 0, with the mask setup it looks like its sliding from nowhere.
- We are using this
Sub Object_OnScriptEnterTo set the initial TARGET position to 0, just so that it shows the menu on startup. If you wanted to have the menu HIDDEN on startup, you would change the 0 to -90
desktopx.Object("Target").top = 0
End Sub
Here is the script to SLIDE the TARGET UP/DOWN: (this code goes in the
BUTTON)
REPLACE the code from the "HIDE/SHOW" above.
| BUTTON Code | |
Sub Object_OnScriptEnter |
|
This would end up looking like this (when you click the button it goes UP then DOWN):
To make this look a LOT better you
could go in and make the MASK's transparency = 0 so that its basically invisible.
You can use whatever objects you want, you would only have to change the -90 to
the correct height for the object you want to use.
Again, these are just samples for you to work with.
STEP 3 - Shrinking / Expanding
Ok, so we know how to HIDE/SHOW by clicking the button, and we can make it SLIDE UP and DOWN too. Now lets make the TARGET EXPAND / SHRINK.
To do this we will use some of the same functions as above. Only now we want to not MOVE the TOP, we want to change the WIDTH of the TARGET.
The targets "default" size is: 255x88 What we want it to do is shrink down to 30x88 (so that it EXPANDS out from the left to the right).
One of the things we need to do is
change the ADVANCED settings on the TARGET image.
Click on properties, then States then ADVANCED:
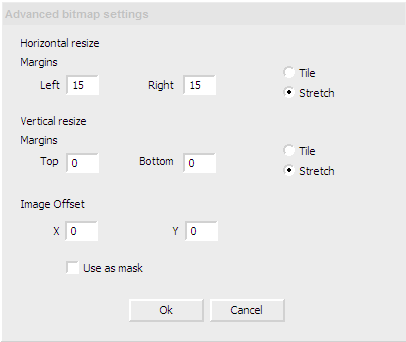
This will make it so the 3d EDGE of the TARGET stays the right width, and the insides kind of Expand.
| BUTTON Code | |
Sub Object_OnScriptEnter |
|
This would end up looking like this
(when you click the button it EXPANDS / SHRINKS):
It wont look exactly like this, the edges should stay and the middle should shrink
(I just dumped this into flash, so its not the same).
In the case of the EXPAND/SHRINK, you do NOT need the MASK, so you could delete that object. I left it here only for reference.
CONCLUSION
I hope you took the time to enter the code (not just copy/pasted the entire thing) so you could work thru the tutorial step-by-step and see how things work.
This tutorial is actually 3 in 1. But they are related, so I wanted to make this last Tutorial a good one.
This will be my last tutorial for a while. I hope you have enjoyed this step into DX.
|
Enjoy, RomanDA AKA: David A. Roman http://romanda.wincustomize.com |
Learning DX Step-By-Step - #9
Wallpaper Changer
Wednesday, May 2, 2007 by RomanDA | Discussion: DesktopX Tutorials
|
|
|
| Step-by-Step Tutorials |
#9 - Wallpaper Changer |
|
A series by RomanDA |
|
Listing of other DX Tutorials:
Click
here
Today's Lesson:
"Wallpaper Changer"
In this lesson we will
walk thru a few built-in commands in DX that allow you to create a
Wallpaper Changer.
We will start simple and add to the script. It is amazing all the
things that are built into DX.
We will use the file dialog box, the wallpaper changer, create a "right-click" menu and even a custom preference window.
For this and all the Step-By-Step DX Tutorials you will need to purchase DesktopX for $14.95 from Stardock.
Lets get started.
STEP 1 - Using the System.FileOpenDialog & System.SetWallpaper
Create a new object (look at the old tutorials for info on how to do this).
Once it is created (you can use any image you want, but for me I'm just going to use the standard round DX image.
Add the following script:
| Vbscript Code | |
Function Object_OnLButtonUp(x, y, Dragged)
|
|
Looking at the above script we have some new things in here.
| Vbscript Code | |
System.FileOpenDialog("Select Wallpaper...", "", FolderName , "Wallpapers|*.jpg", 0) |
|
The FileOpenDialog is a built-in
DesktopX function. It allows you to select a file from a standard windows
looking open dialog box.
The format is very simple.
- "Select Wallpaper..." - Title for the window
- "" - default file (say you want it to come up with a file selected, this would be that file name)
- FolderName - The default folder to open
- "Wallpapers |*.jpg" - this is the file Extension to use, in this case JPG
- 0 - flags (to learn more about all these flags look over: https://www.stardock.com/products/desktopx/documentation/scripting/system_namespace.html )
The way this works, is you click on the object, it pops open the FileOpenDialog , then you select your wallpaper this file name gets saved into the Wallpaper var.
| Vbscript Code | |
System.SetWallpaper wallpaper, 3 |
|
This is another built-in DesktopX command. It does exactly what it says "SetWallpaper". It gets passed 2 items:
- wallpaper - the file we picked from above, has to have the entire path (IE: c:\wallpaper\mywallpaper.jpg )
- 3 - There are 3 options for
this: (we will add a right-click menu later to select this)
- 0 = use default wallpaper
- 1 = Center wallpaper
- 2 = Tile wallpaper
- 3 = Stretch wallpaper
So with just the above script you have created a object/widget that allows you to click, pick a file, and have it set the wallpaper to that file.
This is good, but every time it loads it points to that same folder, what if you had multiple folders? What if you want it to STORE what folder you picked the last time?
STEP 2 - Pulling the Folder name from the Open Window Dialog box
Lets add a few lines of code to our script.
Our entire script looks like this now:
| Vbscript Code | |
'Called when the script is executed |
|
By Adding dim FolderName at the
very top of the script it will make that variable Global, meaning it will be
able to read/write to that var from any/all functions/subs.
If you don't add this it will not be able to pull the value of FolderName from
the other functions.
| Vbscript Code | |
Dim foldername |
|
We are going to add a way to pull
the Folder name from the one we selected in our Dialog box.
To do this we need to "pull" the file name, and then strip that out from the
var.
We are going to assume that the
user clicked on another drive/folder/filename from the open dialog.
Let's say I picked: D:\My
data\Wallpapers\ZubazisUgly.jpg
Breaking this apart:
Set filesys = CreateObject("Scripting.FileSystemObject")
Sets the var FILESYS to a FileSystemObjectf = filesys.GetBaseName(wallpaper)Pulls the File name from the entire path
In this case it pulls: ZubazisUgly.jpgt = instr(1,wallpaper,f)This finds the position of the file name in the path, so that we can strip it out.
FolderName = left(wallpaper,t-1)
This pulls the LEFT T-1 characters from the string so we end up with just the path:
D:\My data\Wallpapers\
| Vbscript Code | |
Function Object_OnLButtonUp(x, y, Dragged) |
|
This is all well and good, but the next time we click the button it will still use the C:\wallpaper folder, so we want to add a little more code to save and restore this var.
STEP 3 - Adding the Save / Load registry functions
We are going to add (2) new functions to the script:
- The SaveSettings and LoadSettings are functions we talked about in Tutorial #6.
- We are storing the FolderName into the reg key "HKCU\SOFTWARE\desktopx\wallpaperpicker\folder"
- We use a DEFAULT of the
Current DesktopX Executable Directory so that it loads up using the folder
the EXE was run from.
You don't want to hard-code a folder here because not everyone's pc will have that folder location.
| Vbscript Code | |
Function SaveSettings() |
|
STEP 4 - Putting it all together
Lets see what the entire script looks like now, with all the above included.
| Vbscript Code | |
Dim foldername |
|
This should allow you to click and open a dialog box, allowing you to pick a folder/file to set the wallpaper, then it sets the wallpaper, and stores the selected folder.
STEP 5 - Adding a Right-Click menu for options.
The next step is to add a menu so
we can pick from default/centered/tiled/stretched for the wallpaper.
I made a tutorial a while back on how to add a Right-click menu -
CLICK HERE
to view that, I'm not going to go thru this step by step, I'm just going to give
you the working code. If you want a break down of how the menu works,
please use the above link to the other Tutorial.
The code below will popup a menu
when you right-click. It gives you 4 options, from changing to the default
wallpaper, to making it tiled/stretched.
It will do this immediately so you can see what it does, it also stores the info
in a Var (WPFormat) so that the next time you pick a wallpaper it will use this
same setting. With 1 exception the 0. This is designed to set the
wallpaper to the default, so we don't want to STORE that, we will default it back
to 3 (stretched).
| Vbscript Code | |
Function Object_OnRButtonUpEx(obj,x,y,dragged)
|
|
STEP 6 - Putting it all together
We are going to add a few more DIMs at the top:
- Dim Wallpaper - stores the selected Wallpaper name
- Dim WPFormat - Stores the Current Wallpaper "format" - stretched/centered/etc.
Here is the FULL script, if you just want to copy/paste this into your object, its your call.
| Vbscript Code | |
Dim foldername
|
|
CONCLUSION
I hope you took the time to enter the code (not just copy/pasted the entire thing) so you could work thru the tutorial step-by-step and see how things work. You will notice I added a small IF under the Open Dialog box so that it only does anything if you select a file, it will crash out without that code if you don't select a file.
I hope you have enjoyed this step into DX, and look forward to the next installment..
|
Enjoy, RomanDA AKA: David A. Roman http://romanda.wincustomize.com |
Learning DX Step-By-Step - #8
Tool-Tip Replacement
Monday, April 30, 2007 by RomanDA | Discussion: DesktopX Tutorials
|
|
|
| Step-by-Step Tutorials |
#8 - Tool-Tip Replacement |
|
A series by RomanDA |
|
Listing of other DX Tutorials:
Click
here
Today's Lesson:
"Tool-Tip Replacement"
In this lesson we will make a replacement for the built in Tool-tip, one that can be made any color, shadow, transparency, and have it re-size automatically.
This is not going to be a simple STEP-BY-STEP, I'm assuming if you are this advanced into DX, I don't need to explain how to get the script windows up, or edit properties! This is more like a SCRIPT example, not a step-by-step.
For this and all the Step-By-Step DX Tutorials you will need to purchase DesktopX for $14.95 from Stardock.
Lets get started.
STEP 1 - Create a simple graphic bg to use.I made a very simple rounded corner background item to use for the tool-tip background.

- The reason for the RED is because that's the best color to use for changing hue's
- Rounded corners (just cause)
- black frame cause I liked it.
- You can make yours anyway you want.
STEP 2 - Create the ToolTipBack
Create a new object (see previous tutorials).
- Select the tool-tip-back.png from above.
- You will need to set the "ADVANCED" properties on the object so it can be re-sized easily.
- Click on the "summary" tab and name this object "ToolTip_Back"
- Make this part of the GROUP "ToolTip"

STEP 3 - Add the ToolTip_Text to the ToolTip_Back
Create a TEXT object, place it inside the ToolTip_Back object, position might change, on mine its 6/8.
- Make the text about 10px Arial black, or whatever color you want.
- Call it ToolTip_Text
- Make the Parent/Owner ToolTip_Back
- make the Group ToolTip
- for this example change the left/top to 5 & 5

STEP 4 - Making a test object for the tip.
The idea of this tutorial is to have a new-look tool-tip that would replace the built-in one. So, we need something to mouse over to see this tool-tip.
We need to make something, anything to mouse over. You can use the "default" object since we dont really care what it looks like.
- Make a NEW OBJECT, call it TEST_OBJECT.
- use any image you
want, or just the built-in default image.
(this is what I will show here) - We need to add a script to this object.
| Vbscript Code | |
|
Sub Object_OnMouseEnter Call ShowToolTip("This is my Tool-Tip") End Sub Sub Object_OnMouseLeave Call HideToolTip() End Sub |
|
STEP 5 - Adding the code for the Tool-tip
Add the following code to the above TEST object. Put it at the bottom of the code, under the OnMouseLeave sub section.
I will try and explain some of the code below. (look for the yellow info)
| Vbscript Code | |
|
Function ShowToolTip(TextToShow) desktopx.Object("ToolTip_Text").text = TextToShow 'The Text you passed to the function
'--- Set the height/width of the ToolTip_Back object (the +10
+20 are used to give the text box some padding around the text.
'--- We need to position the tool-tip above the object you are
mouseing over.
'-- We have to add a few "IFs here" to see if the object
you are mouseing over is at the top of the screen, or of its to
close to the left or right side of the screen.
'-- I have some issues here with these. I have
struggled trying to get the tool tip to show
'-- VERY simple function here, HIDE the tooltip_back! |
|
STEP 6 - Test it out.
Once you put the above code into the test object you should be able to mouse over and away and see the tool tip text pop-up. You might have to make some changes to the above code.
You
can move the tooltip_back up or down more based on your preferences.
The changes would be on the places where it shows "Desktopx.Object("ToolTip_Back").Top
= ...
You can make that + or - smaller or larger to suit your desires.
STEP 7 - Changes and more changes.
Things you can easily change.
- Color of the
tool-tip background image (play with the hue/brightness/contrast to
get it looking the color you would like.
You could also CODE this so that important tool-tips show up in RED, info in Yellow, etc. Its up to you. - Transparency: make the background image as clear as you like. Again, this could be coded easily.
- Text: using the
Call desktopx.ScriptObject("ToolTip_Back").ShowToolTip("This is
my Tool-Tip") you can change the text in the tool-tip
easily here you can even add multiple lines.
EX: Call desktopx.ScriptObject("ToolTip_Back").ShowToolTip("Tool Tip Text Line 1" & vbnewline & "second line here" & third line here")
This is just my idea on how to change out the built-in tool tip command.
I hope you have enjoyed this step into DX, and look forward to the next installment..
|
Enjoy, RomanDA AKA: David A. Roman http://romanda.wincustomize.com |
Learning DX Step-By-Step - #6
User Input / Save / Retrieve
Wednesday, April 11, 2007 by RomanDA | Discussion: DesktopX Tutorials
|
|
||||||||||||
| Step-by-Step Tutorial |
#6 - User Input / Save / Retrieve |
|||||||||||
|
A series by RomanDA |
||||||||||||
|
Listing of other DX Tutorials:
Click
here In this lesson we will cover how to gather information from a user via a popup dialog box, and to how to store and retrieve this data from the registry. As in the previous tutorial, the goal here is for you to learn how to create an object, add code to it, and be able to edit that code to make changes to the way the object/widget behaves. The code is provided for you to copy/paste, but it would work best if you type in the code, to see how DX "Auto-fills" the info as you type. Its really the best way to see how DX works. In order to use these Tutorials you will need to purchase DesktopX for $14.95 from Stardock. Lets get started. |
||||||||||||
| STEP 1 - What are we doing here? | ||||||||||||
|
Why do we want to get
input from a user? Well that's all depends on the gadget/widget you are creating. For a Weather widget you need to get the City code or Zip code to use. If you have a "to-do list" widget, you would want to get the item they want to add into the list. There are a lot of reasons you need to gather input from the user.
Why store the data in the
Registry? Alternatives: |
||||||||||||
| STEP 2 - Lets Get Started- Make a TEXT object. | ||||||||||||
|
As in the previous
tutorials, I think you should know enough by now so that i can move past
the every-single-step process.
Create a TEXT object. ADD the following at the bottom of the existing script items (Object_OnScriptEnter/Object_OnScriptExit)
Lets break the above apart.
The way this will work is very simple. The original Text object shows: Click to Add Text
When you click on the object you will see a dialog box like below: The next Object will now look like: Click to Add Text2nd Line of Text You can keep adding more and more lines to the object. This was simply
to show you how to get "input" from the user. |
||||||||||||
| STEP 3 - STORING User Entered Data | ||||||||||||
|
Using the same style entry
box above we want to store a single piece of data into the registry. To add this to the registry, we need to create a link into the Registry by using the WScript.Shell, we open a link. Then we use the .REGWRITE command to send info to a particular part of the registry. In this case we are going to use the "KEY" you see listed below. You could use just about anything. The HKCU = HKEY_Current_User - you could use HKLM - for Local Machine. I prefer to use the Current User because this way each person could have their own settings on the machine. As for the rest of the key, that is open to your desire, for now we want to use \Stardock\DesktopX\Widget\Tutorial6\SavedInfo This can be done right in the previous code like this:
This Just adds the value of X into the KEY "Saved Info". It would not look like what our text.object looks like now. So if you want it to match the widget's info with what you are storing in the registry just change the RegWrite line and replace the X with object.text If we click on the widget, and add the "2nd Line of Text" to it, then we look in the registry we see the following in the KEY:
If you continue to add things, you will see this change, over and over. |
||||||||||||
| STEP 4 - Retrieving the Data From the Registry | ||||||||||||
|
So, we stored the data into
the Registry, and into the actual object (kind of dumb to do it in both,
but it helps us see what's being stored). Now we want to pull that data into another object. So lets make a new TEXT object, put in the text "Click to Restore" (you can save a LOT of time by "right-clicking" on the existing object and hitting "CLONE". This makes a duplicate object with all the same code already in place!) We want to add a very simple script to this object.
You will notice about 80% of this is the same. What is different is:
You could make a lot of modifications to this one, but it has a great
base to build from. |
||||||||||||
| CONCLUSION | ||||||||||||
|
There are a lot of usages for these items. Anytime you want to get
user info, or store/retrieve data from the registry you now know what to
do. Keep in mind that you can read in ANY "KEY" from the registry, so
you could easily modify this to pull in the data in the key for say...
Who the "Registered Owner" of the pc is There are lots of things you could pull from the reg. and update as well. SO PLEASE PLEASE PLEASE Take care when you write to the registry. Check back as I add new Step-By-Step Tutorials on how to make this a link to a folder, web-site, or just about anything you want! I hope you have enjoyed this step into DX, and look forward to the next installment.
|
||||||||||||


Learning DX Step-By-Step - #5
Using WMI
Thursday, April 5, 2007 by RomanDA | Discussion: DesktopX Tutorials
| |
|
| Step-by-Step Tutorials |
#5 - Using WMI |
|
A series by RomanDA |
|
Listing of other DX Tutorials: Click here
Today's Lesson: "Using WMI" Windows Management Instrumentation
In this lesson we will cover how to use Microsoft's WMI to find out some basic info about our windows computer.
In order to use these Tutorials you will need to purchase DesktopX for $14.95 from Stardock.
Lets get started.
STEP 1 - Create a text object.
I'm not going to go back over the first 4 tutorials, if you haven't read them, and gone thru them, please go back and do that first.
Create a TEXT objet, make the default text something like "TEST" it doesn't matter, make it the size you want (big enough to read on your screen).
We are simply going to be using this text object to display the info we gather. Again, this is just to show you HOW to use WMI to retrieve info from your computer, not how to make a pretty widget. We can do that later.
Don't worry about adding scripts yet, we will do that in a later step.
STEP 2 - WMI Basic connection
WMI is used to pull information from your system, things like Computer name, User name, What drives are attached to your system. We are going to pull this information from your computer using a simple script in DX.
Open your object, click on NEW for the script.
We will be adding some info to the "Sub Object_OnScriptEnter"
Vbscript Code
 Dim objWMIService
Set objWMIService = GetObject("winmgmts:\\.\root\cimv2")
Set compinfo = objWMIService.ExecQuery ("Select * from Win32_ComputerSystem")
The DIM is used to Declare variables and allocates storage space.
The first SET command is used to make the connection to the local computer. I could get all technical on this part, but if you really want to know all the details on this connect string visit this site.
The 2nd SET command is used to pull the information you want from the computer. In this example we are wanting to get the user name, domain name, and computer name. This works like a SQL Query string, there are a ton of options for this as well. Again, this is a BASIC tutorial, so if you want more details, look the commands up.
Lets break this line apart:
Lets look at what information we can pull from this one table:
Set CompInfo
Set the variable CompInfo to the info we pull from WMI
objWMIService
objWMIService was setup in the previous SET command to
point to the WMI service.
.ExecQuery (
Execute a query into the WMI database
"Select *
we want to "SELECT" * - EVERYTHING
we could have picked just 1 item if we only wanted say the Username, etc.
from Win32_ComputerSystem")
The data we want is coming from the Win32_ComputerSystem part of WMI
There are DOZENS of these tables in WMI.
HERE is a great place to learn all about WMI
I'm not going to go through ALL of this, I just want you to see what is available from this 1 table.
WMI Information
 class Win32_ComputerSystem : CIM_UnitaryComputerSystem
{
  uint16 AdminPasswordStatus;
  boolean AutomaticManagedPagefile;
  boolean AutomaticResetBootOption;
  boolean AutomaticResetCapability;
  uint16 BootOptionOnLimit;
  uint16 BootOptionOnWatchDog;
  boolean BootROMSupported;
  string BootupState;
  string Caption;
  uint16 ChassisBootupState;
  string CreationClassName;
    sint16 CurrentTimeZone;
    boolean DaylightInEffect;
    string Description;
    string DNSHostName;
    string Domain;
    uint16 DomainRole;
    boolean EnableDaylightSavingsTime;
    uint16 FrontPanelResetStatus;
    boolean InfraredSupported;
    string InitialLoadInfo;
    datetime InstallDate;
    uint16 KeyboardPasswordStatus;
    string LastLoadInfo;
    string Manufacturer;
    string Model;
    string Name;
    string NameFormat;
    boolean NetworkServerModeEnabled;
    uint32 NumberOfLogicalProcessors;
    uint32 NumberOfProcessors;
    uint8 OEMLogoBitmap[];
    string OEMStringArray[];
    boolean PartOfDomain;
    sint64 PauseAfterReset;
    uint16 PCSystemType;
    uint16 PowerManagementCapabilities[];
    boolean PowerManagementSupported;
    uint16 PowerOnPasswordStatus;
    uint16 PowerState;
    uint16 PowerSupplyState;
    string PrimaryOwnerContact;
    string PrimaryOwnerName;
    uint16 ResetCapability;
    sint16 ResetCount;
    sint16 ResetLimit;
    string Roles[];
    string Status;
    string SupportContactDescription[];
    uint16 SystemStartupDelay;
    string SystemStartupOptions[];
    uint8 SystemStartupSetting;
    string SystemType;
    uint16 ThermalState;
    uint64 TotalPhysicalMemory;
    string UserName;
    uint16 WakeUpType;
    string Workgroup;
  };
What we want from this table is:
- UserName - User Name
- TotalPhysicalMemory - Total Memory
- Domain - Domain name (If there is one)
- Name - Computer Name
STEP 3 - Pulling info from WMI
So, we know how to make the connection to WMI, and we know what table we want.
Lets get the USERNAME that is logged into the current computer.
Vbscript Code
 For Each objComputer In CompInfo
  PCName = objComputer.Name
  Next
  object.text = "ComputerName: " & PCName
Let's look over this one too.
I'm not going to break everything apart, but the basics are this:
the FOR EACH is used to pull 1 item at a time from the COMPINFO we set before, and store it in the objComputer variable.
Then we assigning the variable PCName to the .NAME field from the table.
Then we take and set the TEXT of the object to "ComputerName: " & PCName
SAVE & APPLY this now, and see what happens.
What you SHOULD see is your text object showing something like:
ComputerName: MyPcsName
Not to hard was it? Lets add a little more.
STEP 4 - Adding more info
Open the object back up, EDIT the script. Lets add a little more info. We added the Domain name (if there is one, you may not have one), and the Username. Insert this script right below the UserName = objComputer.UserName line. Don't worry I will put the entire script at the bottom in one place, so you can copy/paste it if you want.
Vbscript Code
 For Each objComputer In CompInfo
   PCName = objComputer.Name
   PCDomain = objComputer.Domain
   UserName = objComputer.UserName
Next
  object.text = "ComputerName: " & PCName & vbnewline
  object.text = object.text & "Domain: " & PCDomain & vbnewline
  object.text = object.text & "UserName: " & UserName & vbnewline
Notice the USERNAME has the domain name as part of it? (if you have a domain, otherwise you wont see this).
We want to pull JUST the user name out from that. So lets add a simple IF statement to the script.
Vbscript Code
 If len(PCName) > 1 Then
   t = len(PCName)+2
   UserName = mid(UserName,t)
 End If
This simply looks at the PCName to see if its LENgth is over 1 character
Then it gets the length of that name + 2 spaces (the \ and then the first letter of the name)
Then it sets UserName to the MIDdle of the the string UserName starting at the T postion.
STEP 5 - What Drives do we have?
We are going to add a little more to this script. One of the things people have asked to see is how to determine what drives, drive letters, etc. are on your pc.
The code we are going to add looks a lot like what we used above:
Vbscript Code
 Set objWMIService = GetObject("winmgmts:\\.\root\cimv2")
Set DriveInfo = objWMIService.ExecQuery ("Select * from Win32_LogicalDisk")
object.Text = object.Text & vbnewline & "DeviceID | DriveType | Description "
object.Text = object.Text & " | VolumeName | FreeSpace | FileSystem"
For Each objDrive In DriveInfo
   object.Text = object.Text & vbnewline & objDrive.DeviceID & " | "
   object.Text = object.Text & objDrive.DriveType & " | " & objDrive.Description
   object.Text = object.Text & " | " & objDrive.VolumeName & " | "
   object.Text = object.Text & objDrive.FreeSpace & " | " & objDrive.FileSystem
Next
We are pulling a lot of info from the WIN32_LogicalDisk table. add the code, see what shows up.
You should see something like:
DeviceID | DriveType | Description | VolumeName | FreeSpace | FileSystem
C: | 3 | Local Fixed Disk | Boot-2006b | 30640107520 | NTFS
D: | 3 | Local Fixed Disk | Storage-2006b | 14589018112 | NTFS
E: | 5 | CD-ROM Disc | 20030803_1304 | 0 | CDFS
F: | 5 | CD-ROM Disc | | |
STEP 5 - Here's The code:
Promised to post all the code in one place, here it is: CONCLUSION
Vbscript Code
 'Called when the script is executed
Sub Object_OnScriptEnter
  Dim objWMIService
  Set objWMIService = GetObject("winmgmts:\\.\root\cimv2")
  Set CompInfo = objWMIService.ExecQuery ("Select * from Win32_ComputerSystem")
  For Each objComputer In CompInfo
    PCName = objComputer.Name
    PCDomain = objComputer.Domain
    UserName = objComputer.UserName
    If len(PCName) > 1 Then
      t = len(PCName)+2
      UserName = mid(UserName,t)
    End If
  Next
  object.text = "ComputerName: " & PCName & vbnewline
  object.text = object.text & "Domain: " & PCDomain & vbnewline
  object.text = object.text & "UserName: " & UserName & vbnewline

  Set objWMIService = GetObject("winmgmts:\\.\root\cimv2")
  Set DriveInfo = objWMIService.ExecQuery ("Select * from Win32_LogicalDisk")
  object.Text = object.Text & vbnewline & "DeviceID | DriveType | Description "
  object.Text = object.Text & " | VolumeName | FreeSpace | FileSystem"
  For Each objDrive In DriveInfo
    object.Text = object.Text & vbnewline & objDrive.DeviceID & " | "
    object.Text = object.Text & objDrive.DriveType & " | " & objDrive.Description
    object.Text = object.Text & " | " & objDrive.VolumeName & " | "
    object.Text = object.Text & objDrive.FreeSpace & " | " & objDrive.FileSystem
  Next
End Sub
There are a lot of things that can be done with this info. Things like making a Drive monitor, or a simple piece of text with your username etc on it.
WMI is EXTREMELY powerful, you can pull things from other computers on your network, A simple GOOGLE search will show you TONS of places with lots of script examples.
Check back as I add new Step-By-Step Tutorials on how to make this a link to a folder, web-site, or just about anything you want!
I hope you have enjoyed this step into DX, and look forward to the next installment.
| Enjoy, RomanDA http://romanda.wincustomize.com |
Learning DX Step-By-Step - #3
Tutorial #3 - Attack of the Clones
Thursday, February 22, 2007 by RomanDA | Discussion: DesktopX Tutorials
|
|
|||
| Step-by-Step Tutorials |
#3 - Attack of the Clones |
||
|
A series by RomanDA |
|||
|
Listing of other DX Tutorials: Click here Today's Lesson: "Attack of the Clones" In this lesson we will cover how to create a clone from an object, so we can have multiple items on the screen linked to a Folder, a Program and a web URL. In order to use this tutorial, you will need to first go thru Tutorial #2 (and download the zip file from there as well). I will assume you downloaded the zip of the png files, followed the Tutorial #2, and are ready to take your Lightbulb and make a new one that will point to a Program and another to a URL. For this and all the Step-By-Step DX Tutorials you will need to purchase DesktopX for $14.95 from Stardock. Lets get started. |
|||
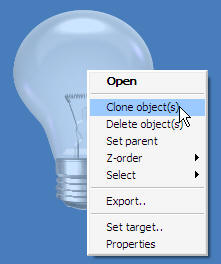
| STEP 1 - Cloning the Lightbulb | |||
Again, I know this is
redundant but you need to have completed Tutorial #2 before you attempt
this one. That said, we will take our lightbulb and make a clone:
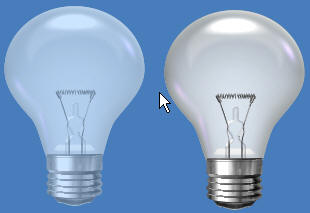
You have just created a CLONE!! *** Repeat this step one more time so that you end up with 3 lightbulbs *** |
|||
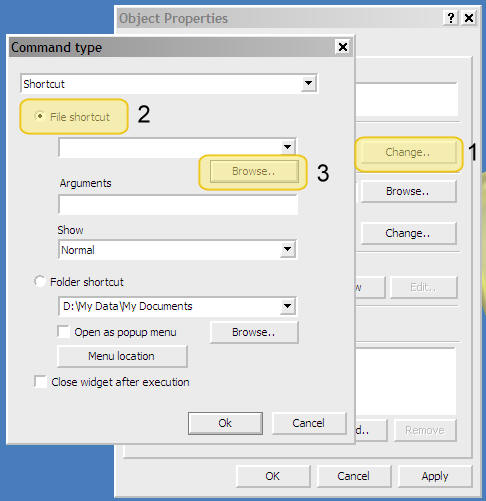
| STEP 2 - Point your Clone to a Program | |||
|
|||
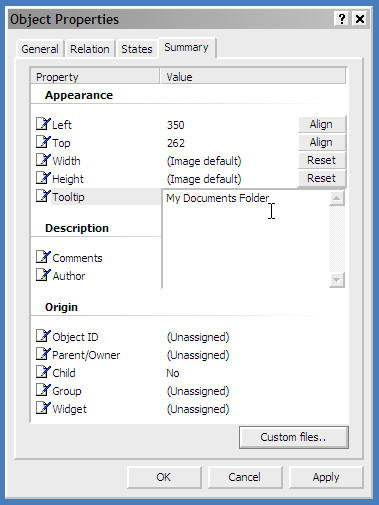
| STEP 3 - Adding a TOOL-TIP to these so you know which one is which | |||
Ok, you have 2 identical
(well 3 really) clones on your desktop. So that you can know which
one does what, we are going to add a TOOL-TIP (the text that shows up
when you mouse over something) to each.
|
|||
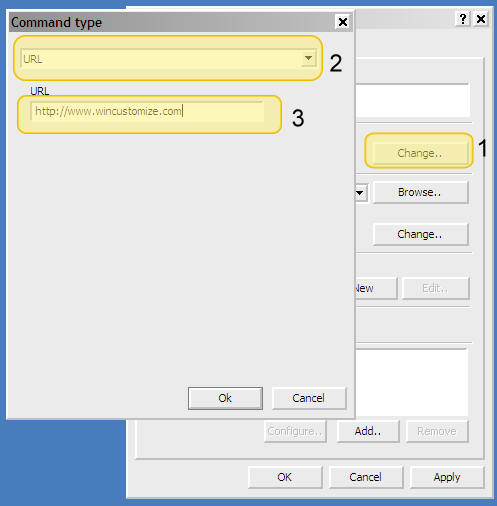
| STEP 4 - Making a URL Linked Object | |||
|
|||
| CONCLUSION | |||
|
Ok, That wasn't hard was it? Ok, yeah so now you have these 3 HUGE lightbulbs on your desktop, and they suck, well make your own images, and change them! Changing them is simple, go back to Tutorial #2, look at step #3 and just pick your own images for "mouse over" and "mouse away" states. You can even download from the MISC Icons library and use them for these states. Check back as I add new Step-By-Step Tutorials on how to make this a link to a folder, web-site, or just about anything you want! I hope you have enjoyed this step into DX, and look forward to the next installment..
|
|||
Learning DX Step-By-Step - #2
Tutorial #1 - Folder Object
Thursday, February 22, 2007 by RomanDA | Discussion: DesktopX Tutorials
|
|
||
| Step-by-Step Tutorials |
#2 - Folder Object |
|
|
A series by RomanDA |
||
|
Listing of other DX Tutorials: Click here Today's Lesson: "Folder Object" In this lesson we will cover how to create a simple object that you can use to open a folder. (We will be using this in the next one to create a Program and a URL Shortcut. To use this tutorial you will need these 2 PNG files - click HERE to download - (yes, they are lame, but i wanted something simple to use). For this and all the Step-By-Step DX Tutorials you will need to purchase DesktopX for $14.95 from Stardock. Lets get started. |
||
| STEP 1 - Load DesktopX | ||
|
Once you have DesktopX
installed, look in your Start Menu for "Object Desktop" then for "DesktopX",
click it to load the program.
You will see the DesktopX
STARTUP Screen
(yours wont say PROFESSIONAL unless you purchased PRO)
It will load the DesktopX
SETTINGS Window:
We just wish to get these screens out of the way for now, we are not going to use them. Click "CANCEL" on the SETTINGS window, and DONE on the STARTUP Screen. You should have a blank
screen now with a new icon in your system tray:
|
||
| STEP 2 - Create an object | ||
|
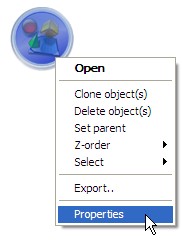
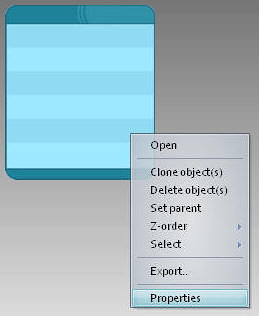
RIGHT CLICK on the
|
||
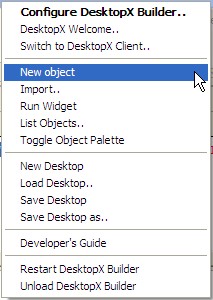 |
You will need to select the "NEW OBJECT" item on this menu. | |
|
You will see the OBJECT
PROPERTIES window below (as well as the object itself).
This window will be referenced over and over in these tutorials.
IE: Open Properties / Select States
(which would mean to select the States TAB in the
Properties window)
You can access this
properties window at any time by RIGHT-CLICKING on the object and
selecting PROPERTIES.
|
||
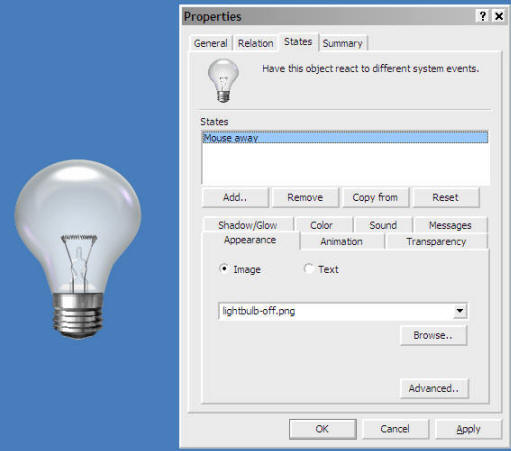
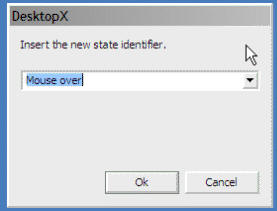
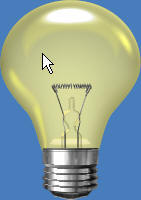
| STEP 3 - Adding Images into the Object | ||
When you added the object,
it brought up the PROPERTIES window, now select the "STATES" tab to
change to this TAB.
|
||
| STEP 4 - Making your Lightbulb DO something. | ||
|
||
| STEP 5 - Changing the CURSOR on the Lightbulb | ||
|
||
| CONCLUSION | ||
|
This is a pretty simple
Tutorial, I was going to continue this and make several clones of the
lightbulb for a program and a url, but I want to split that into the
next Tutorial. I will post that at the same time I post this, so
you can continue with
Tutorial #3 - Attack of the Clones Check back as I add new Step-By-Step Tutorials on how to make this a link to a folder, web-site, or just about anything you want! I hope you have enjoyed this step into DX, and look forward to the next installment.
|
||
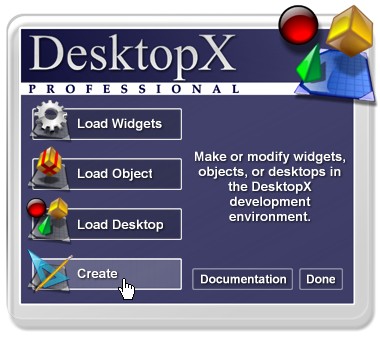 One you see this screen,
click on "CREATE" because we want to CREATE a new Widget.
One you see this screen,
click on "CREATE" because we want to CREATE a new Widget.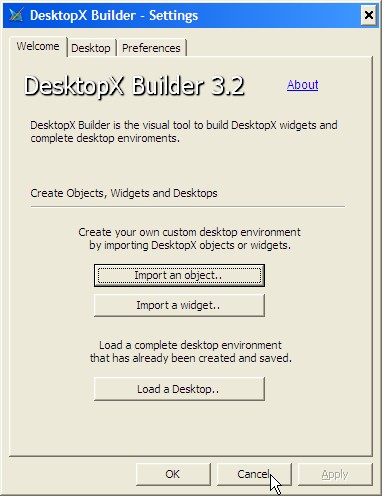
 - Notice the HAND Cursor
Controlling Groups
Beginner
Monday, January 22, 2007 by sViz | Discussion: DesktopX Tutorials
Toggling a group of objects on and off (show/hide) through object properties is not hard. You just need to group your objects and create another object as an object controller. Like what you see below.


In the properties of the group controller, change the object type to ‘object controller’. In the command type dialog set it to open/toggle, and then in the drop down choose the name of the group.

Folks, it’s that easy. Further configurations can be made in the group objects themselves under Properties > Relation > Popup as explained in the Developer’s Guide here—Link
I know you’re looking at the command options in that object controller and you’re thinking, can’t I control more than show/hide? Well, maybe you’re not but the answer is—YES! With simple scripts you can move the entire group, change the color of all the objects in the group, re-arrange the group, and yes, you can still show and hide the group, too!
Let’s get started.
Change the group controller’s object type back to ‘Layer’ because that’s where we’ll put the script.
When scripting groups, the For Each statement is extremely useful. This statement basically tells DX to do something for each object in the group. In this statement each object is called ‘elem’ and you can assign it most normal properties (e.g. object.text / elem.text, object.hue / elem.hue etc.) such as explained in the DevGuide here – Link
Here are some scripts for you to try (my group’s name is “testgroup”).
TOGGLE (SHOW/HIDE) SCRIPT:
Sub Object_OnLbuttonUp(x,y,dragged)
If Not dragged Then
For Each elem In Desktopx.GroupObjects("testgroup")
If elem.visible = True Then
elem.visible = False
ElseIf elem.visible = False Then
elem.visible = True
End If
Next
End If
End Sub
MOVE GROUP SCRIPT:
Sub Object_OnLbuttonUp(x,y,dragged)
If Not dragged Then
For Each elem In Desktopx.GroupObjects("testgroup")
elem.left = elem.left + 2
Next
End If
End Sub
CHANGE COLOR SCRIPT:
Sub Object_OnLbuttonUp(x,y,dragged)
If Not dragged Then
For Each elem In Desktopx.GroupObjects("testgroup")
If elem.hue=> 255 Then
elem.hue = 0
Else
elem.hue = elem.hue + 15
End If
Next
End If
End Sub
Simple, no?
Now, what if you don’t want your objects in a group? After all you might want them to move independently. Ungroup the grouped objects and insert the script below into the group controller:
TOGGLE SEVERAL OBJECTS:
Sub Object_OnLbuttonUp(x,y,dragged)
If Not dragged Then
‘Check if one of the objects are already hidden or showing
Select Case Desktopx.Object("1").visible
Case True
showhide= False
Case False
showhide= True
End Select
'Set objects visibility
Desktopx.Object("1").visible = showhide
Desktopx.Object("2").visible = showhide
Desktopx.Object("3").visible = showhide
End If
End Sub
MOVE SEVERAL OBJECTS:
Sub Object_OnLbuttonUp(x,y,dragged)
If Not dragged Then
Desktopx.Object("1").top = Desktopx.Object("1").top + 2
Desktopx.Object("2").top = Desktopx.Object("2").top + 2
Desktopx.Object("3").top = Desktopx.Object("3").top + 2
End If
End Sub
Obviously, when you think about it, if you had A LOT of ungrouped objects you wanted to control, listing them would be laborious and tweaking one small aspect would be painstaking. Trust me, I know. Before I got the hang of scripting I used this method ad nauseam and every time I wanted to make a change I had to go through the entire list—several times! There is an easier way. This method uses the For Next statement and is facilitated by how you name the objects you want to control. I use this method a lot as I did in my Scrolling Text tutorial Link , here I’ll explain it some more.
First, rename your objects like this:
object1, object2, object3 OR item1, item2, item3 (not item01, 02, 03 etc.)

Whatever name you use make sure you name the other objects the same and in serial order. This is important. It is also important to define the number of objects you are controlling. We’ll use the variable numofobjs to do this. Insert the script below into the group controller.
Dim numofobjs
'Define number of objects to control
numofobjs = 3
Sub Object_OnLbuttonUp(x,y,dragged)
If Not dragged Then toggle
End Sub
Function toggle
'Check the visiblity of object
Select Case Desktopx.Object("object1").visible
Case True
showhide= False
Case False
showhide= True
End Select
'Reset visibility of objects
For x= 1 To numofobjs
desktopx.Object("object" & x).visible =showhide
Next
End Function
Now what does this mean:
For x= 1 To numofobjs
desktopx.Object("object" & x).visible =showhide
Next
For Next is basically a loop that will start at 1 and do whatever code is in between as many times as you define in numofobjs; that’s 3 times. So it goes from 1 to 3.
X is a variable that will change on each loop. On the 1st loop x=1, on the 2nd loop x=2, and on the 3rd loop x=3.
So when you add ‘x’ to the object name here: (“object” & x) you will get “object1” on the first loop, “object2” on the 2nd loop and “object3” on the 3rd loop. So, on each loop you set the visibility of a different object! It’s nice and streamlined and much easier than listing each object line after line.
The end! Thanks for reading.
DX Tutorial #6: Date/Time Widget - PART 1
Creating your first DX Widget Step-by-step! - PART 1
Wednesday, August 16, 2006 by RomanDA | Discussion: DesktopX Tutorials
My goal is to make a set of tutorials for DekstopX. If you have ideas on what you would like to see, please email me at DXTutorials@RomanDA.org
Time/Date & more - PART 1:
I have been asked about a dozen times how to get this or that date info into an object. So I will try and cover that here.
This is not my typical tutorial, this will be a STEP-BY-STEP Creation of a widget, not just some code.
DOWNLOAD THE ZIP FILE FOR THIS TUTORIAL FIRST!
DekstopX can use JavaScript or VBScript as its language, I am a LOT more familiar with VBScript then JS so that is what I use.
As always, I'm sure there are other, if not better ways to do this, but this is my way.
| The Players: | |||||||||||||
| Here are the objects we will be setting up: (forgive me Danniloc as some of this was from our conversation - the graphics are mind but look like the one your working on): | |||||||||||||
| |||||||||||||
Creating the Objects: | ||
| For those of you that have never used DX this is not hard, I will walk you through creating the above object. LOAD DekstopX and go into the CREATE mode: * if you do not have DekstopX (builder) you will need to download it. | ||
| BASE OBJECT: | ||
| Create the BASE object by | ||
 |
RIGHT-CLICK on the DekstopX Icon in the system tray.
Select "New object" <-- See this for more info | |
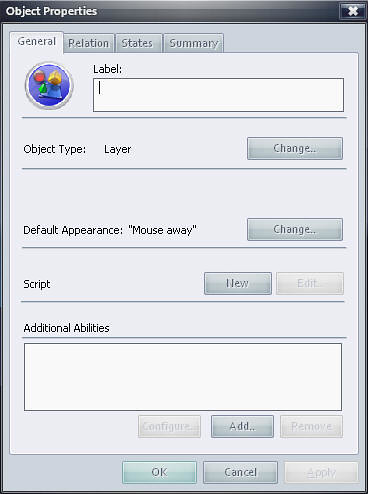 |
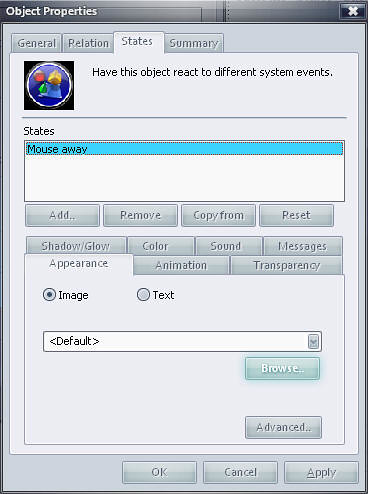
The Object Properties Dialog will show up.
Click the "States" Tab | |
 |
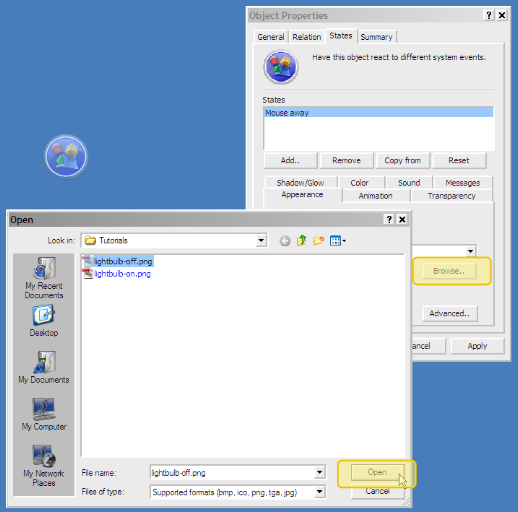
Click the "Browse" Button. | |
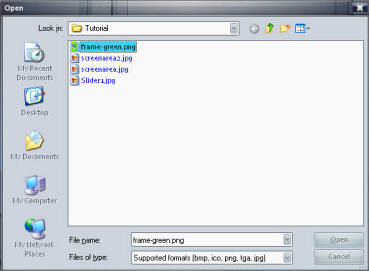 |
Select the "Frame-Green.png" File from the 6-DateWidget.zip file here.
Select "Open" Click "OK" in the "Object Properties" Dialog box. | |
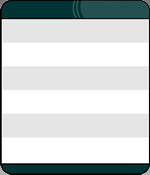 |
You should now see your FRAME or BASE object.
| |
 |
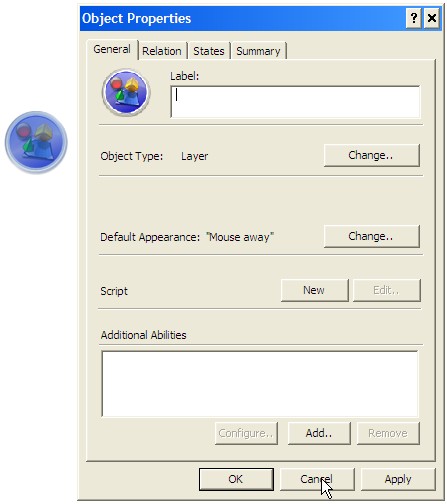
RIGHT CLICK on this object and select "Properties". | |
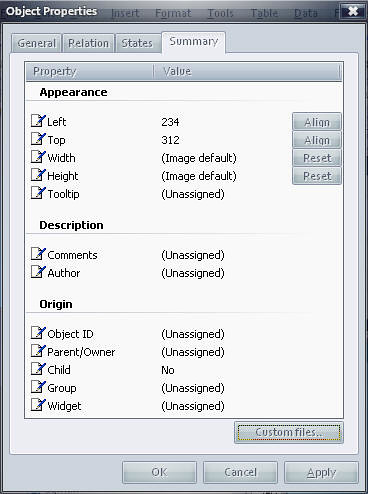 |
In the Object Properties dialog, select the "Summary" tab
In here we will change the following: Object ID: BASE Group: DateWidget Widget: DateWidget If you want you can add your name to the "Author" Section.
When done editing these, click the "OK" Button. | |
| OTHER OBJECTS: | ||
| We will follow the same above steps to create the TEXT objects but there will be a few minor change. I'm not going to re-post all the same images, see above if you get lost. DayOfWeek Object | ||
|
RIGHT-CLICK on the DekstopX Icon in the system tray.
Select "New object" | |
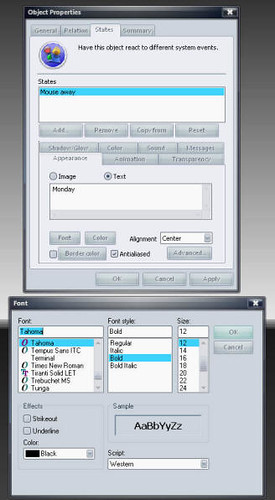 |
Select the "States" Tab
In there select "TEXT" not "IMAGE" from the Appearance Tab. Type in "Monday" in the provided text area Select Alignment: CENTER Click on Font and select a font you like, I like Tahoma, you can pick whatever you want, be advised the size, and font will make some of the next screen shots look strange, for now pick Tahoma and 12 and bold, you can come back later and change it. Select OK on the Font Dialog. Select the Color Button, select a dark color something that will look good on the white background (or gray), I'm picking a dark gray.
| |
|
In the Object Properties dialog, select the "Summary" tab
In here we will change the following: Left: 0 Top: 20 Width: 150 Height: (image default) Object ID: DayOfWeek Parent/Owner: BASE Child: YES Group: DateWidget Widget: DateWidget
When done editing these, click the "OK" Button. | |
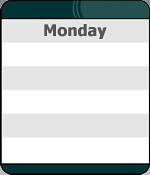 |
This should be your new widget
Congrats, its beginning to look like something. | |
| MonthName Object | ||
| Follow the exact same steps from above except this time you will put in:
"August" in the text area, and the following in the Summary Tab: | ||
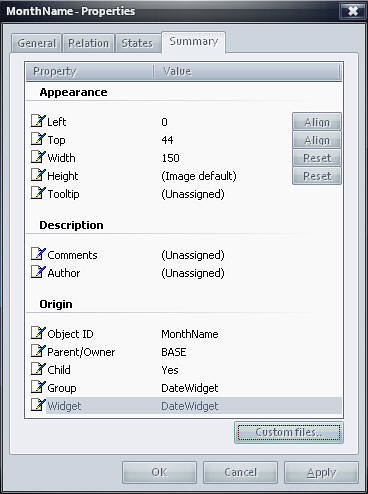 |
In the Object Properties dialog, select the "Summary" tab
In here we will change the following: Left: 0 Top: 44 Width: 150 Height: (image default) Object ID: MonthName Parent/Owner: BASE Child: YES Group: DateWidget Widget: DateWidget
When done editing these, click the "OK" Button. | |
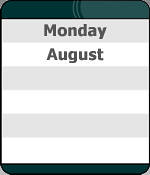 |
Your new object should look like this now. | |
| Date Object | ||
| Follow the exact same steps from above except this time you will put in:
"16" in the text area | ||
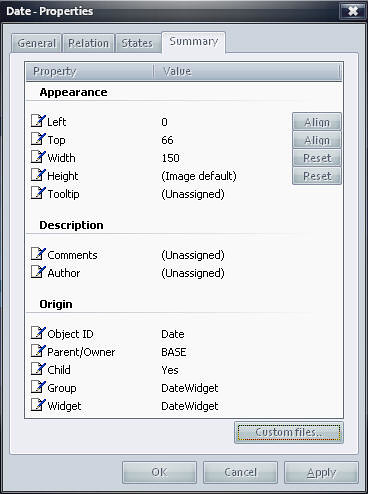 |
In the Object Properties dialog, select the "Summary" tab
In here we will change the following: Left: 0 Top: 66 Width: 150 Height: (image default) Object ID: Date Parent/Owner: BASE Child: YES Group: DateWidget Widget: DateWidget
When done editing these, click the "OK" Button. | |
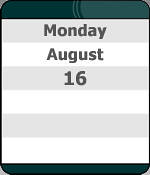 |
Your new object should look like this now. | |
| Year Object | ||
| Follow the exact same steps from above except this time you will put in:
"2006" in the text area | ||
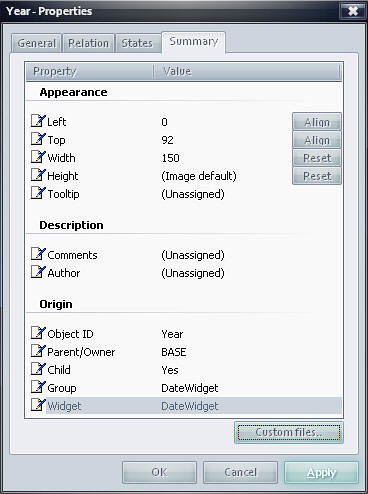 |
In the Object Properties dialog, select the "Summary" tab
In here we will change the following: Left: 0 Top: 92 Width: 150 Height: (image default) Object ID: Year Parent/Owner: BASE Child: YES Group: DateWidget Widget: DateWidget
When done editing these, click the "OK" Button. | |
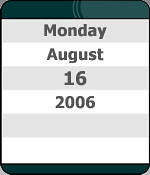 |
Your new object should look like this now.
See we are getting there. IF you have done everything correct up to this point, you should be able to "DRAG" this around, and everything should move as 1. If something moves that shouldn't you will need to RIGHT-CLICK on that object, hit Properties, then make sure that the Group and Widget are both "DateWidget". then check it again. | |
| Time Object | ||
| Follow the exact same steps from above except this time you will put in:
"10:16 am" in the text area | ||
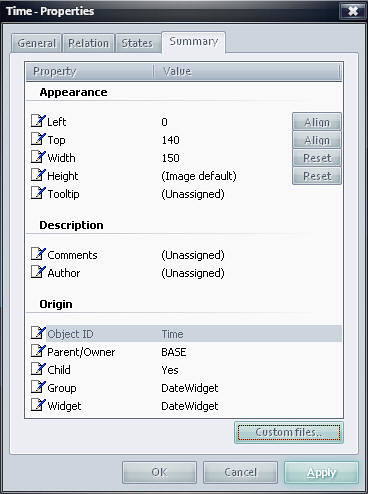 |
In the Object Properties dialog, select the "Summary" tab
In here we will change the following: Left: 0 Top: 140 Width: 150 Height: (image default) Object ID: Time Parent/Owner: BASE Child: YES Group: DateWidget Widget: DateWidget
When done editing these, click the "OK" Button. | |
 |
We are now done creating objects.
Your widget does nothing at this point except show the text we put into it. Its time to start making this thing WORK. | |
Please look at Part 2 for the continuation of this tutorial, and PLEASE let me know if you find these useful.
 |
Enjoy, RomanDA AKA: David A. Roman http://romanda.wincustomize.com http://www.romanda.org DXTutorials@RomanDA.org |