


Harley-Davidson Raw MyColors Walkthrough
Thursday, July 31, 2008 by Island Dog | Discussion: OS Customization
The Harley-Davidson Raw MyColors Theme was recently released, so as usual, I want to take you through a walkthrough of what is featured in this theme. This is a theme designed for MyColors, and to find more information about MyColors, you can read through a walkthrough or view a screencast with more information.
Visual Style and Wallpaper
The visual style for the Harley-Davidson MyColors theme is a bit hard to describe, but the “Raw” name is one of the first things that come to mind. The start button is of course the Harley-Davidson logo, and the rest of the skin has a dark, but well designed feel to it.

The wallpaper is also in tune with the “raw” look as well. Pictures of Harleys take the space along with what I would call graffiti-like artwork across a wall backdrop. If you want to change to a different resolution, just look in the Wallpapers tab in the MyColors Theme manager.

Icons
These icons are really awesome. They are just filled with all types of Harley-Davidson goodness! The Mailbox icon is probably one of my favorites from this group.

Gadgets
The Harley-Davidson MyColors Theme include 3 gadgets for use on the desktop. Gadgets are mini-applications and this theme includes a weather gadget, clock, and calendar all staying true to the Harley-Davidson Raw style.

The Harley-Davidson Raw MyColors theme is available for both Windows Vista and XP. If you are a subscriber to Object Desktop then you are eligible for a discount for MyColors themes. For more information visit the Harley-Davidson Raw MyColors page.
Stardock Central Clarification
Wednesday, July 30, 2008 by DorkCoffeez | Discussion: Stardock Support General

There have been multiple responses from many different Stardock Representatives and community members about the status of Stardock Central and Impulse. At this time I would like to clarify the situation as it stands. This is of course subject to change but this is the current situation at the time of this posting. Any changes I am made aware of I will post here as well.
Impulse is the new downloading tool for Stardock software, games, published games, and store front. It will receive priority in all new downloads and updates. There are a great many plans for updates to the software including tools, features, and so on. If you have not already, we encourage you to make the switch.
Stardock Central will continue to feature updates for Stardock software only at this time. This will not include games, even Stardock original ones. However WindownBlinds, Icon packager, and so on will still have the updates made available to them as a service to our customers.
As I said any of this is subject to change but as it stands right now this the policy regarding these two free tools. I do apologize for any inconvenience in these matters.
As always if you have any troubles or questions you can let us know at support@stardock.com.
Seabass
The Blur feature and effecting Shadows
A must read for WindowBlind skinners!!
Wednesday, July 30, 2008 by SKoriginals | Discussion: WindowBlinds Tutorials
Ok so your a skinner, you make a skin with transparency and you've added a shadow to your frames and such. Now you want to add the blurring feature to your skin but you get something like this...

hum... now we have a problem cause that looks like hell.
But take notice, the image is square but the blur is effecting only SOME of the whole image area for that part of the frame. So whats happening here? This didn't just hit me till last night even though I've been dealing with it personally ever since the blur feature was added. After some discussion with another Master (Lasse, aka PixelPirate) skinner it dawned on us and here are some 'test' results for my working theory on this 'discovery'.
The Theory
The blur effect has a threshold point. At some point in the opacity of the image the blur feature no longer effects the image being used.
The Tests
I'm going to test this as I write this post so bare with me. For the test I'll make a white wallpaper with a 2 pixel stroke on it, make a 100 pixel long frame section gradiented with a 100% to 0% opacity set with a blur and at true size. This should give a 1% opacity change per line of pixels on the frame and we'll see where the blur stops taking effect. Here goes...

ok here is test 1... first is our 'control' (the plain stroke, no frame) then blue, red, green, black and last white. As you can see pure black has no blur effect at all. This isn't exactly what I expected. Lets try different shades of grey because it seems white does have an effect where black doesn't. there must be some point at which this changes.
Test 2... I'm not going to post the pics of this but oddly enough black up to 3,3,3 does not blur and anything lighter does. The odd part is the white gradient (used as the inactive part) also did not blur at the same time. Need to run some different tests...
Test 3... Here I made something like a frame and added a pure black gradiented outer glow in frame 1. This blurred the frame but not the outer glow. In frame 2 I added a dark blue shadow to the outer glow as you can see where the dark blue shadow appears so does the blur. Additionally even though the inactive frame did NOT have the dark blue shadow it also blurred the same area. In frame 3 I changed the dark blue shadow to pure black and again the blur effect did nothing to it. See the image below.

My Conclusion (updated Aug. 2nd '08)
Window Frames - You must use pure black (or RGB 3,3,3 and lower) for the shadows to not blur. Blur will effect anything with color. Image for the frame must have a clear line of pixels on the outter rim for the widnow frame. Blurr effect is square, it does nto support odd shapes, you can use the settings under the 'Extras' tab to round off the corners.
Taskbar - untested
Start Menu - Not fully tested. Blur effect looks odd when 2 transparent parts are touching in XP, Vista is uneffected by this.
_________________________________________________
Now you might ask why I went through this trouble and why the big write up. As a skinner and an advocate to 'pushing limits' and finding out what those limits are these sort of things help both me and all you other skinners. Currently there is no 'Mask Layer' for the blur effect but this might be one way to (in some fashion) create one to an extent.
My conclusion is based solely on the above testing plus comments and further testing below. Please if you find some variation or the like, feel free to post your results here for others to see and read.
Thanks and happy skinning as always 
Camtasia interviews Island Dog
And he doesn't embarrass himself or us!
Tuesday, July 29, 2008 by ZubaZ | Discussion: Community
The new admin of Wincustomize is always making efforts to improve the experience of both new and old ("used", "experienced"?) users of Stardock apps and this site better. One of the most effective methods is through the use of web-based video. It gives the users a chance to understand faster and more completely than text and still images could.
Apparently the developers of the software ID uses is impressed with what he has done and has interviewed him on his use of Camtasia Studio.
Spencer covers the how and why pretty well. It's well worth a read! Great job Island Dog!
Tips for Uploading and Moderation
Get the most out of your WinCustomize submissions
Monday, July 28, 2008 by Island Dog | Discussion: OS Customization
 On one of the episodes of the WinCustomize SkinCast, we touched on how some of us look for skins to feature, and gave some tips on getting featured and getting more downloads. This is especially useful for new users who have just started skinning, or are considering picking it up. I wanted to put some of these tips into a guide, and also offer some suggestions and guidelines for when you do upload a skin to WinCustomize.
Uploading Tips
- Previews. Make sure to have a preview of at least 1024x768 for submissions such as wallpapers, .dreams. logons, etc. Smaller previews can be made for items like CursorFX themes, Icons, etc., but be sure that you do include a preview with the upload, or otherwise it will be rejected. When doing a preview of your skin, there really isn’t a set way to design them, but keep a few things in mind.
- Make sure the preview matches what the skin really looks like.
- Just don’t take a quick screenshot. The preview itself is the first thing people will see about your skin, so you want it to make a great first impression. Take some time and design a preview that really shows off the skin.
- Files. If you need to upload a pack or something that contains more than one element, you have to use the .zip format, no .rar.
- Clear Description. Too many skins get uploaded that have little or no description. A good tip is to give as much relevant information as possible about your submission. Does your wallpaper have multiple resolutions? Is the skin compatible with both XP and Vista? Are there color variations? Let people know what they are downloading.
- Rips. This is a particularly sensitive area, but I wanted to emphasize that not everyone knows the rules about this, so today we can make this clear. Ripping (or Rips) is basically taking someone else’s work and distributing it without the authors permission. If you upload something to WinCustomize it must be your own work, or you must have the written permission from the original author included. This includes any type of modification to someone’s work as well. If you are also wanting to create and upload a matching skin based off another persons work, you still need to have their permission included.
- Test the Skin. Before you upload, you might also want to consider having friends or other members of the community give your skin a test to make sure there are no issues. The forums on WinCustomize are a great place to ask for assistance and even more tips.
- Use Sub-Styles and .Zips. This is particularly true for WindowBlinds skins, wallpapers, and logons, but can apply to pretty much any skin or theme. If you have multiple variations of a skin, for example, a WindowBlinds skin that has several different colors. These need to either be included as sub-styles or multiple files in a .zip. If it’s a wallpaper that has several resolutions, those would also need to be included in a single pack.
Tips for Getting Featured
- Good Previews. The preview tips above are very important for this. If your preview doesn’t show off your skin well, there’s less of a chance of someone actually downloading it to see that it is a perfect skin to feature.
- Promote Yourself. Every member of WinCustomize can have their own personal page with their own personal domain. For instance, mine is islanddog.wincustomize.com. As you see on my page, my Skins Gallery is listed, along with a guestbook where other members can leave comments, there is a photo gallery I can upload images to, and more. You can include your personal URL in forums signatures, e-mail signatures, and anything else to get people to come visit your gallery.
- Recommend a Skin. If you see a skin you like, or you think yours is good enough to be featured in various articles, drop myself or a site moderator a PM. We always welcome feedback from the community.
This Week in Skinning - July 25th
Skin Roundup for 7-25-08
Friday, July 25, 2008 by Island Dog | Discussion: OS Customization
Now for this weeks picks!
|
|
Autobot for CursorFX by nimbletongue An Autobots cursor theme, do I really need to say anymore? |
|
|
~~~Fusion~~~ in DesktopX Themes by WeatherBound This DX theme has a wide variety of accessories, it's resolution independent, and has a slider to adjust the colors. |
|
|
Wispy Cloud in Dreams by CarGuy1 A very nice .dream, with a smooth animation that isn't too busy on the desktop. |
|
|
Black LogonVista in LogonStudio Vista by Life is a Game This logon has a very clean design and is a great addition to your logon library. |
|
|
desktopx icon in ObjectDock Icons by SG This icon for DesktopX takes a big turn from the "normal" icon. It's a fun and unique twist to the standard icon. |
|
|
Twirl lines in Wallpapers by Dahama This design really caught my eye this week. Very creative and good use of color. |
|
|
Thundera for WindowBlinds by Z71 Whether or not you know what Thundera is, this theme is still a fantastic piece of work. A very smooth look, and don't forget to grab the wallpaper as well. |
 |
gaiety for XP and Vista for WindowBlinds by mkorashy The second skin by mkorashy is another fine one. I really enjoy the colors scheme with this skin and it's perfect for daily use. |


Thanks to all the skinners this week, and be sure to visit their personal pages here on WinCustomize for more of their works. See you next week!
Dynamic Dreams Question
I need your help!
Wednesday, July 23, 2008 by dream-er | Discussion: DeskScapes
So, for those of you that don't know, I've been working on making some cool new Dynamic Dreams. Only problem is, these Dynamic Dreams have some fancy new keyboard and mouse input commands! (ooohh!! super fancy!)
I've been having a problem though... Nobody wants their computer to be actively running mouse input (wasting a little CPU usage) when they're not looking at their desktop. It just doesn't make sense to have an object on your desktop following your mouse around when you can't see it! So, consequently, I have resorted to keyboard button commands to act as a signal for mouse input.
Now, I want the button command to be un-intrustive, a command that people don't use a lot (ex: Ctrl+C wouldn't be good since people copy and paste all the time). Currently, I have been using Ctrl+Shift as the button configuration.
I wanted to get people's opinions on what you feel should be the proper button combo to operate the mouse control. Try not to go down the "let's make it a setting!" option since that would take a little too much time to implement at the time being.
Thanks to all in advance for your help and input!
DesktopX: Making a Vista Sidebar Gadget
Tuesday, July 22, 2008 by Island Dog | Discussion: OS Customization
DesktopX 3.5 was released recently, and one of the biggest feature updates is the ability to export your DX creations as a Vista sidebar gadget. Creating a gadget for the Vista sidebar isn’t the easiest thing to do, and it has limitations that DesktopX can easily overcome. DesktopX is a very powerful application which can create a wide variety of mini-applications for your desktop. These can range from simple weather gadgets, on up to very complex applications with multiple functions all that can be wrapped in custom graphics.
The gadgets that can be created with DesktopX can be scripted with many languages including C++, which allows an almost endless amount of possibilities. Now if you aren’t big on scripting, don’t be too intimidated, as you can still create some great gadgets with the included plugins, or by going through the huge amount of documentation/tutorials provided by Stardock. You can also find more tutorials written by experienced community members which can be found at the WinCustomize Wiki.
I have created quite a few DesktopX widgets over the last few years, and although I am not a coder, I was able to create some really cool and useful widgets. I’m going to take you on a walkthrough on how to create a desktop widget, and turn it into a Vista sidebar gadget using DesktopX Pro 3.5. I’m going to break apart the Election Countdown gadget I made, which will make a perfect example for today’s guide.
Since I am somewhat of a political junkie, I wanted a simple countdown gadget that would tell me how many days left until the 2008 election. Remember, this is just the example I’m using today, the process for creating the sidebar gadget will work the same for whatever type of gadget you create.
First step is creating the basic graphic resources for my project. This of course will vary depending on what type of gadget you are creating, but since mine is a simple countdown, I really just needed a single image which will have space for the countdown numbering.

Once my graphics are complete I fire up the DesktopX Builder and click the button to create a new desktop object. This will serve as the base of my countdown gadget.

From the properties window I can set my graphic resources, and create a new script which will control the actual countdown.

Once my countdown script is set and applied, I can move on to tweaking the font that will be used to display the number of days remaining according to my countdown. You can also adjust colors, add shadows, and many more options in this area.

I check to make sure all my graphics are looking good, and I can then right-click and group all my objects so that they will behave like one object, but keep the functionality of the different layers I have applied. Now would be a good time to give your gadget a test. If all is working correctly, right-click again and select Export.

From here you will begin the process of exporting your desktop object into a Vista sidebar gadget. If you are using DesktopX Pro you can check the setting to export as a stand-alone gadget, so that users won’t have to have DesktopX installed to use it. You will also be given the options to enter information like author information, description, etc.


After all that, just set your output, click finish, and your gadget should be created.

Just double-click to install the gadget file, and you should now have your gadget occupying the Vista sidebar.

For more information about DesktopX, visit www.desktopx.net.
July 21st Skin Thoughts and Reviews
Monday, July 21, 2008 by wulfn1 | Discussion: Community
Gonna use one skin this week and take it several different places for you.
100: A Tribute to Boxxi by Pandorra (aka KittyMalone)
This is a beautifully worked skin that showcases the talents of two skinners in such a stylish way.
Boxxi's work has always leaned toward the flowing lines of Art Deco , giving his works a look of something you'd see in the home of a 1920's flapper. Combining that style with Kitty's breathtaking artwork is a real winner here. The two styles compliment each other so well, it's like a pairing that' was meant to be.
The blind itself is easy on the eye, keeps it's coloration to a minimum so you can use any color you like with it and it still looks sharp and stylish, and is a fast load , easy to work with no matter how many windows you have open.
Since there isn't a CursorFX set yet for this blind, I found Eclipse by J. Aroche worked nicely with the whole concept.

I love this wall and just had to use it.It's by Pandorra (we're gonna miss you KittyMalone!) 100 A Tribute to BoXXi ( I am so thankful she uploaded this! you would have been missing out if you couldn't download it!) The irreverent pixielike girl swinging on the moon's beams , looks so free and happy I had to use her. And since she created a wall for this suite, I felt I should include it.
I used Slider by Skinhit twice this week. Because at the time I am putting these themes together, there is yet no Iconpackage nor as I mentioned earlier CursorFX theme.
I love the DesktopX theme created by PuterDudeJim for this suite. 100- A Tribute to BoXXi has everything you need in a desktopX theme all wrapped into one control panel. I like that feature makes things so easy to decide and I can pick and choose which items I want to display when.
100 A Tribute to BoXXi by Xiandi is a sharp little RainLendar skin.
for the second look:
I looked at several walls, and found that BoXXiLoGiX by BoXXi was the logical path to take here. I liked one other (Existence by D8abyte) ,but it became too busy and I had to change. I will save that wall for a screenie with nothing but blind, as It is so intricate you really can't add to it without ruining the flowing lines that make up that wall.
I mentioned I was going to take one skin and show several versions of how it can be put together, this is my second look for the 100 A Tribute to BoXXi skin suite.

For the Iconpackage, I used Slider by Skinhit. I tried to recolor it, by inverting the colors , and while it looked exactly as I had hoped on my configuration screen, Iconpackager has some issues with recoloring still and it didn't make it to recoloring on my desktop. Too bad, while it looks good as it is, it would have been spectacular recolored with this skin theme.
I wanted to incorporate BoXXi's work into this theme and found a great CursorFX theme that works perfectly with the grouping I've created here. Allante by BoXXi (now renamed to BoXX) has the points and lines that flow nicely with the rest of the group. The pointer is sharp and easy to maneuver which is important when you are trying to highlight text and point to minute objects in whatever window you are using. I enlarged the cursor as well, to make it stand out more.
I chose to use just an Object Dock theme for the desktop this time. I didn't want to go so busy your eyes hurt! BoXXi has a great theme for ObjectDock that I felt really spoke to this setup . The BlackBoXX is the perfect accent here and I had a hard time choosing which of the images I wanted to use for the icons, there are so many and they are all great. I stuck with the images that mimic'd the tribal tatoos I have seen. Tribal tats have that pointed fading line style that is rapidly becoming the theme of this grouping.
CarbonRC by Nimbin worked the best here. It's simple, black and has a graphic with the same flow the rest of the theme seems to be taking.
Now for my third setup, I am going to add a bit of color to this blind.
Saturnesque2 by BoXXi is the wall I chose. I wanted to keep within the theme of highlighting BoXXi's work and when I saw this wall, I knew it would provide the color I needed to point out my idea of bringing out the beauty of this blind.

I did a bit of recoloring to the blind itself as well. There is a subtle purple hue to the parts of the blind that take color. I will be showing a window for you to see that coloring ,in the screenie.
Win3D DuskXP Was a most colorful Iconpackage , all the Win3D packages are colorful and well done, but the lavender hue of this package worked perfectly with BoXXi's wall and the recolorization I did with the blind. I only wish there had been a firefox icon in the pack.
The cursorFX theme is kurio cxp suite by HAPTORK. I chose the kurio color duo subtheme here. I liked that it was already lavender and I didn't have to colorize.
I only used one desktop addition here ,as I wanted it to really show off the blind and wall. DesktopX object Glass Menu by Themer Boy had the right shade of blue and just the right amount of backlighting to work with the wall I chose.
All in all I would have to say the 100 tribute is very versatile and highly usable. I haven't even touched on all the accessories available to compliment this theme. I am glad that they chose to pay tribute to BoXXi, as he's been a hard working highly talented member of this community for a very long time. He is missed.
Unfortunately, this has become a small tribute to KittyMalone who has recently left the community as well. I will miss her as will many other community members.
Thanks for reading, all!
Wulfie

No Mac zealots, Apple didn't invent the dock
Monday, July 21, 2008 by Draginol | Discussion: Personal Computing
With Dell taking the Windows experience to the next level with the introduction of the Dell Dock, I've seen a lot of online buzz about it. Most agree that the Dell Dock is really good but intermixed are a lot of Mac fans who use terms like "Mac rip off" or how it's a copy of the Mac dock.
 Mac zealots have a long and glorious history of retroactively claiming pre-existing concepts as being invented by Apple. For example, the modern "widget" (end user created applets that use Javascript) was not invented by Apple. They also didn't first appear in Konfabulator either. They appeared in Stardock DesktopX years earlier. Apple zealots usually counter by arguing that things like desktop accessories from 1981 "invented" the concept (as if the average user was going to whip out small assembly language programs).
 I think most rational people agree that the modern widget is a mini application that can be created by end users that are tied together with a high level scripting language (i.e. Yahoo Widgets, Dashboard, Sidebar Gadgets, DesktopX). And DesktopX borrowed the concept from IBM's worksplace shell which in turn was inspired by prior art as well.
But the controversy over widgets is nothing compared to the claim that Apple somehow invented the concept of docks. Even allowing for the history of NeXT with its side dock, the dock concept is ancient.
Stardock, for example, has been doing "docks" since 1994. Object Desktop for OS/2 included things like Tab LaunchPad and Control Center. You don't see Stardock fans complaining that every sidebar is a "rip off" of Control Center. And Control Center certainly didn't invent the concept of a side-based bar or dock either.
You would be hard pressed to find many companies that have been continuously producing a dock and a sidebar as long as Stardock has -- 14 consecutive years of development. I think it's fair to say that we weren't "inspired" by an Apple OS that wouldn't exist for 7 more years from the time we started doing this sort of thing.

Tab LaunchPad on OS/2 circa 1994
Stardock makes no claims of having invented the dock. We called our first dock Tab LaunchPad because IBM itself had created a dock for OS/2 2.0:

IBM OS/2 LaunchPad circa 1992
But let's say you're a true die-hard Steve Jobs zealot and want to argue that NeXT "invented" the dock. You'd still be wrong as docks were part of Acorn computers from the early 80s. The point, of course, isn't who invented the dock, the argument of course is whether companies like Stardock (who wrote the Dell Dock) were somehow ripping off or stealing or what have you from the MacOS dock and I think you can see why this is such an obnoxious and offensive argument - we've been making docks since before Apple had figured out how to do preemptive multitasking.
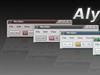
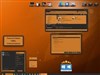
They say a picture is worth a 1000 words. Here is a picture of what the Macintosh looked like in 1996 (System 7.5) along with a picture of Stardock Object Desktop in 1996:
 vs.
vs. 
Mac 1996 vs. Stardock Object Desktop 1996: Which desktop do you think more closely resembles today's modern desktop? Note that Object Desktop was written during the Windows 3.1 era.
Stardock doesn't run around claiming that it invented the modern desktop experience. We don't imply or assert that everyone else is "ripping us off". Some ideas are just obvious.
The Dell Dock represents the continuing evolution of the desktop experience. Like all improvements to the user experience, inspiration can be found everywhere. But when advocates of a company or an operating system try to lay exclusive claim to all such improvements, they diminish the hard work, innovation, and inventiveness by thousands of other people from around the world who often have worked in obscurity with little glory. It is bad enough that these innovators don't get credit they deserve, it's even worse when they are so often smeared as copying those who came after.
Other Pictures:


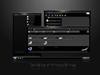
Stardock ObjectDock Plus (4 different docks)
