3 Tips for Using Stardock's Fences
Wednesday, April 9, 2014 by Island Dog | Discussion: Personal Computing
Fences has been one of the most popular desktop organization apps since its introduction several years ago. It has nearly 5 million downloads on Download.com alone and has been recommended by many publications including Lifehacker, PCWorld, and more.
If you aren’t familiar with what Fences does, let me give a brief explanation. If you have a desktop full of icons they can quickly add up and become an unorganized mess in a hurry. Fences lets users create shaded areas on the desktop which contain groups of icons which you can organize inside these areas.
There’s lots of other cool features in Fences that can help you to keep your desktop organized, and here are 3 of my favorite tips to get the most out of using Stardock’s Fences.
Use Rules for Sorting
This is an awesome feature that I think some users might overlook when setting up Fences. You can setup rules in Fences which will help you with sorting and auto-organizing icons. By default, any new icons appearing on your desktop just go right to the desktop. By using a rule, you can set it up to where a certain type of icon will be placed in a fence that you define.
For instance, you can create a rule that will place all new image icons into a fence you have created just for that purpose. You can choose from a variety of types for your rules such as images, documents, folders, web links, and more. You can also set name-based and time-based rules as well.
Customize the Appearance
We like customization, and there’s quite a few ways you can customize your fences. My personal favorite ability is being able to adjust the transparency of a fence. This works great when trying to blend in with a desktop wallpaper I might be using. Fences also allows you to adjust the color by using sliders, and you can also adjust the label text, size, and font used.
Another cool trick is that you can hide a fence by right-clicking the fence, and setting it’s opacity to 0. With that set, the fence and its icons will be hidden until you mouseover the fence.
Create Folder Portals
Do you have a favorite folder you access al the time and want an easier way to interact with it? With Fences you can create a Folder Portal that you can access the contents of any folder right on your desktop. Setting up a portal is nearly the same as setting up a regular fence, but you’ll just need to select the folder to you want to access.
Reminder: Backup Your Object Desktop Apps!
Tuesday, March 4, 2014 by Island Dog | Discussion: Personal Computing
This is something I’ve talked about many times before, but it always deserves repeating and a reminder every once in a while. When you purchase a subscription to Object Desktop you get a great deal on a whole suite of the best desktop enhancement and skinning applications available.

Included with your subscription is:
- WindowBlinds
- DeskScapes
- Fences
- Start8
- ModernMix
- Tiles
- and more!
As long as your subscription is active, you will always get updates to the latest versions and any new apps that are added during that time. While most people renew for many years, some also let their subscriptions lapse or just subscribe for one year at a time. When your subscription is no longer active, you will no longer have access to new updates, but you will still have the apps you had during your subscription to use.
However, it is very important that you backup and archive those apps for future use. If you are using the Object Desktop Manager app, it will save your downloaded files to a folder on your hard drive.
Typically, they will be here: C:\Users\YourName\Downloads\Stardock
You can specify that location in the ODM preferences.
Even if you have the Object Desktop Manager installed and use it, I also recommend downloading the individual files from your Stardock account and making a second backup with those. You can access your downloads here.
3 Tips for Using Stardock's Start8
Wednesday, January 22, 2014 by Island Dog | Discussion: Personal Computing
Start8 from Stardock has made computing life much easier for users of Windows 8 since it was first released. Start8 brings back the start menu to Windows 8 along with other functionality that gives users a more familiar and enjoyable user experience.
Start8 is very easy to use, but I always like to write about tips that maybe some people might not know about, but should.
Start8 Works with WindowBlinds
WindowBlinds is another application from Stardock that most will probably be familiar with. It gives users the ability to apply one of thousands of skins available that change the look and feel of your Windows desktop. The topic of Start8 and WindowBlinds working together has come up several times recently, so I wanted to detail how they work well together.
A WindowBlinds skin will typically include a skinned start menu and start button to match the overall skin. Using both of these apps you can have a completely skinned and customized desktop with a full start menu on Windows 8. You can also choose in the WB settings to either use the start button provided with the WindowBlinds skin, or use the buttons in Start8. Either way, you have control over the look.
Use a Custom Start Button
As I mentioned above, Start8 has the ability to use custom start buttons. There are several already included, and there are many available to download from the Start8 gallery on WinCustomize.com. In the Start8 configuration, under Style, just click the ‘Custom Image’ box and you can select your custom image to use.
Creating your own start button is super simple. We even have a free tool available to easily create them. Download it here.
Use Advanced Tweaks in Start8
This is probably something a little less known, but Start8 also has an Advanced Tweaks setting which gives you some additional features. Some of these include enabling/disabling for different users, showing hidden items in the Programs list, limited the scope of search results, and more.
You can access these by opening Start8Tweak.exe which is in your Start8 application directory.
Windows 8 Stardock Apps for Under $5!
Wednesday, October 9, 2013 by Island Dog | Discussion: Personal Computing
Many of you are already using Windows 8, and the Windows 8.1 update is just released. Stardock has several apps that have solved some of the reported problems in Windows 8.
Below is an overview of some of the most popular Windows 8 apps, all under $5!
Start8
The start menu in Windows 8 was removed, and in the 8.1 update, Microsoft brought the start button back. Unfortunately, their start button DOES NOT bring the Start Menu with it, it launches the Windows 8 Menu. Start8 returns the missing Windows 8 start menu and brings additional features like customization, pinning of desktop and Metro apps, unified search, and more.
Start8 was listed in the "PCWorld Top 100 BEST" list, covered by USA Today, Forbes, CBS News, the Wall Street Journal and more!
ModernMix
There are some cool and useful Modern UI apps available for Windows 8. The problem is, these apps take up the entire screen when opened, which is annoying when running an app like the weather app. ModernMix takes those apps using the Modern UI (Metro) and puts them in desktop windows so you can easily re-size, switch back and forth through running applications, and easily close out of them.
Decor8
Windows 8 limits your start screen customization options to only a few provided background images and a few pre-defined color schemes. Decor8 removes these limitations and provides the freedom to personalize your start screen with your own images and colors.
Use Acoustic Bridge to Send Audio from One PC to Another
Wednesday, September 18, 2013 by Island Dog | Discussion: Personal Computing
Nowadays it’s pretty common to have multiple PCs on your desktop or in your household. With that being said, I wanted to talk about Acoustic Bridge from Stardock and give you an overview on what it does and how to use it. Acoustic Bridge gives you the ability to take the audio signal from one PC and send that signal to another PC in your network.
A good example of use would be if you have a nice set of speakers connected to your desktop PC, and a laptop or Windows tablet with less-than-ideal speakers. Take that audio output coming from your laptop and send it over to your desktop to listen to your music (or any type of audio) on those great sounding desktop speakers.
Purchase Acoustic Bridge for just $9.99
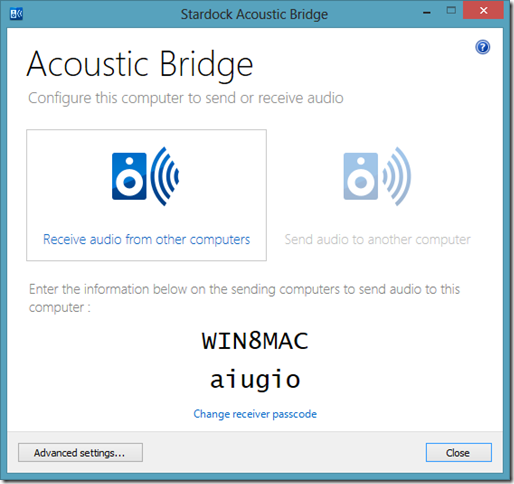
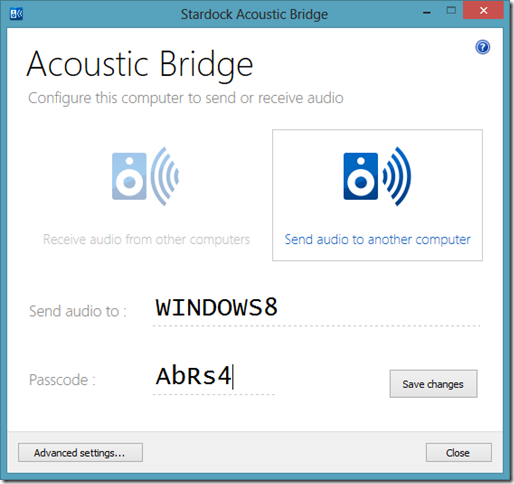
Acoustic Bridge is pretty simple to get setup and running. After installing you choose whether this PC will be sending or receiving the audio signal. This can be changed in settings if you need to reconfigure at another time, and options are available in the system tray for easy access.
TIP: You can install Acoustic Bridge on up to 4 PCs!
Receiving Audio
As you see in the screenshot above, you can configure Acoustic Bridge to send or receive audio. For the PC that wants to receive the audio, make note of the PC name and passcode, and then proceed to install and setup on the PC you want to send audio from.
Sending Audio
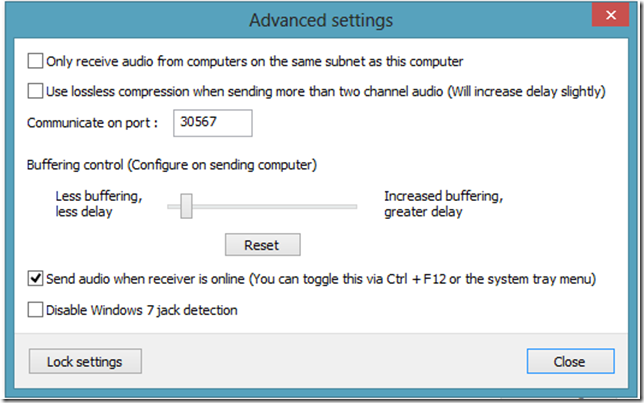
When you select the option to send audio, you just need to enter the PC name and passcode from the receiver setup we mentioned in before. That is the basic setup, but you can click ‘Advanced Settings’ where you can change additional settings such as port numbers and buffering settings.
Once you use Acoustic Bridge you will see how handy it is, and I’m sure it will become one of your favorite desktop utilities!
Object Desktop: The Benefits of Subscribing
Thursday, August 15, 2013 by Island Dog | Discussion: Personal Computing
 If you read our various articles and news you probably see Object Desktop mentioned often. We still get lots of questions about what exactly Object Desktop is, and why a subscription to it should be considered over just purchasing a single product.
Let me first start off by explaining that Object Desktop is a yearly subscription that contains many popular Stardock applications which we’ll cover in detail below.
Purchase Object Desktop for just $49.99
Learn more about Object Desktop
Why Subscribe?
Subscribing gives you access to all the included applications, and as long as your subscription is current, you will receive any updates and new versions that are released. Being a subscriber also gives you the benefit of having early access to beta versions of software so you can check out the latest updates before it’s released to the public.
You are also getting over $100 worth of software for just $49.99, and yearly renewals are just $34.99.
Own any of the stand alone products in Object Desktop? You may be eligible to upgrade for just $34.99! Upgrade now
What’s Included?
You get a whole collection of desktop enhancement apps to both change the look of Windows and to help improve the functionality of it as well. You can download the individual apps from your Stardock account, or use our Object Desktop Manager to keep up-to-date with updates. The Object Desktop Manager is an application that can notify of any new updates available, and lets you download those updates or install any of the various components of Object Desktop which we will talk about more below.
Once you have subscribed, you can download the Object Desktop Manager from your account.

TIP: See a list of all the included apps here.
Now we’ll cover the core applications included with Object Desktop, and a brief overview of what they do.
WindowBlinds
WindowBlinds is one of our most popular pieces of software in Object Desktop, it has been around for many years, and has millions of downloads. WindowBlinds gives you the ability to completely change the look and feel of your Windows desktop by applying skins to the user interface. These skins will change the start menu, window frames, taskbar, and much more. Thousands of skins are available to download and there are styles to match just about every kind of taste.
TIP: Download more skins for WindowBlinds and other Object Desktop apps from WinCustomize.com
Start8
If you are running Windows 8 and are looking to bring back the look and functionality of the missing start button, then Start8 is what you’re looking for. Start8 brings back the missing start menu along with many additional features such as boot straight to desktop, jump list support, customizable start buttons, and more.
TIP: If you use Start8 with WindowBlinds, Start8 will inherit the skin used so it will match.
DeskScapes
DeskScapes does lots of cool things, and the top feature would be putting animated wallpapers on the desktop. Whether you’re looking for a subtle landscape animation, or a 3D rendered animation of the solar system, there are Dreams (animated wallpapers) available. Not only does it apply both animated and static wallpapers, it also lets you apply effects to them giving you even more customization options.
Fences
Fences is another popular desktop utility programs included with Object Desktop. Fences removes those messy, out-of-control icons on your desktop and lets you wrangle them into "fences" on your desktop. You can label, resize, and even create rules for these fences to keep your desktop clean and tidy. Additional features include, letting you create folder portals so you can have direct access to favorite folders right on your desktop.
TIP: Double-click an empty space on the desktop and your icons and fences will disappear. Double-click again to bring back.
WindowFX
WindowFX lets you add a bunch of cool effects to your desktop. Make the desktop windows wobble, assign them different animations for opening/closing, take control of window focusing, and more! We have several demo videos on the WindowFX website to show exactly the neat things that WindowFX can do.
ModernMix
Another app designed for Windows 8 users is ModernMix. If you have ever used a "Modern UI App" (Metro App) in Windows 8 you may have noticed that it’s full screen, which is pretty annoying for most apps. ModernMix lets you run those same apps in a window on your desktop, just like do with regular desktop software.
These are just several of the popular apps included with your Object Desktop subscription. You get many other applications like IconPackager, IconDeveloper, Tweak7, Keyboard Launchpad, and several more.
If you want total control over the way Windows looks and functions, then you can’t go wrong with an Object Desktop subscription.
Troublemaking at Twit.TV!
Friday, August 9, 2013 by Draginol | Discussion: Personal Computing
WindowBlinds 8 Walkthrough: Changing and Applying Skins
Friday, July 19, 2013 by Island Dog | Discussion: Personal Computing
 In my previous article we went over the new user interface in WindowBlinds 8. If you are new to WindowBlinds or just want a refresher, then give that a quick read here. This time I wanted to show users how to find, change, and apply skins in WindowBlinds.
Purchase WindowBlinds 8 for just $9.99
Getting New Skins
WindowBlinds includes quite a few skins to get your started, but there are thousands available for download on WinCustomize.com. There are skins with a minimal look and skins with wild graphics, and just about everything in between. Regardless of your style, I’m sure you will find something that you will enjoy having on your desktop.
WindowBlinds skins come in a .wba format, and sometimes those will be packed in a .zip file that will need to be extracted. When you double-click a .wba file, it should automatically install to WindowBlinds and be added to your skin list. There’s also an option to manually install a skin by clicking through the menu as seen in the screenshot below.
TIP! If you don’t see an installed skin, select ‘Rebuild skin list’ from the WindowBlinds menu.
Viewing and Selecting Skins
The left side of the WindowBlinds window is where you can browse and view all your installed skins. Hovering your mouse pointer over each skin will reveal the name of the skin and selecting one will bring up more options on the right. You will also see a preview of the skin there as well.
TIP! There’s an option available to keep the skin names visible if you prefer.
Right now you could just press the ‘Apply Style’ button and apply the skin, and you will be all set.
Substyles, Coloring, and More
As I mentioned before, when you select a skin you will get some additional skin options on the right side of the WindowBlinds window. One of those will be a drop-down menu for substyles. Substyles are variations of the selected skin. Some skin artists will make different substyles specific to Windows 7 or Windows 8, and some will make light or dark versions of a skin. If there are substyles available to can select which to use here, and remember, you will have to apply the skin again to show it.
There are also options available to recolor skins, add textures, and to change the Explorer backgrounds. We will cover these features in another article.
WindowBlinds 8 Walkthrough: The New User Interface
Thursday, June 20, 2013 by Island Dog | Discussion: Personal Computing
 WindowBlinds 8 has arrived and is available now for users on both Windows 8 and 7. There are a lot of features to cover with this new release, so be on the look-out for more WindowBlinds walk-thrus.
Purchase WindowBlinds 8 for just $9.99
The New User Interface
I wanted to start off with a general overview of the new user interface and the basic functions. The UI has been completely redesigned, so I want to make sure everyone is up to speed on the new look and functions of WindowBlinds 8.
This is the new main interface for WindowBlinds 8. If you already own WB, then the UI probably looks substantially different. The basic functionality remains the same, but we will cover it for new users.
On the left side of the window (screenshot above) you have a list of skin previews. WindowBlinds comes with several great looking skins, and you download more from WinCustomize.com. When you select a skin, it will display a preview on the right side of the configuration screen. Here is where you can adjust the "Color", "Texture", and "Background" per the chosen skin. Whenever you want to apply a new skin, or see the changes you made, just hit the "Apply Style" button in the bottom right corner of the WB config and you'll see the changes being applied to your desktop.
Styles
Under the "Style" tab, you can select a different substyle of the skin. Some skins come with substyles, and some don't. Usually the substyles offer a lighter or darker version of the skin, or even one specific to a specific OS.
Colors
Selecting the "Color" tab gives you the ability to re-color the skin you have chosen and change the color of some system colors. You can pick from several common color choices and fine tune the coloring options with the adjustment sliders.
Transparency Adjustments
"Transparency" is another option under "Colors". This is another favorite feature among users as you can add and adjust the transparency of the start menu, task bar, and window frames. Just use the sliders to adjust the amount of transparency you want, then apply the skin again to make the changes.
If you're feeling really ambitious, choose "Fonts". The fonts tab allows you to change the font shown in your windows. Tired of the standard sans serif font that comes with Windows? Choose something more stylized, or simply change it to a serif font, like Times New Roman.
Textures
Selecting the "Textures" tab button allows you to apply a texture to the skin you've chosen. There are several textures included with WindowBlinds, and you can easily add your own texture effect, or download more from WinCustomize.com.
Desktop Wallpaper and Explorer Backgrounds
Lastly, we have the "Background" section. You can manage your desktop wallpapers from within WindowBlinds, add specific directories where WB can look for images to use, and even set WB to automatically change your selected wallpapers at set intervals.
"Explorer Backgrounds" can also be applied here, along with the opacity levels of active/inactive Explorer windows.
This gives you a good overview of the functionality and new user interface of WindowBlinds 8. The best way to experience WindowBlinds is to download skins, apply them, and explore all the cool features that can be found in WindowBlinds!
ObjectDock: How to Change the Background Theme
Monday, June 3, 2013 by Island Dog | Discussion: Personal Computing

I wrote a similar article to this years ago, but ObjectDock has had several updates since then, so I created a new one to help with questions on how to change the background theme. ObjectDock has become a favorite app among Windows users over the years as it’s a great app for organizing your desktop icons, shortcuts, etc. To see more of what ObjectDock can do and how you can configure it, be sure to check out my article.
Link: Organizing Your Desktop with ObjectDock
ObjectDock not only offers the great features listed above, it's also customizable. There are thousands of icons and background themes available to download from WinCustomize.com. Many of them are made to match popular WindowBlinds skins, so you can have matching components on your desktop. There are all styles and colors available, and once you download them they can be added to your ObjectDock collection very easily.
Purchase ObjectDock for just $4.99
Adding a New Background Theme
If you downloaded a new background theme, we’ll start with how to add it to the existing ObjectDock collection. Most of the backgrounds will come in a ".zip" format, so the first thing to do is unzip them into a folder of their own.
Next, move that folder to the ObjectDock "Backgrounds" folder, and they are now added to the background selector.
TIP! The ObjectDock theme folder will typically be located here: C:\Program Files (x86)\Stardock\ObjectDock\Backgrounds
Changing the Background Theme
Whether you want to change to one of the included backgrounds, or one you added yourself, you can do that with the Background chooser in the ObjectDock configuration.
You can access the settings through the ObjectDock tray icon, right-clicking a dock (select settings), OR via a shortcut on the dock itself.
See the screenshot below:
Click "Style/Color" > "Change Theme". That will bring up the Background chooser and from there, simply select the background you want to use.
TIP! The process is the same for tabbed AND animated docks.


