


Icon-A-Day, Icon # 51, The Bitmap File
This one makes me crazy.
Monday, February 21, 2005 by mormegil | Discussion: Icons
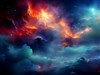
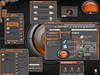
| Icon 51 (BMP File) Today we get back to the default file icons and as long as we're at it lets take care of the first one on the list: the Bitmap file. This icon is one of those icons that drives me crazy. It is exceedingly simple in concept, yet always leaves me wanting more. For the JPG file I almost always do a photograph of some kind, since JPG's are most well known for saving digital "Pictures". For the GIF file I like to do a smiley, or some other pixely net image since Gifs are best know for the web, and emoticons. Bitmaps or BMP files are perhaps best known for wallpaper, but it would seem odd to put a monitor on a file. (Note to self, try this someday, might work). What I tend to end up doing is some sort of generic image, a "Bliss" like image, or a sunset. This is why I am never exited to do the BMP icon, and I tend to put it off. But since I promised a file icon to day I have decided to get this one checked off the list. | ||
| Step 1: Once again we will start by copying a base icon, this time the JPG file. I delete everything but the main file and its title. The title I change to BMP. .jpg) |
Step 2: Now I grab the brush from our My Pictures folder and move it down in front of our file. To add some depth I move the handle of the brush to the back. .jpg) |
Step 3: Now with the Mesh Tool I go in and edit our Paint "swoosh". Making it fade from blue to green to red. .jpg) |
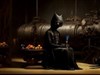
| Step 4: Now I copy one of the images from the photos in our My Picture folder and crop it down. Then I place it on our folder with a Multiply Transparency set to 0. I also draw a black box around it to act as a frame. .jpg) |
Step 5: Now to make this a bit more interesting I want to do a little palette on the bottom of the page, so I draw some boxes and line them up flush under our picture. .jpg) |
Step 4: Now using the eye dropper tool I sample some colors from the picture and assign them to the palette squares. One row the greens, one the blues. .jpg) |
| Step 4: Now we are back to our standards; we give the new file and brush a Reflection. .jpg) |
Step 8: We need a new shadow for the brush handle so we take care of that. .jpg) |
Completed Icon Image..jpg) |
Click here to download the finished icon. | ||
|
That's one more of our staple icons out of the way. And I must say it turned out much better then I was thinking it would. Since that went well I think tomorrow we will finish up the Default Image file types and do the GIF. See ya then. | ||
Please login to comment and/or vote for this skin.
Welcome Guest! Please take the time to register with us.
There are many great features available to you once you register, including:
- Richer content, access to many features that are disabled for guests like commenting on the forums and downloading skins.
- Access to a great community, with a massive database of many, many areas of interest.
- Access to contests & subscription offers like exclusive emails.
- It's simple, and FREE!
Reply #1 Monday, February 21, 2005 10:52 PM
Thanks, Teach.