


WindowBlinds 10: Colors, Textures, and Fonts
Tuesday, April 24, 2018 by Island Dog | Discussion: OS Customization
 We had some questions come in asking about some of the additional features of WindowBlinds regarding textures and backgrounds, so I wanted to write a post going into more detail about it. These are all features that aren’t really difficult to use, but if you are a new user you just might not be familiar with where everything is and how they work.
If you are completely new to WindowBlinds, let me recommend you also take a read through the WindowBlinds 10 Walkthrough: Changing your Desktop Theme.
Get WindowBlinds here.
Colors, Textures, and Fonts
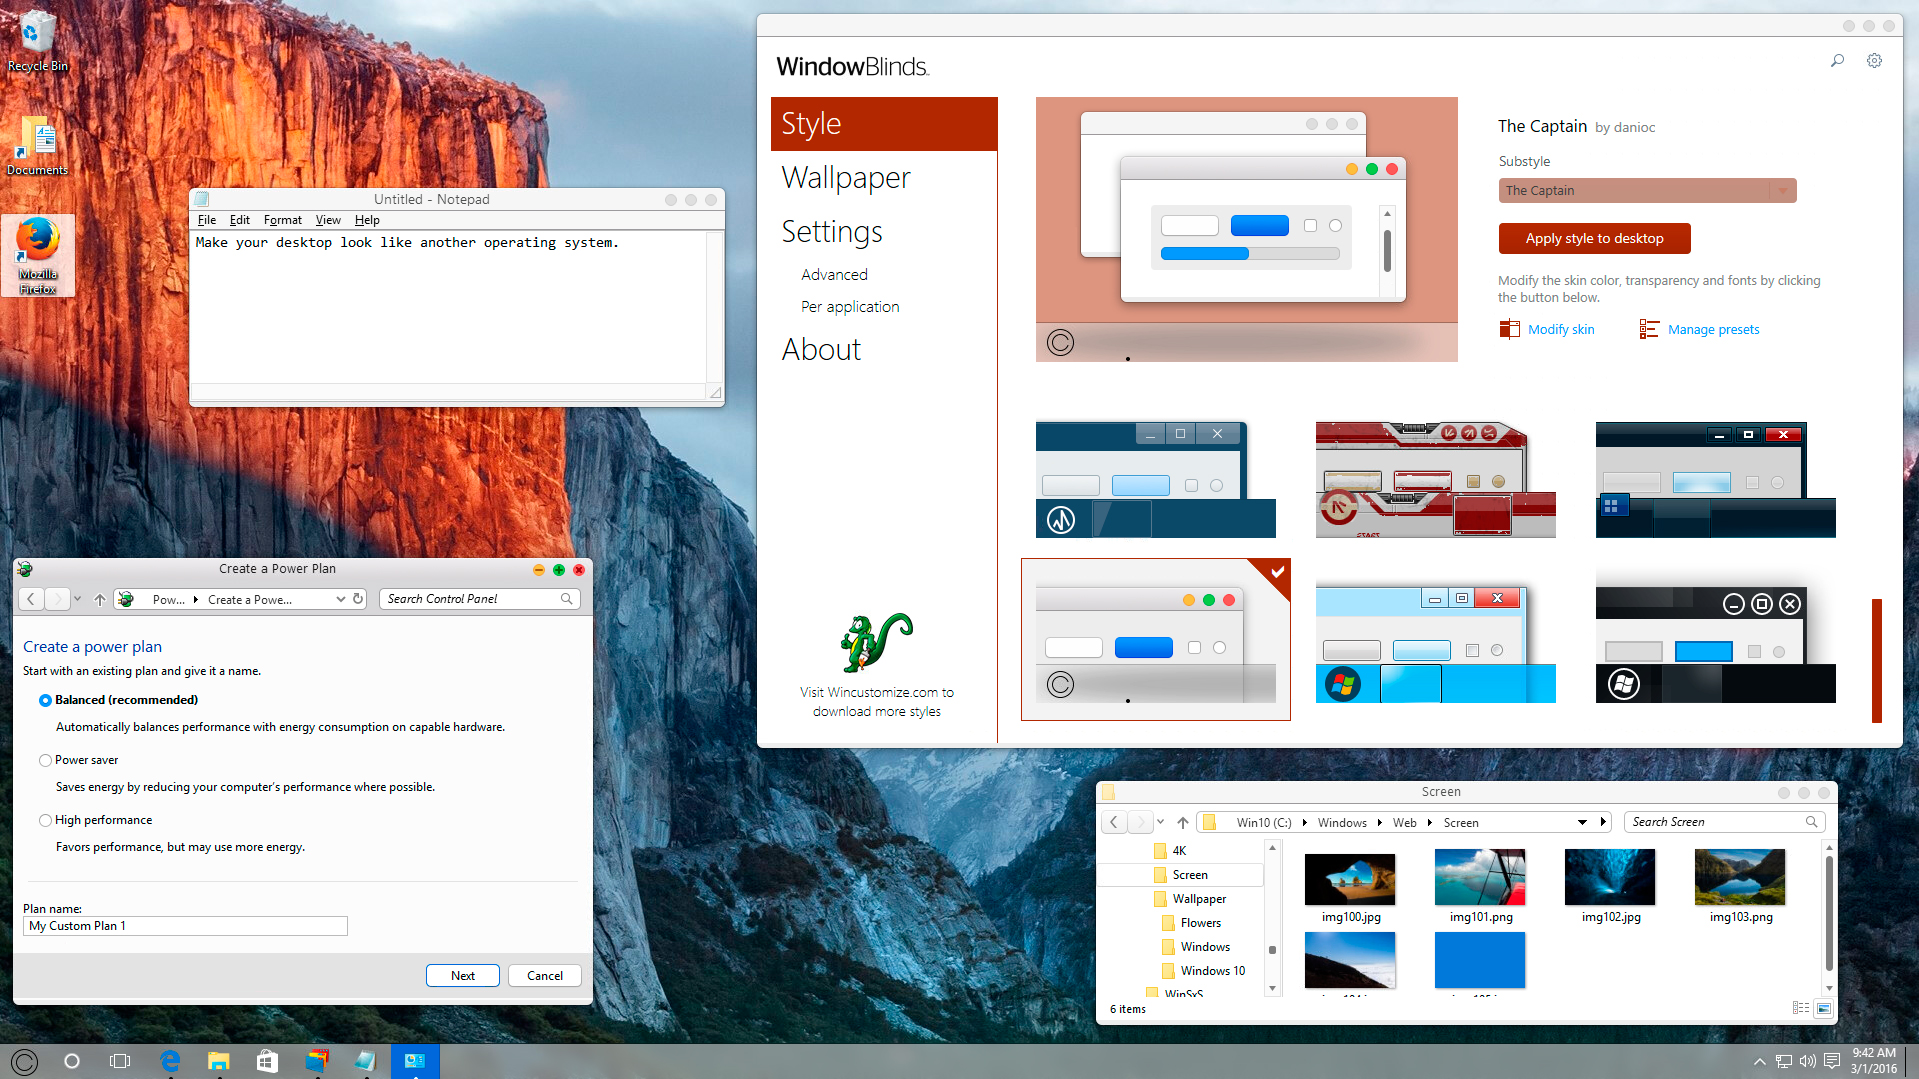
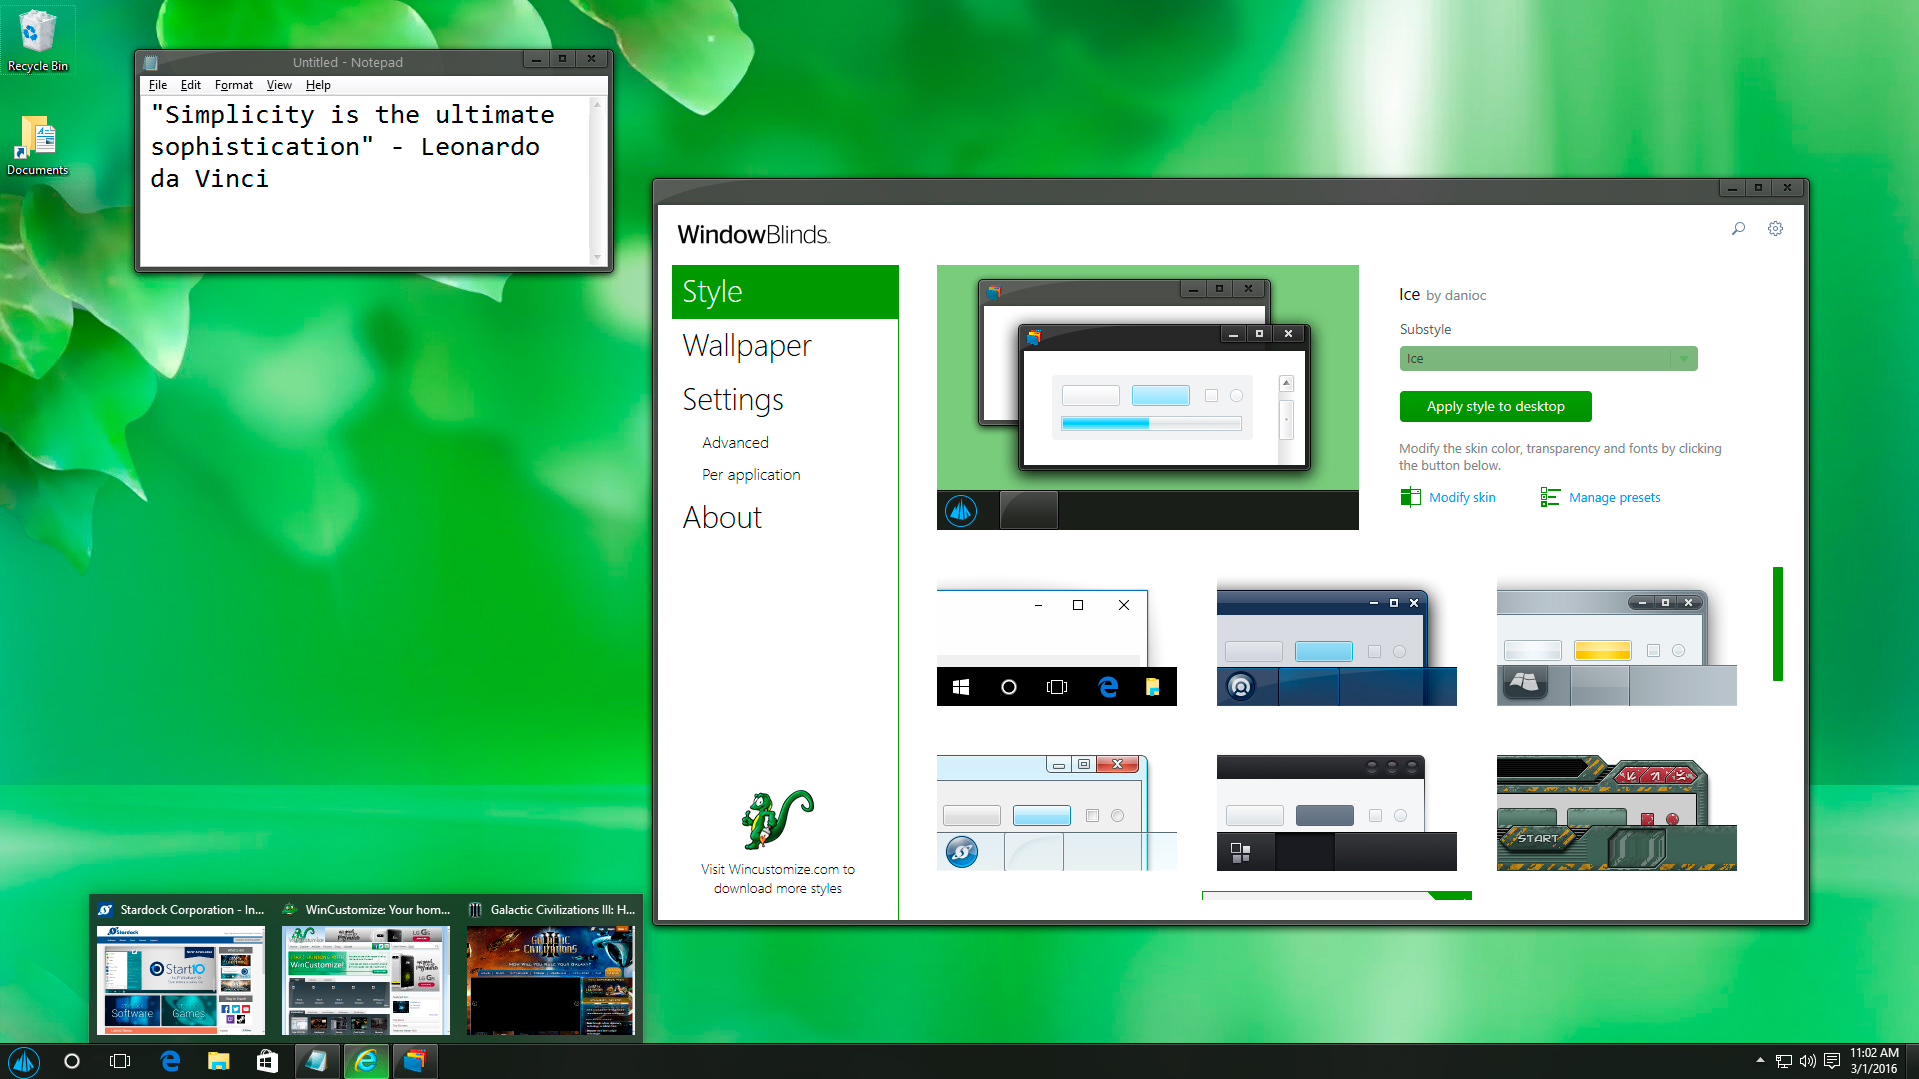
On most WindowBlinds skins, you’ll see an option to 'modify skin' on the right of the WindowBlinds interface. Clicking that will bring up the options for Color, Transparency, Texture, and Fonts. Clicking one of those expands the section with all the available options for that particular feature. We’ll start out with selecting Color, and that will bring up the coloring options in WindowBlinds. Using this option you can change the color of a WindowBlinds skin by selecting a color and using the sliders to adjust it even further. You can just the brightness and saturation, and there’s also options to adjust the range and primary skin colors. Of course you can also stick with WindowBlinds smart recoloring which will give you excellent results. Note that some skins will accept color changes better than others depending on their design.

The last option in the Color tab is for fonts. Here you can override the font that is defined in the skin, and you also have the option to adjust the size of the fonts.
Transparency
Next we have the Transparency option which gives you the ability to change the transparency of the start menu, task bar, window frames, and context menus. Just adjust the sliders to the amount of transparency you want, and apply the changes to see them in use.

Textures
Textures is another feature available in WindowBlinds that gives users the ability to add textures to a WindowBlinds skin. When adding a texture, it can dramatically change the way a skin looks depending on what type of texture image is used. There are a bunch of textures included, and it’s fairly simple to create and add your own so you can customize a skin to your personal liking.
We even have a WindowBlinds Texture gallery on WinCustomize.com where people can download textures other people have made and shared.

WindowBlinds is available individually for your Windows PC, but you can get that and more with a low-cost membership to Object Desktop. While you're a member, you'll get free updates, access to all betas, and any new apps for one year. You’ll also get access to other great programs like Groupy, Start10, DeskScapes, Fences, Multiplicity, and more!
Visit the Object Desktop site for more information.
WinCustomize Master Skinner Spotlight: LightStar
Tuesday, March 27, 2018 by Island Dog | Discussion: OS Customization
 Each week on WinCustomize we feature a skin made by one of the creators from our community. We've decided to take that idea a bit further and spotlight the creators themselves!
I wanted to start this off with one of our top skinners and long-time member, Tom, also known here as LightStar!
He was kind enough to take the time to answer some questions so we could get to know him a little bit more.
Can you tell us a bit about yourself and how you got involved in “skinning”?
Well, I am originally from Westland, MI, and spent 22 years in the military. I then worked for a local college (where I earned my degree from) as a Computer/Network Technician and then for the State of Indiana as a Director of Technology at a Department of Corrections facility. I was forced to retire early because of a disability I incurred while serving in the military that had progressed to a point where I could not work anymore.
While I was still working though, I was at home one night and saw a skin design for Windows XP on the Internet that inspired me to start doing designs on my own. Back then I was developing MSStyle skins for a company called TGTSoft and their StyleXP software, but when Windows 7 came out, the owner decided to shut the business down. So for a while I continued designing for Windows XP, but soon found out about Stardock’s fantastic WindowBlinds software and decided it was perfect for what I wanted to do and started developing skins for it. At first I did a lot of porting of my prior MSStyle designs to WindowBlinds in order to learn using SkinStudio, and eventually starting developing WindowBlinds skins from scratch, which I continue to do to this day and I truly enjoy it!

You’ve created an almost countless amount of WindowBlinds skins. Do you have a favorite?
To tell you the truth, I have done so many WindowBlinds skins - 272 to be exact - that it would be really hard to pick a single skin. But some of my favorites are my 1942, Art of War, Aurialis, Aztec, Black Sails, Digi Slots, Empire, Flash Punk, Future Life, Medieval and Neon Nights skins, just to name a few. There are so many others too!
Could you tell us about your creative process when designing a skin? Do you have a vision of the design beforehand, or does that evolve during the actual design process?
Initially I get inspired by something I see, or an idea, it could be anything... just some colors, a shape, etc. From that point the first thing I design is the start menu, after that I work the other areas based on the shape and color of the start menu. I try to do virtually all of my designs to be highly functional, but at times I add a little bit of “glitz”. When completed, I look at all areas of the skin, sometimes down to the per pixel level, and make adjustments as necessary. Before releasing though I have my good friend RedneckDude take a look at the skin, be it a free or Master Skin, to have him check for any issues.

From start to finish, how long does it typically take you to create an entire WindowBlinds skin?
It usually takes me anywhere from 40 to 80 hours or more to create a skin initially, and another 4-6 hours , depending on its complexity. I virtually spend most of my day designing, 7 days a week.
Skinning obviously takes a good amount of time out of your schedule. Do you have any other hobbies or interests besides skinning?
Skinning is pretty well all that I do now, I really enjoy doing it. I used to have a hobby of metal detecting which I also really enjoyed, and I found some really cool things, but due to physical limitations I had to give that up.
Other than that, spending time with my family is a must when I can! I also enjoy helping the poor and needy when I can. To tell you the truth, that is where most of my income from selling my Master Skins goes, and it feels so good to help!

Thanks for being a valuable member of WinCustomize and for taking the time to speak with us this week! You can see all of LightStar's skins here.
Keep an eye out for more member spotlights!
How to Create an Animated Wallpaper Using Stardock's DreamMaker
Monday, December 11, 2017 by Island Dog | Discussion: OS Customization
Animated wallpapers were introduced to Windows back in the Vista days and has since been continued with the DeskScapes app created by Stardock. By using DeskScapes, you can have beautiful animated wallpapers on your Windows desktops. DeskScapes also lets users manage both animated and static wallpapers, add effects, and more. You can get a more detailed of what DeskScapes does with this article found here.
There are thousands of animated wallpapers, also called Dreams, available for download on WinCustomize.com. Most of these are created by users of DeskScapes, and although there’s a variety of methods used to make the actual animation in the wallpaper, you will need to use DreamMaker to package your videos so you can use and share with others. DreamMaker is an app that is included with DeskScapes that helps you with that process.
Overview
DreamMaker can be found in the DeskScapes directly on your PC, usually in C:\Program Files (x86)\Stardock\DeskScapes. Just run the DreamMaker.exe and you can begin assembling your .dream file.
There are four types of animated wallpapers you can create and then package with DreamMaker.
- Single Video File – This is just a simple animated wallpaper made from a video file. You would need either a wmv or avi file for this.
- Triggered Video – This uses a video, but you can set triggers for that video to play at a certain time.
- Dynamic Content – This is for dynamic .dream content
- Hybrid Content – This is an animated wallpaper that can use both static images and animated content. More about that here.
Remember, DreamMaker only packages your content and makes it ready for distribution and use with DeskScapes. You still need to create your own content with video clips, 3D rendering applications, etc. The forums on WinCustomize is a great resource to ask questions and get advice on way to do this.
Getting Started
Once you have all the files for your .dream ready, we can begin. In DreamMaker you will see it has 3 tabs that we will be working with. The first tab is the Dream Information where you will enter the name of your Dream and a description of it. You will also need to add a thumbnail image (.jpeg, .PNG, no larger than 256x256) that represents your animated wallpaper.

Next is the Dream Contents tab. This is where you will select which type of .dream you are creating (see overview above). One you select the type of .dream you are making, you can select and add all the necessary files needed for that particular animated wallpaper.

The last tab is where you enter the Author Information. Here you can enter the author’s name, website, any copyright info, and a box for any additional information you want to include.

All you have to do now is click the Create .Dream button, and your animated wallpaper will be packaged into a .dream file, and will then be ready for use.
Sharing Your Animated Wallpaper .Dream Files
Now that you have your .dream file ready, you can either keep for yourself or share it with others so they might enjoy it as well! WinCustomize.com is where thousands of other animated wallpapers are available for the public to download, and it’s easy to join and get your wallpaper added.
Note: When sharing an animated wallpaper, it must be created by you or have the necessary permissions included to distribute. See more about that here.
It’s free to join and upload your animated wallpaper to WinCustomize.com. If you already have a Stardock account, you can simply use the same login credentials as they work across all Stardock sites. Next, head over to the upload page, enter all the information and upload your files. WinCustomize has a moderation process, so after a short time the .dream file will appear on the site and will be available for download.
Useful resources:
- DeskScapes and Animated Wallpaper Submission Notice
- Creating Hybrid Animated Wallpapers for DeskScapes
- Tips for Uploading and Moderation
DeskScapes is available individually for your Windows PC, but you can get that and more with a low-cost membership to Object Desktop. While you're a member, you'll get free updates, access to all betas, and any new apps for one year. You’ll also get access to other great programs like Fences, Start10, Groupy, WindowBlinds, Multiplicity, and more!
Visit the Object Desktop site for more information.
Changing Windows 10 Icons with IconPackager 10
Tuesday, November 14, 2017 by Island Dog | Discussion: OS Customization
Windows icons haven't changed much over the years and they're not something we think about too much, even though we click on them every day. One thing we can probably agree on is that the default icons on the Windows desktop or in the Explorer can be a bit plain - but, we can easily change that using IconPackager!
Instead of altering icons one by one, IconPackager uses an entire package of icons to change nearly every one at the click of a button.
![]()
Downloading new IconPackager themes
There are thousands of icon packs available on WinCustomize.com that can apply a matching icon set across your entire Windows PC. The program comes with several high-quality icon packs that you can start using right away, but I definitely recommend downloading even more. There are a wide variety of styles available to achieve the look that you desire for your desktop.
Just head over to the IconPackager gallery and start browsing. When you find a theme you like, just click the download button to get it. When you double-click the file, it will install to IconPackager.
![]()
Applying the Icon Theme
Open the IconPackager 10 configuration window and you’ll immediately see all the icon packs that you currently have installed. Scroll through the list at the bottom of the window to see all of them, then select any of them and click the preview button to see a larger preview of the icons. When you are ready to apply, just click ‘Apply icons to my desktop’. If you want to go back to the default Windows icons, just select that and apply.
![]()
Changing the Icons Colors
A cool feature in IconPackager 10 is the ability to change icon colors. Click the "Colors" section in the IconPackager configuration and you’ll be presented with a variety of options. Use the sliders to change the color and you’ll be able to preview the changes right from the preview window. When you're satisfied with your choice, just hit "apply" again and they will be applied to your PC.
![]()
Changing Individual Icons
If you want to just change individual icons, then click the Customize section in the IconPackager configuration. Here, you will see all of your icons. Double-clicking one will launch a new window that allows you to change that specific icon. When you’re done, hit "apply."
![]()
IconPackager 10 is individually available for your Windows PC, but you can get that and more with a low-cost membership to Object Desktop. While you're a member, you'll get free updates, access to all betas, and any new apps for one year. You’ll also get access to other great programs like Start10, DeskScapes, WindowBlinds, Multiplicity, and many more!
Visit the Object Desktop site for more information.
3 Tips for using WindowBlinds
Tuesday, October 17, 2017 by Island Dog | Discussion: OS Customization
WindowBlinds allows you to change the complete look and feel of Windows by applying skins to the user interface. This popular app includes several great looking skins, plus you can download thousands more on WinCustomize.com.
I wanted to share a few tips for using WindowBlinds, especially for those who are new to it!
Use WindowBlinds with Start10 for a complete customization experience
If you're a Windows 10 user and want the Start menu to be skinned, then you will need to get Start10. Start10 is a Windows Start menu alternative and, when used with WindowBlinds, it will let you skin your Start menu.

Modify a skin within WindowBlinds
There are tons of great skins that you can download and use with WindowBlinds, but sometimes you might want to customize it even further. WindowBlinds allows you to modify a skin by adjusting the color, transparency, texture, and fonts used in the skin. When you select a skin, just click ‘Modify style’ and you’ll be able to adjust all those options to your liking. If you find a color and texture you like, you can also save that as a preset.

Manage and apply wallpapers
Not only can you apply skins, but WindowBlinds can also manage and apply your wallpapers. In the WindowBlinds configuration screen, click 'Wallpapers' and you will see the wallpapers on your PC. You can apply them by double-clicking. If you click the ‘Settings’ button, you have options to set wallpapers to change at certain times or events.

Learn more about WindowBlinds here.
WindowBlinds is also available as part of the low-cost membership to Object Desktop. While you're a member, you'll get free updates, access to all betas, and any new apps for one year. You’ll also get access to other great apps such as Start10, DeskScapes, Fences, Multiplicity, and many more! Learn more about Object Desktop here.
How to Customize Windows 10
Wednesday, October 11, 2017 by Island Dog | Discussion: OS Customization
Most of us use Windows 10 on our desktops, laptops, and tablet devices these days. Did you know that there are a ton of ways that you can customize Windows 10 to style it how you want and also make it easier to work with? I wanted to create a guide to customizing Windows 10 using Stardock software and the best skins, themes, and wallpapers that you can find on WinCustomize.com.
Use a custom theme with WindowBlinds
One of our most popular desktop customization apps is WindowBlinds. It lets you completely change the look and feel of your Windows desktop by applying skins to the user interface. These skins can change the start menu, window frames, taskbar, and much more. Thousands of skins are available to download from WinCustomize.com in a variety of styles and colors. They can also be customized further by adjusting transparency, applying different colors and textures, etc.
If you are using Start10 , then WindowBlinds will also change the Start menu to match the rest of the skin.
Add animated wallpapers with DeskScapes
DeskScapes gives you the ability to have custom animated wallpapers right on your desktop. Not only does it apply both animated and static wallpapers, it also has over 40 special effects that can be applied to them. Wallpapers can also be customized with animations, while animated wallpapers can be used as a screensaver. You can download dozens of options or even create your own from pictures or video!

Customize the Start menu with Start10
Start10 gives you the features and customization options to make the Windows 10 Start menu look and function like you want it to. Choose from a Windows 7 or Windows 10 style menu, or pick the Modern style to combine the best of both. Start10 also lets you maintain the "All Programs" folder metaphor, filter searches in the Start menu, and even integrates with Stardock Fences, another popular desktop application. You can also customize its transparency, coloring, texture, custom start buttons, and more!
Organize your desktop with Fences
Fences is designed to organize your desktop icons to help reduce clutter and allow you to sort icons for easy and quick access. You can create and label “fences” for your icons and folders, which then can be moved around and placed on your desktop however you like. You can adjust the size and shape of the fences to fit your needs, create rules to sort your icons and shortcuts, customize the color and transparency of the fences, and much more.
You can even create folder portals, which gives you easy access to frequently used folders without having to search around for them. Fences can also be rolled up (so that you just see the title bars) to create an even cleaner looking desktop.
Animate windows with WindowFX
WindowFX enhances your Windows desktop experience by adding over 30 animated effects to your desktop windows. There are even some (over 20!) that can be added to your Start menu. These animations can be applied to things like the opening and closing of windows, moving windows, and much more.
Additional features include the ability to automatically resize windows, hide labels on desktop icons, and use a focus feature to highlight open windows.
View and manage your running applications with Tiles
You can increase your productivity by adding Tiles to your desktop. Tiles lets you easily view and manage the running applications with a customizable sidebar that can be configured a variety of ways. Use pages for different classes of windows, and even drag applications to the bar to add them as shortcuts. Tiles is also skinnable and includes several themes and more can be downloaded from WinCustomize.com.

Add custom drop shadows
ShadowFX lets you add custom drop shadows to Windows 10. You can choose from a variety of pre-made shadows, or you can design and use your own. You can also download additional shadows from WinCustomize.com. ShadowFX is great to use when you have windows stacked on each other, since it helps you distinguish between the windows.
Change your desktop icons with IconPackager
There’s really nothing more plain than the default icons in Windows. However, they're easily changed with just a few clicks using IconPackager. Instead of changing icons one by one, IconPackager uses an entire package of icons to change nearly every one at the click of a button. Of course, you can change icons individually, but there are thousands of icon packs available that can apply a matching set across your entire Windows PC. These bundled packs of custom icons can also be customized and recolored from within IconPackager.

All of these applications are individually available for your Windows PC, but you can get them all (and more!) with a low-cost membership to Object Desktop. While you're a member, you'll get free updates, access to all betas, and any new apps for one year. In addition to the apps listed above, Object Desktop suite includes:
- Multiplicity
- SpaceMonger
- Launch
- and more!
Visit the Object Desktop site for more information!
Wincustomize Download Guide
Need help with something you downloaded? Try here!
Tuesday, September 26, 2017 by Island Dog | Discussion: OS Customization
WinCustomize has a wide variety of skins and themes for nearly every aspect of your Windows operating system. From animated wallpaper for DeskScapes all the way to skins for WindowBlinds, from cursor themes to icon packs, we are the site for finding the best themes to use with your Stardock applications. Since we have a massive amount of available downloads, we've created a guide that explains what software is needed (if any) in order to use these great skins and themes.
I’d also recommend subscribing to WinCustomize. Once you become a subscriber, you'll have access to unlimited downloads, ad-free browsing, and discounts on Master skin purchases.
Become a WinCustomize subscriber here.
Galleries
When you want to browse the galleries on WinCustomize, the "explore" button on the site is the best place to start. Clicking here will take you to an overview of our featured galleries, which showcase the most popular categories on the site. You can also get a list of the galleries by hovering over the "explore" button. If you're a WinCustomize subscriber, you can customize this menu to show only the galleries you want to see.
When you click to view a gallery in WinCustomize, the gallery you select will have a description telling you which software (if any) you need in order to use that particular download. The screenshot below highlights the description area.

In the screenshot above, we’re looking at the WindowBlinds gallery. It gives you a brief description of the software and links to the product page required for that download. If you don’t already have that application, you can download the free trial from its site. If you are interested in customization and productivity for your desktop, I would recommend checking out Object Desktop. This is our suite of over a dozen desktop applications. You can see the benefits of being a member here.
To download a skin, just click the Download button on an individual skin page. If it is an item that requires the use of an application then read more about that below.
Software
While we have a variety of downloads available on WinCustomize, these are some of the most popular applications that users come to download skins and themes for. Click the links to find out more information about the product and to download a free trial.
- wba - Windowblinds
- dream - DeskScapes
- cursorfx - CursorFX
- .iptheme - IconPackager
- .dockzip - ObjectDock
Many other downloads will be contained in a .zip file, which you will need to extract once downloaded.
Master skins
WinCustomize creators who have reached the rank of Master are able to sell their skins on WinCustomize. These premium skins are available to purchase, but if you are a WinCustomize Subscriber then you will get a 20% discount on the purchase of these skins. When browsing the galleries, Master skins will have a special badge indicating they are from a Master skinner. You can also use the filters in the galleries to only show Master skins.

Tutorials and community help
For a list of tutorials on how to use many of the Stardock apps, see here. If you have questions about the downloads on WinCustomize, or just want to come chat with the rest of our great community, be sure stop by and visit our community forums here.
WindowBlinds 10 Walkthrough: Changing your Desktop Theme
Wednesday, January 18, 2017 by Island Dog | Discussion: OS Customization
WindowBlinds 10 gives Windows users the ability to change the look and feel of the desktop by applying custom skins to the user interface. There are thousands of skins available to create a truly custom feel. WindowBlinds has an interface that is very easy to use, but I wanted to go over the basics of the app and how to get started with changing your desktop theme.
Get WindowBlinds here.
WindowBlinds Overview
When you first open WindowBlinds, the main ‘Style’ configuration screen will pop up. Here you’ll see the main window which displays all of your installed WindowBlinds skins. On the left side you have links to other features in WindowBlinds such as wallpaper management and settings. Clicking the WinCustomize logo at the bottom will take you directly to the WindowBlinds skin gallery where you can browse and download thousands of skins to use.

Applying a desktop skin
WindowBlinds includes several skins that you can immediately start using. If you don't find anything you like in the defaults, you can download more at WinCustomize.com. To install a skin that you've downloaded, just double-click the .wba file and it will automatically install into WindowBlinds. Click any skin in the WindowBlinds window and you’ll get a preview of the skin with additional options shown at the top of the WindowBlinds window. These options include the ability to color the skin, adjust transparency, apply textures, and more.
Some skins will have a substyle that can be chosen by using the drop-down menu. Substyles are the same skin, but with different options such as different color options or substyles that are made for a particular version of Windows.

Once you have selected the skin you want to use, either double-click the WindowBlinds window or select ‘apply style to desktop’ to apply the skin. You desktop should now be skinned!
Examples of WindowBlinds skins:
 |
 |
Wallpapers
Another cool feature in WindowBlinds is being able to manage your desktop wallpaper right from the app. In the wallpaper section you’ll see all your specified wallpapers in one place. Click the setting button and choose wallpaper locations. Here you can tell WindowBlinds where to look for your wallpapers so they’ll be included.

Once you have your folder locations setup, you can easily browse through your wallpaper collections and apply them by double-clicking or hitting the apply button.

WindowBlinds Settings
Here you will find all the settings that you can adjust in WindowBlinds. I won’t go into much of what these do, but if you need to adjust any settings or set specific app-specific settings this is where you will be able to do that.

So that was just a basic overview of the WindowBlinds configuration and how to apply a skin and wallpaper to your desktop. This should help any new users get started, and be sure to check back for more articles as we will take a look more at some of the features in WindowBlinds.
Learn more about WindowBlinds here.
Creating Shadows for ShadowFX
Wednesday, September 17, 2014 by Island Dog | Discussion: OS Customization
ShadowFX is the newest desktop customization app from Stardock that gives you the ability to add drop shadows to your windows in Windows 8. It’s very easy to use, just select which shadow you want from the drop-down list, and you’re good to go.
ShadowFX is also easy to customize, and making your own shadows is very simple. You can create your own shadows to use for yourself, and you can submit them and share with others on WinCustomize.com.
Learn more about ShadowFX | Get ShadowFX for just $4.99

There’s only a few files needed to put your own shadow together. Most of them are the actual graphics files and one is the theme.sfx file. I recommend taking a look at the default skin directory and see the files that are included for yourself. The default directory should be here: C:\Program Files (x86)\Stardock\ShadowFX\skins\skins
The four graphic files needed are for the left, right, top, and bottom shadows. Each image you create should have an active/inactive state. The theme.sfx file (open with a text editor), lets you define the parameters of the shadow. Here you can define things like the shadow name, image names, and image offsets.

Once have everything together in a folder, you can make a .zip file from that and rename it as a .shadowfxtheme file so it will install to ShadowFX when double-clicked. That covers the basics of creating your very own shadows for ShadowFX, and be sure to share your shadows with others on WinCustomize.com.
Customize Your Windows Desktop With These $10 Apps
Friday, March 14, 2014 by Island Dog | Discussion: OS Customization
The ability to customize your Windows desktop has been around for quite some time now, and there's never been a better time to jump in and start making Windows look and work how you want it to. We've previously talked about how Stardock has several $5 apps to make Windows 8 more usable, and today we're going to take it a step further with some other customization and enhancement apps that are just $10.
Lets take a look at some of the best and most popular desktop customization apps that you can use to completely change the look and feel of Windows 8 and Windows 7.
WindowBlinds
WindowBlinds is the flagship application in the Object Desktop suite, and has been downloaded more than 18 million times on Download.com alone. WindowBlinds lets Windows users change the entire look of Windows by applying skins to the user interface. There are thousands available for download on sites like WinCustomize.com which offers a huge variety of skins in just about every color and design you could possibly imagine.
Users can even customize skins further by applying colors, textures, and by adjusting the transparency of different parts of the user interface. If you are using Windows 8 and the popular Start8 application to bring back the start menu, then WindowBlinds will also skin the start menu to match the rest of the skin.
TIP: Object Desktop includes all the apps we talked about today.
Get WindowBlinds for just $9.99.
![preview-1-7998[1]](https://draginol.stardock.net/images/islanddog/3d81fd7d50bf_EDDD/preview-1-79981.jpg "preview-1-7998[1]")
Skin: GlassMaxX14 by basj
DeskScapes
DeskScapes is another popular app, and it also goes along perfectly with other apps such as WindowBlinds. DeskScapes brings animation to your desktop by using videos and animated pictures as your desktop background. You can also customize your own background wallpaper with effects, and also includes support for multiple monitors.
TIP: Create your own animated wallpapers with the DreamMaker app included with DeskScapes.

WindowFX
WindowFX is a another cool product that really enhances your desktop experience by adding over 30 animated effects to your desktop windows and over 20 that can be added to your start menu. Animations can be applied to such things like open and closing windows, moving windows, and more.
Other features including the ability to automatically resize windows, hide labels on desktop icons, and use a focus feature to highlight open windows.
TIP: Many of the animations can be configured with different animation styles
