


This Week in Skinning - June 15th
Skin Roundup for 6-15-07
Friday, June 15, 2007 by Island Dog | Discussion: Community
Last week was a pretty good week, but still lacking in some areas, so I hope this week is an improvement. Some people will take a "break" during the summer, and some seem to have even more skinning projects planned, so what is your plan for this summer? Are you going to take a little break, or are you going to keep going and submit great skins throughout the summer?
If you have any projects you are currently working, be sure to drop a teaser in the "what are you working on" thread to give us a peek at what's coming up.
Now for the picks!
Space shrink in DesktopX Widgets
By
bilbo1930

This "combo" widget has things such as a weather display, calendar, and meters all with some great animations. Very nice.
RED in Dreams
By
KnowTheFuture

This Dream is using vector graphics and has come up with a very interesting
effect. Be sure to download this one.
Brass and Glass Tiles in ObjectDock
By
Cavan1

I always enjoy seeing new dock backgrounds, and Cavan1 brings us a great set
with a brass look.
Dragonology 4 in Wallpapers
By
vlad

He said he couldn't describe it, and neither can I. I can tell you it's a great wallpaper and that you should download it and see for yourself.

This is a great, clean skin for Xion. The best part is it comes in six different colors which will match a variety of themes.
Great work everyone! Be sure to check out the others skins made by these artists, and leave a comment on their works. See you next week!
WinCustomize: Private Message / E-Mail Features
Send a message to someone!
Thursday, June 14, 2007 by Island Dog | Discussion: Community
If you are a regular forum user on WinCustomize.com then you are probably aware of the e-mail and PM (private message) system we have, or you might not have paid it much attention before. These features, especially the PM system, have been long awaited and requested for a while, so I wanted to give a quick tour on how to use these features for new users, or our "regulars" who maybe didn't notice the changes.
We have many, and I mean many members who use the forums on WinCustomize, and maybe you want to send a message to someone without broadcasting it to the rest of the forums. Using the PM and e-mail feature is also great for reporting possible rips to admins and moderators, along with any other issues that you might need to contact a moderator about.
Towards the bottom of each forum category there is a list of moderators for that section of forums with options to send e-mail and PM's. WinCustomize moderators will typically have a WC moderator logo attached to their posts, and a representative of Stardock will have a Stardock logo on theirs.
To send a message to anyone on the forums, simply click their username and a drop-down menu should appear giving you a list of options where you can view their profile, e-mail, or PM the user.
Note: Members can disable receiving messages and e-mails through the settings in "my account" in the forums.
Clicking the e-mail / PM option will bring you to an editor where you can compose and send your message to the selected user. When you receive a new PM, you will see an "alert" at the top of the forums notifying you of a new message. If someone sends you an e-mail from the forums you will just receive the e-mail to your registered e-mail account, and the person sending the message will not see the actual e-mail address it was sent to. Your message inbox on the forums can be accessed by clicking "private messages" in the forum summary area near the top of the forums.
|
|
|


It's a great way to contact other members on WinCustomize, especially for people who are wanting to contact other skinners for permissions. Be sure to check it out and always feel free to drop me a PM.
Subscribe To Our YouTube Channel
And Desktop Customization Group
Friday, June 8, 2007 by Island Dog | Discussion: Community
Another cool feature of YouTube is the ability to setup a group where users can share and discuss videos they have uploaded. I have setup a desktop customization group where people have started to share their desktop videos, especially ones with animated wallpapers.
Stop by our YouTube channel and subscribe, and also join our group (click "groups" on our channel page). By subscribing you will get updates with the latest videos we post. I would really like to see some people upload their desktop videos and post them. It takes posting "screenshots" to a whole new level.
This Week in Skinning - June 8th
Skin Roundup for 6-8-07
Friday, June 8, 2007 by Island Dog | Discussion: Community
Happy Friday everyone! Well it has been an exciting week here at
WinCustomize. A
new gallery
was added for the Xion media player, and we had the release of
LogonStudio Vista,
and both seem to be getting a great amount of submissions.
Now for this weeks picks!
Oxidized Tabs & Side Docks for ObjectDock
By
WebGizmos

WebGizmos is at it again, and this time with a set of docks for the Oxidized suite. Great job.
Creative Suite 3 icon set for ObjectDock
By
patrick24

A fantastic set of icons to replace the default Adobe Creative Suite icons.
Side to Side in Wallpapers
By
Richard Mohler

A beautiful abstract wallpaper once again from Richard Mohler. Very nice work.
Knot Vista for Xion for Xion
By
I.R. Brainiac

Well the first Xion skin at WC is certainly a great one. This was made to match an upcoming premium WB in which I can't wait to see.
Green Lantern v1.0 in WindowBlinds
By
unclerob

Another fan art skin by unclerob, this time we have the Green Lantern. Great skin whether you are a Green Lantern fan or not.
Don't forget to give us a sneak peek of anything you are working on in our "what are you working on" thread in the forums. I'm hoping to see some really great submission this summer, and so far we are off to a great start. See you next week!
Changing the Vista Logon Screen
LogonStudio Vista walkthrough
Thursday, June 7, 2007 by Island Dog | Discussion: Vista Customization
For years LogonStudio has been the easiest and best way to change your default Windows XP logon screens. Windows Vista has been out for a while now and if you are like me, I have grown quite tired of the default logon. Well LogonStudio Vista is now available, and it makes the Vista logon screen just as easy to change.
You can use any of the logon screens that are included with LogonStudio Vista, or you can download one of many already available at the LogonStudio library on WinCustomize. You also have the option to create your own logon screen and share it with the community if you choose.
Lets take a tour through LogonStudio Vista to show you how simple it is to apply, create, and upload Vista logon screens.
The first thing you will need to do is get LogonStudio Vista. It's a free download from it's website (and the XP version), or if you are a subscriber to Object Desktop then you can download it through Stardock Central. Once it's installed, start the application and you should be at the configuration screen.

LogonStudio Vista
To change your logon screen just select the one you want to use and hit apply. That's it, you new logon screen will apply. If you want to revert back to the default one, just select "Windows Vista default" and hit apply again. If you want to download more logons just hit the "Download" button and it will take you directly to the LogonStudio Vista gallery on WinCustomize.

Creating new logon
Creating a new logon for your own use, or to share with the community is just as easy. Just click "Create", and choose the browse button to navigate to the image you want to use as a logon, enter the name of the logon and author and press "save". Your new logon is complete! Another way is to just drag the image you want into the LogonStudio window, either way it's very easy to do.
If you wish to share your logon with others, then clicking the "Upload" button will take you directly to the upload page for the Logon gallery at WinCustomize.com. Remember if you share with the community, your work must be your own or have the permission from the original author if you are using someone else's images.
For more information and download links, visit the LogonStudio website.
-
LogonStudio Vista
Learning DX Step-By-Step - #11
Animation Station
Wednesday, June 6, 2007 by RomanDA | Discussion: DesktopX Tutorials

 |
|
| Step-by-Step Tutorials |
#11 - Animation |
|
A series by RomanDA |
|
Listing of other DX Tutorials:
Click here
Today's Lesson: "Animation"
Ok, So.. I lied. Well I
didn't Lie, I really was done, but this one was really simple and I saw some
people asking about this, and I had just finished making just this thing.
I figured why not.
So call it a bonus for me becoming a Master.. or call it, I was bored.
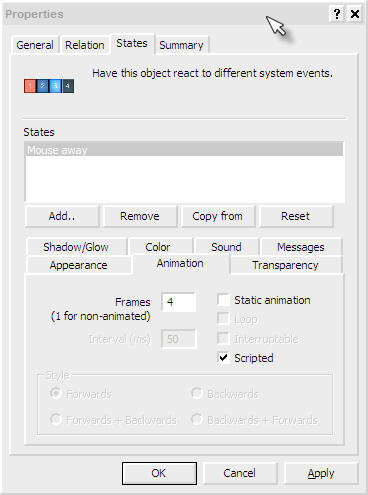
We will be Using the SCRIPTED Animation check you have seen in the Object "Animation" tab.
For this and all the Step-By-Step DX Tutorials you will need to purchase DesktopX for $14.95 from Stardock.
Lets get started.
STEP 1 - Create the objects
We are going to make a single object here, but its more complicated then normal.
First thing you have to do is make a PNG that has multiple images inside it. There are a LOT of ways to make this kind of PNG.
I have used FLASH to export a
series of images, then they all need to be complied into one image.
Like this:
![]()
The trick with the frames
(objects) in this kind of image is that the need to be EXACTLY The same size,
and they have to be spaced EXACTLY the same as well.
In this case the image has 4 frames, I numbered them for you so you will be able
to see the animation in action.
Create a NEW object, call it
"TEST" or whatever.
You can (save-as) the above image, and use it for testing. The Catch here
is make sure you change the ANIMATION TAB in the STATES tab of the properties to
show:
(4) Frames, and SCRIPTED is checked.
STEP 2 - Moving Ahead - Add a Script
Create a SCRIPT on the object we just created.
| ANIMATION Code | |
Function Object_OnLButtonUp(x, y, Dragged) |
|
Lets look at the above script.
First we use the same function we use all the time to handle click:
| ANIMATION Code | |
Function Object_OnLButtonUp(x, y, Dragged) |
|
Here is the main part of the
script. The script looks at the object to see what its Current Frame is.
CurFrame = object.CurrentFrame + 1
This is based on 0-3 not 1-4, even though there are 4 frames in the
animation. We START at 0 not 1!!!!
Then we check to see if CurFrame
its less than < the max number of frames (4 frames of animation).
If so, then we make the current frame the new CurFrame.
Or else the object's CurrentFrame is set to 0 (the first frame of the animation).
| ANIMATION Code | |
CurFrame = object.CurrentFrame + 1 |
|
CONCLUSION
So, that's about it. you
click on the object, and it changes the current frame up 1 each time till it
gets to the last frame, then it goes back to 0.
I used this in something I'm working on right now.
I hope you took the time to enter the code (not just copy/pasted the entire thing) so you could work thru the tutorial step-by-step and see how things work.
This one was very simple, but I know I didn't know how to use this till I had to, so I hope it helps everyone out.
This REALLY will be my last tutorial for a while. I hope you have enjoyed this step into DX.
|
Enjoy, RomanDA AKA: David A. Roman http://romanda.wincustomize.com |
This Week in Skinning - June 1st
Skin Roundup for 6-1-07
Friday, June 1, 2007 by Island Dog | Discussion: Community
A new month is here, but now it's time to take a look at back at the week and see some of the skins that you might have missed. Being that it's a new month that also means the new edition of "This Month in Dreams" is out. You can find that feature here.
May was a great month for submissions, so let's make sure June is just as great. Now on to the picks!
Pirates for CursorXP
By Artur Berk

Artur has created another awesome cursor, this time with a pirates touch. Great work.
Vienna in DesktopX Themes
By gef

This DX theme is based off the WindowBlinds skin by vStyler. It comes with a variety of objects. Be sure to download this one.
Spout for Dreams
By TheMasterBaron

I really like this dreams as the "water" appears to stick to your screen for a moment. Very nice work.
Q's Varient X2 in Wallpapers
By Qx9

This is a very cool looking abstract wallpaper. This is one you definitely want to download and check out.
Athena in WindowBlinds
By vStyler

Another port from vStyler of a very clean and usable skin. Be sure to download this one, you won't be disappointed.
Well May seemed to be a great month for skins, and this week was a great end to the month. Remember to keep the community updated with the things you are working on by posting teasers in the "what are you working on" thread in the forums. See you next week!
Animated Wallpapers: This Month in Dreams - May '07
Dream.WinCustomize.Com
Thursday, May 31, 2007 by Island Dog | Discussion: Animated Wallpapers
The end of this month snuck up real fast, but I did not forget about "This Month in Dreams". This was another month of some fantastic submissions, and some of the creators are pumping out dream after dream. Just as it gets hard to pick weekly skins, it's just about as difficult to select Dreams every month.
This Month in Dreams - May '07
The dreams in this months edition are:
- ATI Ruby
- High-Tech
- Orange Tube
- Star Destroyer Convoy
- Falling Rain
- Living Blue Wallpaper
- Shark Pit
- Spout
- Desktop Collage
Another dream I wanted to feature this month was Necromancy: Inferno. Due to a strange codec problem I was unable to include it in this months video, but be sure to check it out.
To use these animated wallpapers you need Windows Vista Ultimate, and Stardock DeskScapes. For the free DeskScapes download and more dreams, visit:
Learning DX Step-By-Step - #10
Hide & Seek
Thursday, May 31, 2007 by RomanDA | Discussion: DesktopX Tutorials
|
|
|
| Step-by-Step Tutorials |
#10 - Hide & Seek |
|
A series by RomanDA |
|
Listing of other DX Tutorials:
Click here
Today's Lesson: "Hide & Seek"
This will be the last in this series
of Tutorials. I hope you have enjoyed them, and managed to get something out of
them.
In this lesson we will do some basic DX operations on one object from another.
We will cover the following:
- HIDE/SHOW one object by clicking on another
- SLIDE/HIDE one object by clicking on another
- EXPAND/SHRINK one object by clicking on another
For this and all the Step-By-Step DX Tutorials you will need to purchase DesktopX for $14.95 from Stardock.
Lets get started.
STEP 1 - Create the objects
For this tutorial we will be using 3 objects: (right click and SAVE the images to your pc)
| Mask |
|
| Button |
|
| Target |
 |
- Create 3 objects. (look at the old tutorials for info on how to do this)
- Create an object called Mask
- width: 260
- height: 90
- Group Tutorial10
- Widget Tutorial10
- NOTE: we will later change the transparency to 0, but for now we want to see how the mask makes things work.
- Create an object called Target
- Make its PARENT object MASK
- place it at 0,0 for top/left.
- Group Tutorial10
- Widget Tutorial10
- Create an object called Button
- place it above the TARGET/MASK object (like you see in the table above, just above it)
- Widget Tutorial10
- NO GROUP!!!!
- We will make a VERY simple script on Button to hide/show Target.
STEP 2 - Add a simple HIDE/SHOW Script
Add the following script to Button:
| BUTTON Code | |
Function Object_OnLButtonUp(x, y, Dragged) |
|
Lets look at the above script.
Its VERY simple, we look at the Visibility of Target and see if its True
(is it visible), if so, we HIDE it (False), if its Hidden (False) we Show it (True).
| BUTTON Code | |
If desktopx.Object("Target").visible = True Then 'is Target Visible? |
|
That's all there is to it.
SAVE the code.
Click Button to see how it toggles Target on/off.
The MASK will stay there, but that's ok for now, we will play with that NEXT.
Here is what you will see:
| Normal View | CLICKED |
 |
 |
STEP 3 - Sliding Target
Now, lets change things up. Lets make the TARGET SLIDE up into the menu. We do this by making a script that has a few Timers (in order to slow up the sliding).
The script is a modified version of my script I used in another tutorial. The basics are this.
- The
Function Object_OnLButtonUp(x, y, Dragged)is the button being pressed (well released)
Inside here we look at the TOP position of the TARGET.
If the TARGET's top is = 0 this means its being shown and is at the normal position, so we want to HIDE it (Timer 200).
If not then we want to SHOW it (Timer 100).
We kill the timer just to be sure, then we set the correct timer to start. - In the timers we simply look
to see if the top is at 0 or at -90 (shown / hidden).
All we do to HIDE the TARGET is to move it 5 spaces at a time UP - Because we have the TARGET's parent as a MASK it will move up past the Visible area the mask shows, so it will look like its vanishing.
- In the Timer we keep moving it UP until it reaches -90 (the object it 88 pixels tall), then we kill the timer.
- When we click the button again it sees the TARGET.top position is -90 and it SHOWS it by doing the opposite as it does to SHOW it.
- We move it DOWN 5 pixels at a time till its back to 0, with the mask setup it looks like its sliding from nowhere.
- We are using this
Sub Object_OnScriptEnterTo set the initial TARGET position to 0, just so that it shows the menu on startup. If you wanted to have the menu HIDDEN on startup, you would change the 0 to -90
desktopx.Object("Target").top = 0
End Sub
Here is the script to SLIDE the TARGET UP/DOWN: (this code goes in the
BUTTON)
REPLACE the code from the "HIDE/SHOW" above.
| BUTTON Code | |
Sub Object_OnScriptEnter |
|
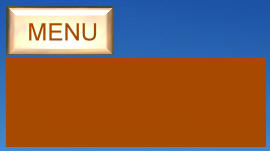
This would end up looking like this (when you click the button it goes UP then DOWN):
To make this look a LOT better you
could go in and make the MASK's transparency = 0 so that its basically invisible.
You can use whatever objects you want, you would only have to change the -90 to
the correct height for the object you want to use.
Again, these are just samples for you to work with.
STEP 3 - Shrinking / Expanding
Ok, so we know how to HIDE/SHOW by clicking the button, and we can make it SLIDE UP and DOWN too. Now lets make the TARGET EXPAND / SHRINK.
To do this we will use some of the same functions as above. Only now we want to not MOVE the TOP, we want to change the WIDTH of the TARGET.
The targets "default" size is: 255x88 What we want it to do is shrink down to 30x88 (so that it EXPANDS out from the left to the right).
One of the things we need to do is
change the ADVANCED settings on the TARGET image.
Click on properties, then States then ADVANCED:
This will make it so the 3d EDGE of the TARGET stays the right width, and the insides kind of Expand.
| BUTTON Code | |
Sub Object_OnScriptEnter |
|
This would end up looking like this
(when you click the button it EXPANDS / SHRINKS):
It wont look exactly like this, the edges should stay and the middle should shrink
(I just dumped this into flash, so its not the same).
In the case of the EXPAND/SHRINK, you do NOT need the MASK, so you could delete that object. I left it here only for reference.
CONCLUSION
I hope you took the time to enter the code (not just copy/pasted the entire thing) so you could work thru the tutorial step-by-step and see how things work.
This tutorial is actually 3 in 1. But they are related, so I wanted to make this last Tutorial a good one.
This will be my last tutorial for a while. I hope you have enjoyed this step into DX.
|
Enjoy, RomanDA AKA: David A. Roman http://romanda.wincustomize.com |
Creating 'Shell Animations' for SkinStudio Part 3
Creating AVI animations in Flash tutorial Part 3
Monday, May 28, 2007 by Life is a Game | Discussion: WindowBlinds Tutorials
In this part I will show you how to use the ‘Explode’ effect that is ideal to use for the ‘Empty Bin’ and ‘Permanent Delete’ animations. To get started either open the source file with which you ended up at the end of Part 2 or click here WWW Link to download it.
------------------------------------
STEP 1
First we need to delete the right folder as we don’t need it in this tutorial. To do this select the ‘Selection Tool’ and select the folder (1) and press key ‘Delete’ on your keyboard.

------------------------------------
STEP 2
Next we need to remove the second half of the animation as we will replace it later on with the 'Explode' effect. Click on the last keyframe (1) and press 'Shift+F6' to remove it.

------------------------------------
STEP 3
Now we need to remove the 'Motion Tween' of the second half of the animation. First click on the frame next to the middle keyframe and press 'F6' to create new keyframe (1) and then right-click on it and select 'Remove Tween' (2) from the drop-down menu. We needed to remove the tween because the 'Explode' effect can't be applied properly on the 'Motion Tween'.

------------------------------------
STEP 4
Now the fun begins. Right-click on the object you wish to 'Explode' (LOL) and select Timeline Effects>Effects>Explode (2) from the drop-down menu.

------------------------------------
STEP 5
After completing STEP 4 an 'Explode' window opens. I suggest you to try-out different settings until you get the desired effect. I used the below settings for this tutorial. First select the duration of the 'Explode Animation' you want (1). After that set the direction (2) in which the explode fragments should move to after the explosion. Next are Arc Size (3) and Rotate Fragments by (4). As I wanted that my fragments don't fly around too much I set them both to 20. The higher you set these numbers the bigger the explosion. Finally set the size change of your fragments if you wish to do so (5) and the final alpha of your animation (6). You should just leave it on 0% as this will make all the fragments disappear. When you set all the settings click the 'Update Preview' button (7) to see your animation. Please note that every time you change a setting you will need to hit this button to see the changes. Once happy with the explosion hit 'OK' to insert it into your flash document. You will probably need to wait a few seconds so please be patient.

------------------------------------
STEP 6
The final step you need to do is set that the explosion plays only once in case you still have some extra frames after it so it will not loop. In 'Properties' (1) tab click on the 'Loop' and select 'Play Once' (2) from the drop-down menu.
------------------------------------
Press CTRL+ENTER to preview the animation and if happy with it export it to AVI as described in Part 1. WWW Link

------------------------------------
This part completes the tutorials that you will need to create all the 'Shell Animations' so now you are ready to create stunning animations. You can download the final source file here WWW Link. Please post in comments your final results or if you have any further questions. Good luck!