IconPackager 5 Guided Tour
Wednesday, November 18, 2009 by Frogboy | Discussion: OS Customization
IconPackager is a program that allows users to change all their Windows icons by applying themes of icons contained in an “icon package”. There are thousands of icon packages available on the Internet to choose from.
What’s new in IconPackager 5 over IconPackager 4
- Supports Windows 7 and Windows 7 specific icons
- Optionally will restart Explorer to update live folder icons
- Can now be set to apply only specific icons in a package
- Performance improvements in applying
IconPackager explained with screenshots
![]()
Choose amongst hundreds of icon packages to apply to Windows XP, Windows Vista, or Windows 7
![]()
When selecting an icon package, you can easily see which icons are in the package.
![]()
Mix and match different folder styles from different icon packages.
![]()
Making your own icon package is a snap, just select the icon you want to change and choose a different icon for it.
![]()
IconPackager supports changing colors and even stylizing the icons you have.
![]()
Got a program whose icon you’d like to change? IconPackager adds an “icon” tab to virtually any type of file on your computer making it easy to change any individual icon too.
Video Demo
This Week in Skinning - November 13th
Skin Roundup for 11-13-09
Friday, November 13, 2009 by Island Dog | Discussion: OS Customization
![]()
I hope everyone had a great week, and have an even better weekend that is quickly approaching. This week in skinning news we had a big release of DeskScapes 3 which bring animated wallpapers to Windows 7, and of course continues with Vista and XP. If you don’t already have DeskScapes through Object Desktop, it’s on sale this weekend only for $14.95.
If you are a WinCustomize Subscriber, be sure to head over to subscriber resources and grab the new premium suite, Yellow.
Now for this weeks picks!
I Love DesktopX: November 2009
...and a special guest!
Friday, November 6, 2009 by sViz | Discussion: OS Customization

It’s time for another edition of I Love DesktopX, showcasing the outstanding DX skins from the month of October. But this time I thought I’d break up the monotony and ask a fellow DX user what his favorite skins were in the past month. I have to say I pretty much agree with all of them.
Who is this mystery DXer, you ask? None other than Wizard1956, who has been a positive and supportive presence in the skinning community at large. So, I’d like to thank him for his time and contribution to this article.
On to Wiz's picks!

Outstanding General Info
Grim Reaper Time by Fairyy~

For my Halloween desktop I used Grim Reaper Time by Fairyy~ . This widget came in two parts and looked terrific with the Halloween 2008 subscriber theme. I especially liked the clock, which had color options and went really well with the wall.
Most Creative
Star Trek Original CPU/MEM Meter 1.02 by Maraudeur

Worthy of note is the Star Trek Original CPU/MEM Meter 1.02 by Marauder. The graphics may not be for everyone, (although I don't know anyone who isn't a fan of Star Trek,) so other styles would be great. It's a bit large and the drop shadow looks overdone but it is certainly a solid attempt at a widget with quad core support along with RAM usage readings for over 2Gb. I would love to see this developed further as this has true potential.
Theme of the Month
Tinted DX by RedneckDude

Barely squeaking into October was RedneckDude's Tinted DX, based on Mirsguy’s excellent Windowblind of the same name.
It's smooth, polished and shiny black. What's not to like? If you like black and blue, this theme's for you. ![]() It has all the usual stuff you expect in a RND theme plus the widget has a slick dropdown media player. The widget doesn't hide but it takes up little space even on my small monitor.
It has all the usual stuff you expect in a RND theme plus the widget has a slick dropdown media player. The widget doesn't hide but it takes up little space even on my small monitor.
The matching weather widget can be found here: Tinted Weather

DX Fans Rejoice
As you may have gathered by now, I love DesktopX, and I want to see it do well. I want to see new users jump in, and the veterans more active again. I want to see new and exciting skins in the galleries. These are refrains I’ve read on the forums over and over again from DX’s loyal fanbase.
Well, at long last there’s some great (official) news for DesktopX! The much anticipated DX4 is coming down the pike along with other upgrades in the Object Desktop suite of programs.
You can usually count on a major update to rekindle some lost enthusiasm. So far we’ve learned the systray is going bye-bye, and we can now r-click on the desktop to create a new object…
Yay? Okay, not exactly ZOMG!!1! worthy news, but here’s hoping, right? While I can’t say I’m not eager to see what’s in store, I am reserving all celebratory dancing until I see the final product…or a beta…or more previews...*nudge* *nudge* ![]()
As evidenced by the What Would You Like to See in DesktopX 4.x thread, there are a lot of issues with the program that need to be addressed—what’s borked needs to be unborked, what’s currently unavailable needs to be made available, and what’s cumbersome needs to be made easier to use.
I don’t know if all that’s gonna get taken care of in the new version, but I’m sure there should be some major bug fixes going on. So, I’m looking forward to a more stable DX that functions as it should. And hey, at the very least, we should get half a dozen different posts showing us all the cool new tricks DX4 can do. The more buzz the better, I say.
The one thing I am crossing my fingers for is a significant improvement in the ‘Getting Started’ area—that means including more sample/template objects and integrated help (anyone notice those help buttons at the upper-right corner of DX windows do absolutely nothing?) Simply, the more people we can get started in DX, the more people we'll have creating those new and interesting skins, and the more the community will benefit.
So, are you excited for DX4 and what do you hope to see in the new version? What do you make of the news you’ve read so far? Sound off below.
Thanks for reading. Thanks again to Wiz for his picks. Until next month, Happy DXing!
This Week in Skinning - November 6th
Skin Roundup for 11-6-09
Friday, November 6, 2009 by Island Dog | Discussion: OS Customization
![]()
After a brief hiatus we are back with TWiS, the best and only weekly guide to the most awesome desktop skins and themes available. The Halloween rush is obviously over, and now we look forward to the biggest skinning “holiday” of the year which is the Christmas and Winter holidays. There are holiday skins already starting to roll in, and there are plenty in the gallery from years past which are still fantastic to use. We also have a big community holiday suite in the works which is looking great.
Now for this weeks picks!
DeskScape Effects are Cool
Tuesday, November 3, 2009 by Island Dog | Discussion: OS Customization
I was playing around with DeskScapes 3 today, and I found myself downloading a bunch of .dreams and applying effects to them just to see how they look.
It’s hard to tell by just a screenshot, but the Motion Blur effect changes the animation of the Christmas Lights to a really neat effect. Try it out!
Applying the Sepia effect makes a big change to this .dream.

Putting the Alien World effect on this already slick .dream really tops it off.
Let me know which effects are your favorites, and which .dreams you like to apply them to. You can get DeskScapes 3 now by subscribing to Object Desktop .
Video: Creating Textures for WindowBlinds
Monday, November 2, 2009 by Island Dog | Discussion: OS Customization
I wrote a tutorial on how to create textures to use in WindowBlinds 7, but I wanted to take a moment to actually show you how easy it is. IN this video, I create and apply a texture to Aero in just over a minute.
Get WindowBlinds 7 now by becoming an Object Desktop subscriber!
Creating and Using Textures in WindowBlinds 7
Thursday, October 22, 2009 by Island Dog | Discussion: OS Customization
You have been hearing a lot about WindowBlinds 7 and textures lately. We have also introduced a new UIS0 skin format, which will allow users to easily modify Aero with textures, colors, etc. Using textures is a great way to modify a skin with a texture of your liking, or to just apply a texture to Aero for a simple and subtle change in the default user interface of Windows.
Now I want to show you how to actually do it!
First you need to have a texture image. You can either create your own, or grab one from images searches from Bing or Google. Just make sure the graphics are yours or have permissions if distributing them. It’s hard to say what a good size is for a image file, but one important tip is to make sure the texture file has good seamless edges if you plan on tiling it throughout the skin.
For this tutorial I found a nice texture image of water. I thought that would be an interesting effect.
Now open the WindowBlinds configuration, select the skin you wish to texture, and click the textures tab at the bottom.
This tab will let you choose from one of the installed textures, and any texture effects you create will also show up here. To create our own effect, select Create effect near the bottom.In this window you will see you have three different areas that you can apply a texture to. The window frame, taskbar, and start menu. You can apply a different texture to each section, or you can use the same for all.
Click Create new. A new window will popup, and you can select a new image file to load, or load a previous image from the File menu.
As you can see, I loaded my water texture image and now you can use the slider to scale the image to your liking. You can also select whether or not to tile the image by checking the box. Once you are happy with your image, go back to the File menu and save it. This will create your new texture and will then be visible in the texture area of WindowBlinds.
 |  |
I selected the water texture for all three areas, and in the screenshots above you can see my newly created texture along side the rest of them. All you have to do now is select it.
I have to admit this water texture came out really nice. If you need to edit the textures or even delete them, those options are available right next to the Create buttons. A new feature in WindowBlinds 7 will allow you to package textures in a .wba file. All you have to do is place your .texture file and image file into .zip, and rename it as an .wba file.
You should now have a good idea on how to create and apply your own textures with WindowBlinds.
Having Fun with WindowBlinds Textures
Tuesday, October 20, 2009 by Island Dog | Discussion: OS Customization
I have been sitting here downloading images and applying them to my favorite WindowBlinds skins, just to see how they look. The results have been fantastic, and staying true to the Fall season and Halloween, I wanted to make some “festive” textures.
You can also preview WindowBlinds 7 by becoming an Object Desktop subscriber. Head over to www.objectdesktop.com for more info!
Windows 7 Themes and Beyond with WindowBlinds
Monday, October 19, 2009 by Island Dog | Discussion: OS Customization
Windows 7 has greatly improved its own theme capabilities, which are far better than you found in Windows XP or Vista. With Windows 7 you can now change the colors of theme, background, sounds, screensaver, etc. and even package those themes for sharing.
I have seen some nice combinations of themes, and it’s such a far departure from the Luna days most of us should remember. Even though the integrated Personalization options have widely grown over time, there are still limitations to be had. If you want to truly customize your desktop, third-party software is what you will need.
Being that the Windows 7 launch is in October, it’s also very close to the release of Object Desktop 2010, which includes huge updates like WindowBlinds 7. If you want to extend your personalization and customization needs beyond what Windows offers, this is what you want.
With WindowBlinds 7 you have many more options and features available for Windows 7.
Some of these include:
- Advanced skinning options
- Adjustable transparency
- Textures
- Re-coloring of skins in real-time
- Changing of Explorer backgrounds
- and much more!
Take a look at my current Windows 7 desktop using a skin created by a community member of WinCustomize.com.

Here is the same desktop with a texture applied to the skin. The customization options are nearly endless!
Creating Hybrid Animated Wallpapers for DeskScapes
Tuesday, October 13, 2009 by Island Dog | Discussion: OS Customization
With DeskScapes 3 just around the corner, you have been hearing a lot about the new hybrid .dream format, which is good because it’s an awesome feature. Basically, it allows you to take static wallpapers and apply animations to it. This gives more people a chance to create animated wallpapers without having to know how to use 3D applications. It’s really easy to create subtle animations without having to render a huge video file, and it uses very little resources. It does take a bit of work to create a hybrid .dream, but it’s well worth any time spent.
What you will need:
- Static wallpaper
- DeskScapes 3
- DreamMaker (included with DeskScapes)
- Animation images or static images
- Notepad, ObjectEdit, etc.
I can’t take you through every step of creating a hybrid .dream, there are just too many variations to explore. However, this guide should give you a general idea of how to create a hybrid .dream. You can find the documentation in the DeskScapes directory (Program Files/Stardock/Object Desktop/DeskScapes), which will give you more options and parameters when writing the .hybrid file.
The .hybrid file is what tells the hybrid .dream how to act basically. It’s going to tell DeskScapes what images to use, how to use it, and the various settings that can be applied. When you first open it up, it might be overwhelming for some, but don’t worry, it’s really easy to figure out and in no time you will have yours ready. The best thing I can recommend is opening the .hybrid files from one of the included Stardock created .dreams and studying it. This will help you a lot.
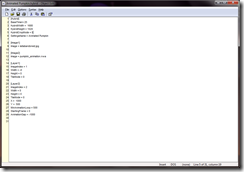
This is what a .hybrid file should look like.
Obviously this will vary depending on your animated wallpaper, but as you see this has the hybrid settings, images, layers, etc. Once again, the description of these functions are explained in the hybrid documentation, but I will cover a few just to get you started.
[Hybrid]
BaseTimer= 25
HybridWidth = 1680
HybridHeight = 1020
HybridCropMode = 0
SettingsName = Animated Pumpkin
[Image1]
Image = isitabandoned.jpg[Image2]
Image = pumpkin_animation.nwa
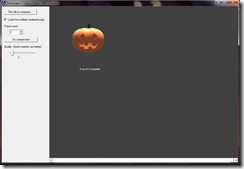
In my sample .dream I have just two images. Image 1 is my static wallpaper and Image 2 is the animation image which has been converted into a .nwa file in SkinStudio. You can use .jpg, or .png files for static images, and animations need to be in the .nwa format. NWA files are compressed animation files often used in WindowBlinds animations. There is also a stand-alone NWA encoder in which you can create .nwa files. In the screenshot below I have a simple two-frame animation of a pumpkin for this example.

Below you can see the definitions for the image layers. You can define up to 50 layers, but here I just have the two layers for my two images. Some example of the parameters you can define are the X and Y coordinates, image size, tile modes, animation settings, etc.
[Layer1]
ImageIndex = 1
Width = -0
Height = 0
TileMode = 0[Layer2]
ImageIndex = 2
Width = 0
Height = 0
TileMode = 0
X = 1000
Y = 500
MinAnimationLoop = 500
StartingFrame = 0
AnimationGap = -1000
Now that we have the basic parameters set for the .hybrid file, it’s time to pull it all together into an actual .dream file for DeskScapes. Gather all your resources and open DreamMaker. In DreamMaker you will need to fill the areas for your name, description, add a thumbnail, etc. After all that is done, open the Dream Contents tab, and select Hybrid Dream. This will give us all the options we need.

Select your .nwa file, then below that add your image resource files, finish up any needed descriptions and hit Create Dream. That should crate the .dream file and place it into the .dream folder and DeskScapes.
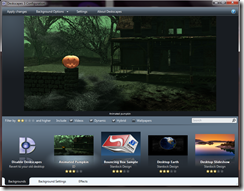
Now you should see your .dream in the DeskScapes window. If you need to make further adjustments to the .hybrid file, as I did to get the pumpkin in the correct position, you can open the extracted .hybrid file and adjust it from there. Just note you will have to repackage it if you intend to share it after that.
I hope this basics tutorial will help you get started creating a hybrid .dream. I have uploaded the example .dream on WinCustomize, so feel free to open it and look at the hybrid file to get a general idea on how it works.
Download – Animated Pumpkin Hybrid Tutorial Dream


