Celebrate St. Patrick's Day with some fun custom skins, dreams, and more from WinCustomize!
These customizations will make you GREEN with envy...see what I did there?
Tuesday, March 13, 2018 by Tatiora | Discussion: Personal Computing
St. Patrick's Day is almost here! I thought I'd celebrate by sharing some of my favorite Dreams, wallpapers, and skins from WinCustomize. There aren't a ton of shamrocks and leprechauns specifically, so I tried to keep the heart of the holiday in my mind as I selected these. You'll see Irish landscapes, a lot of green, and everyone's favorite beverage of choice for St. Patrick's day, too. ![]()
What's better than the ruins of a castle beside the sea? Maybe a fully functional castle beside the sea? Still, the view is marvelous.
Ireland Seaside Castle by rlphwshr
Ah, the forests of the Emerald Isles. This peaceful Dream with drizzling rain is one of my favorites.
Irish Forest by rlphwshr
This skin absolutely... rocks. Okay, yeah, I'll admit that wasn't particularly funny, but at least the skin is cool.
Shamrock (Master Skin) by LightStar
A little bit of old school green flare is in this "magical" skin.
Leprechaun Majik by Vampothika
Of course, I had to include this one. I know too many people who run to the nearest pub on St. Patty's day. Amazing if they can get a seat!
Beer by Klaatu Berada
This skin might make you green with envy. ...yeah, just, uh, check out the skin and ignore my puns. That's what everyone else does.
Lime Green by don5318
Happy St. Patrick's day!
Browse other awesome customizations over at WinCustomize
The Ultimate Customization Apps for your Windows Desktop
Tuesday, February 20, 2018 by Island Dog | Discussion: Personal Computing
For many of us who work with computers all day, it can get a bit boring to look at the same bland desktop all day long. While Windows has made some improvements to the user interface over the years, it's still the same as everyone else's in your home or office. I like to customize things, especially items I use often, and my PC is no exception.
You can customize your desktop as much or as little as you would like with a variety of custom themes and skins found at WinCustomize.com. I wanted to give a quick rundown on how you can make your desktop unique using customization apps available from Stardock.
Change the entire user interface with WindowBlinds
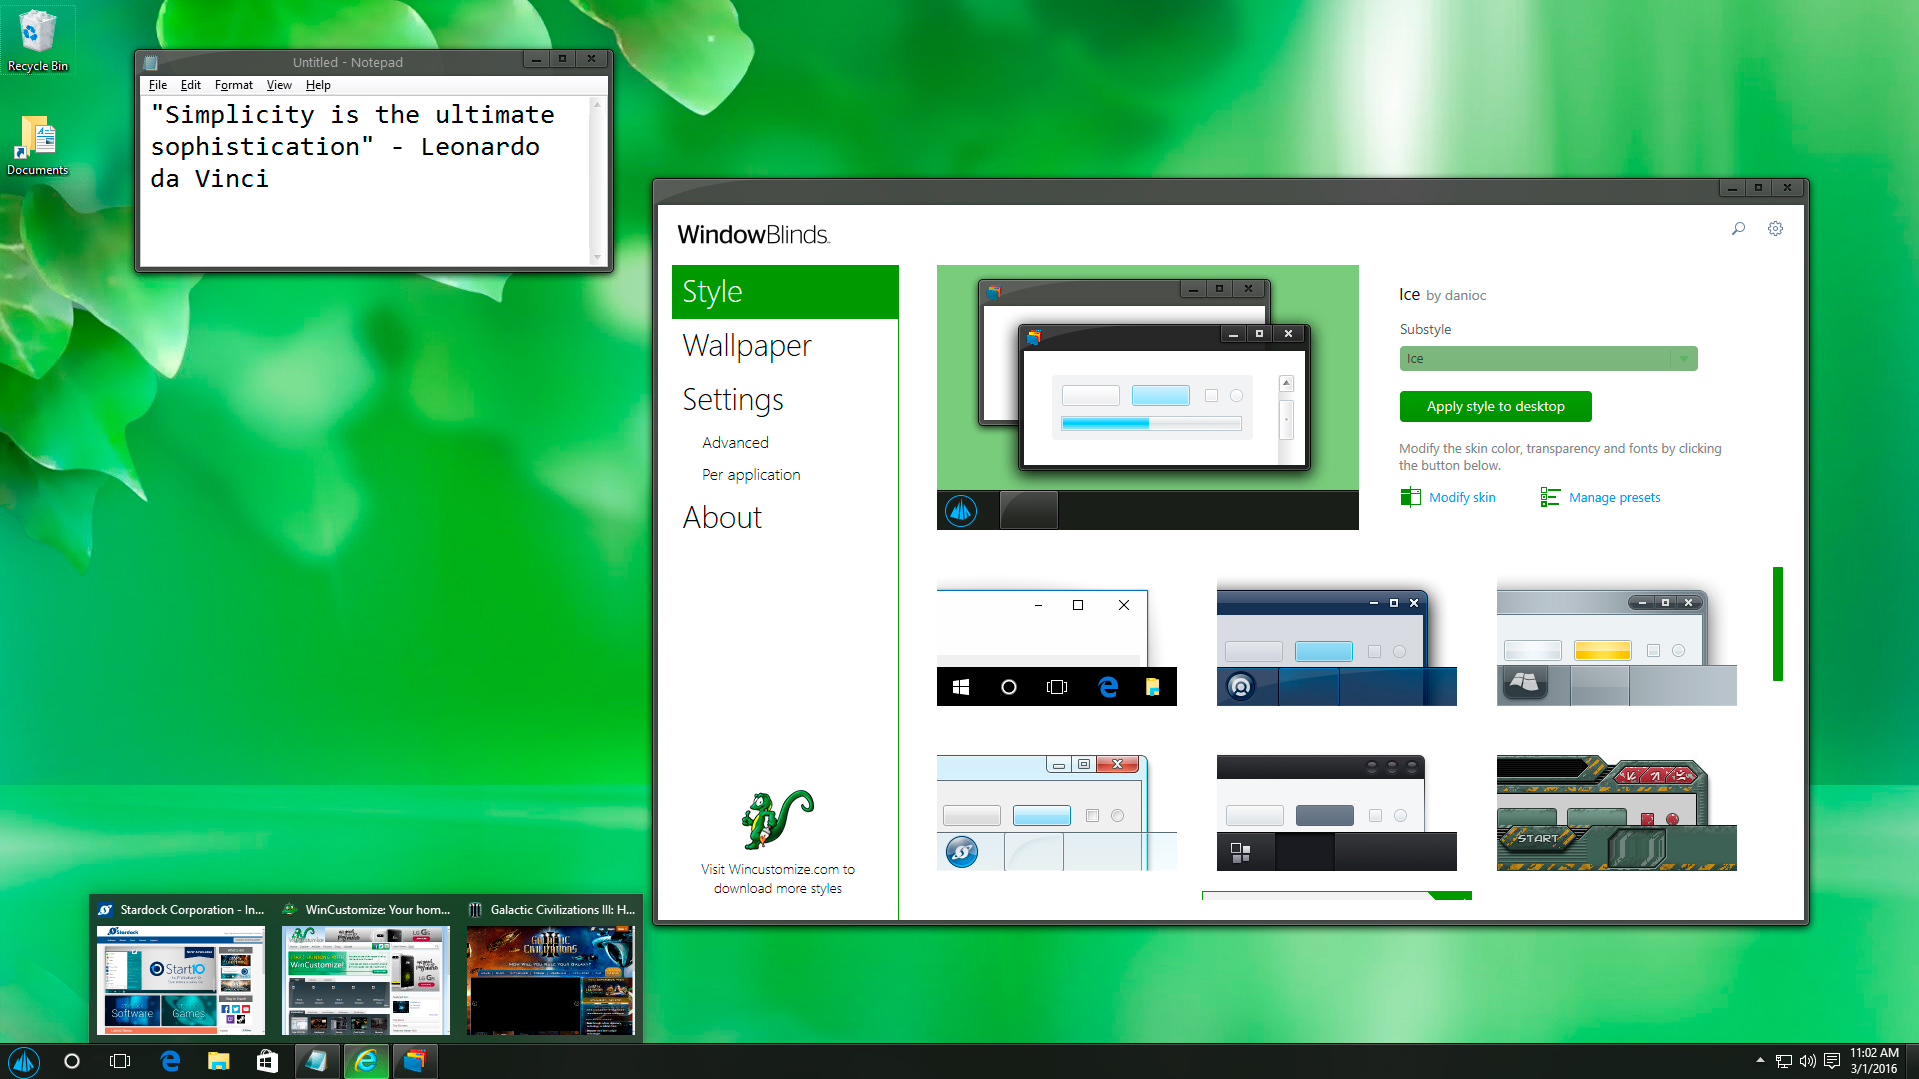
WindowBlinds has been the ultimate customization app for Windows for many years and has been download millions of times. WindowBlinds lets you change the entire user interface to one of the thousands of custom skins that are available on WinCustomize. These skins can be customized further by changing the color, transparency, and texture to suit your style. If you're aWindows 10 user, then using Start10 along with WindowBlinds will also give you the ability to change the Start menu to match the rest of the skin.
Animate your desktop wallpapers with DeskScapes
DeskScapes lets you have cool animated wallpapers right on your desktop. It has over 40 special effects that can be applied to wallpapers in order to take your customization even further. You can apply your images and videos to be the desktop wallpaper and can use any animated wallpaper as your PC screensaver.
Change your desktop icons with IconPackager
Want to change all the icons on your PC at once? IconPackager uses an entire package of icons to change nearly every one at the click of a button. You can also change the icons individually, but there are thousands of icon packs available that can apply a matching set across your entire Windows PC. These bundled packs of custom icons can also be customized and recolored from within IconPackager. This is great for matching the color scheme of other skins you might be using.
All of these applications are individually available for your Windows PC, but you can get them all (and more!) with a low-cost membership to Object Desktop. While you're a member, you'll get free updates, access to all betas, and any new apps for one year. In addition to the apps listed above, Object Desktop suite includes:
- Fences
- Start10
- Multiplicity
- SpaceMonger
- and more!
Visit the Object Desktop site for more information!
Groupy for the Project Manager
Busy doesn't have to mean crazy - our marketing manager shares how Groupy helps her keep organized
Tuesday, February 13, 2018 by Tatiora | Discussion: Personal Computing
Our core marketing team here at Stardock consists of a small group of very dedicated, very busy people. Because of how many products on both the software and game side we handle on a daily basis, an organizational system is absolutely integral to our success.
Katie, our marketing operations manager, is the glue that holds our team together. Because of her diverse skill set, she tackles a lot of different tasks for our team, including keeping all of us and our individual assignments on track!
Because of how much Katie does during her workday, Groupy has become an essential part of keeping her organized. Several simultaneous tasks spread out across 2 computers and 3 monitors was tough to keep track of before (though she managed!), but she’s found that combining her tasks into tabbed groups helps make everything a lot easier to find.
“I keep all of my Adobe programs in one group, explorer windows in another, and then my email, calendars, and Producteev in another,” she told me. Groupy is especially useful for people with fewer monitors, since it cuts down on the space that all of the open windows take on the desktop. Here’s an example of how Katie’s monitors look:
Multiple file explorer windows in a single group makes it easy to keep different files open for easy access without having to click through a bunch of windows. Katie also has her email, calendar, and task management software grouped together on that same monitor.
On her second display, she keeps her web browser tabs together on their own, while keeping Photoshop, premiere and other Adobe products grouped together using Groupy.
Groupy has changed the way a lot of us organize and manage our tasks during our busy days. I don’t have to juggle nearly as much as Katie does, but Groupy has still helped to streamline the way I work so that I can flip through tasks more efficiently and waste less time trying to find what I’m looking for.
Have you tried Groupy yet? If you have, we’d love to hear about how you use it! Share your screenshots and experiences in the comments below.
If you haven’t installed Groupy, you can learn more about the program here. If you’d like to try it out for yourself, consider downloading our free trial and see what you think!
Show Your Desktop Some Love with these Valentine's Day Skins
Tuesday, February 6, 2018 by Island Dog | Discussion: Personal Computing
Valentine’s Day is approaching and this is another good opportunity to add some related skins and themes to your Windows desktop. One of the great things about holidays is that WinCustomize usually has a great selection of ways to spruce up your desktop, from WindowBlinds skins, animated wallpapers, cursor themes, and more.
The best way to get the ultimate desktop experience is with Object Desktop. This is our suite of desktop enhancements and includes apps like WindowBlinds, DeskScapes, Fences, Groupy, Start10, IconPackager, and much more.
You can see many of the Valentine’s Day inspired skins here on WinCustomize, but I wanted to feature some of our favorites.
Valentine’s Day start button by DanilloOc
Happy Valentines Day wallpaper by vlad
My Dirty Valentine CursorFX theme by Vampothika
DeskScapes and Start10 are all included with our Object Desktop suite. If you want to go a step further with your Valentine's customization, you can get CursorFX and get some more custom downloads from WinCustomize.com.
A Year Without Cable TV
Tuesday, January 30, 2018 by Island Dog | Discussion: Personal Computing
Every year or so I take a look at my reoccurring monthly expenses and see what I don’t really use or need any longer. One of the biggest expenses I was tired of paying each month was the cable TV bill. I have thought about completely cutting cable before but always backed away for some reason, but it was time to finally make the cut. I was paying nearly $150 a month for cable and internet which was just ridiculous considering we just didn’t watch TV like we used to. About $10-15 of that was device charges for the cable boxes we had to have on each TV. My kids are in college and/or working so they are hardly home to watch TV. Even when they are they have their own subscriptions to things like Netflix or Hulu, so I found no real reason that cable was something needed in our household.
But before I actually made the call to the cable company and went internet-only, I had to look for some type of way for us to watch the few shows that we regularly watch. There are just a few series we watch, but it’s something we enjoy so I had to do a bit of research on streaming services. We have Netflix, but that is something I actually cancelled with the cable. Their selection of TV shows has become minimal, and although we enjoy some of their original programming, we can just get a month at a time and binge watch something like Stranger Things and then cancel. After reading and researching I decided to give DirectTV Now a try, which was a good choice because if I prepaid for a month they would also send me a free Amazon Fire Stick, so no reason not to give it try.
So with that decided I called Bright House and cancelled my cable service. They of course tried to offer me all types of deals to keep it, but I eventually talked them into giving me a deal on 300mbps internet while threatening to leave for a competitor. So I ended up getting internet-only service for nearly half of what I was paying with cable and internet.
After the first couple of days we realized we made a good decision. We didn’t miss cable at all, and all the shows we wanted to watch were available on streaming services. Even with the added cost of a streaming service, we were still saving quite a bit of money each month compared to cable, so we had no regrets about cutting the cord. Now DirectTV Now was another issue. I cancelled the renewal within the first week. The app was terrible to use, the audio on several shows we wanted to watch didn’t work, and it was supported on very few devices we wanted to use. I switched over to Sling TV and we have been using it ever since. It ended up being cheaper and we can choose the package which has the channels we want. We can use it on our TVs with an Xbox One, Amazon Fire Stick or Apple TV, and we can use it on our iOS devices. I definitely recommend it!
I also started using Hulu as there’s some shows just on there that my wife likes to watch, and I also subscribed to CBS All Access so I can watch the new Star Trek: Discovery. They are both inexpensive options so they make great additions to something like Sling TV.
One of my favorite things about using these streaming services is I can also use them on my PCs. All the ones I use have apps in the Microsoft Store which I can download to my PCs. I even have a streaming fence setup on my desktop using Stardock Fences to keep them organized right on my desktop!

So we got rid of cable for just about a year, and while finishing this article up I was really trying to find some downsides to cutting the cord. The thing is I really can’t think of any. We’re saving money, have just as much or more video content available, and it’s easier to watch on a variety of TVs and mobile devices. If you’ve been thinking about cutting the cord, then I would recommend it. Do a bit of research first, but I think you will be pleased with the options you have to watch your favorite content, and save a bit of money while you’re doing it.
Adventures in PC Building - Part 2
Wherein Kristy continues to try and build her first PC...to relatively favorable results.
Wednesday, January 24, 2018 by Tatiora | Discussion: Personal Computing
The Recap
All you really need to know is that some n00b decided to build a PC (pssst, that n00b is me!) and here’s the conclusion of the grand adventure! If you missed Part 1, you can read it here.
The Build
First things first: we cleared the living room. This meant rolling up my rug to reduce any potential for static, vacuuming the floor well to make sure it was clean, and locking my cat Miza up in my bedroom (who did NOT appreciate that, by the way). Once we got everything tidy, I started bringing out the parts and ripping the plastic bagging off of my case.
Ah, the case… this was once again a subject of differing opinions among my friends. I probably should have listened to Brian when he suggested a full size case - but those things are HUGE, and I didn’t want anything that big if I didn’t absolutely have to have it. So I purchased a mid-size case, which still fits everything - but it’s definitely snug, and putting it together in such tight quarters made an already anxiety-ridden job for me even more stressful.
The first thing Gus taught me to do was how to “shuck” a hard drive. Best Buy had a great sale on 8TB Western Digital external hard drives during the time I was hardware hunting, so I learned how to open the casing and pull it out so I could put it in my computer. That definitely ticked off the “storage space” requirement that I had, and then some! I used this video as a guide, and it really ended up not being too difficult.
There was a moment or two when Gus thought he’d instructed me to get the wrong cooling system and that it wasn’t going to work with my cpu. Once we looked up a video online and realized we weren’t looking at the right way to install it, I got over my mini-heart attack and things got a little easier from there.
Well, ok, not easier. Just...less stressful? No, not that either. At any rate, the build went on!
So. Can we just talk for a minute about the feeling one experiences when preparing to attach the cooling system to their processor? If you haven’t done it yourself (or have done it so many times by now that you’re numb to the terror), allow me to sum it up for you in .gif form:

I think I may have shed about 5 pounds from nervous sweating. Okay, that was a gross - and exaggerated - detail. I also thought when I clicked down the little handle to hold it all into place that I was going to break something - I didn’t, but the fear was extremely real.
Then there were the cords. Oh my goodness, THE CORDS. There were so many! Lots of cords and connections in such a little space can get really frustrating really fast (did I mention that I should have listened to Brian?), so Gus had to be a little more hands on during this part so that we weren’t there ALL night.
After a bit of plugging, un-plugging, shuffling, and reshuffling, we finally got everything pieced together and carried the tower into my office, where we plugged it in for the “moment of truth.” I cannot even begin to describe my elation when the lights came on and I hear the familiar sound of a computer powering up. Oh hey look, here’s another .gif:

All seemed to be well with my new computer - at least, it was on the hardware side. Then, it came time to load the software...
The Panic
I should note that at this point in the building process, we’ve passed 12am and are ebbing into the 12:30am mark. Gus and I are night owls, so this isn’t exceptionally late for us, but it certainly puts the nearly two hours we spent fighting to get the software to load into perspective.
Because I had recycled the hard drives from my previous PC, we had to do some things to the partitions in order to make the OS load. I’ll admit that I’m still not 100% sure what the issue was or what Gus was trying to do here, but it was a very long time of staring at command lines and error messages.
Finally, we found this little video that showed us what we needed to do in order to get the error messages to stop...which was simply to remove the driver disc for my motherboard. That’s it. That’s literally it. Two hours of fighting and it was just because of that. It’s a wonder that my computer didn’t end up flying through my office window when Gus finished. Lucky for me, we were able to show restraint.

At last, somewhere in the neighborhood of 2:30am, we finished loading all of the software and I hopped on to test a few things...and then proceeded to stay up until almost 4am playing Overwatch because I was just so enamored with the fact that I was finally able to play it again. Newsflash: I still suck at the game and die a lot, but at least I do it without lag! Woo!
The Aftermath
As I mentioned above, my PC runs wonderfully. What do you know, you really CAN make them better, stronger, and faster. ![]() I didn’t have any issues installing my programs - Fences, Groupy, and Start10 were the first things to go on my computer - and so far it runs every game my older PC couldn’t.
I didn’t have any issues installing my programs - Fences, Groupy, and Start10 were the first things to go on my computer - and so far it runs every game my older PC couldn’t.
I am definitely glad that I chose to have this experience. I feel like I walked away with a lot of knowledge that I didn’t have before, plus it was actually really fascinating to see how everything goes together! That said, I don’t think I’m especially keen to build my next one. I admire my friends who enjoy building for the fun of it, but it’s too stressful and time consuming for me - I’d rather just pay someone else to do it so that it shows up on my doorstep ready to go.
This new computer can run all of my Stardock games really smoothly now, too, so maybe you’ll find me online and in the fray in Fleet Battles or Ashes a little more often. ![]() I’ll definitely be streaming more in my spare time, too (what’s spare time?), so if you’d like to follow me on Twitch you can find me here. I’ve been really wanting to re-visit the Monkey Island games...
I’ll definitely be streaming more in my spare time, too (what’s spare time?), so if you’d like to follow me on Twitch you can find me here. I’ve been really wanting to re-visit the Monkey Island games...
Thanks for reading!
Getting Started with Stardock's Groupy
Tuesday, December 19, 2017 by Island Dog | Discussion: Personal Computing
We've introduced a new app: Groupy! I think PC users are going to find the ability to group their apps into tabbed windows very useful in their daily workflow. Groupy works similarly to how you use tabs in web browsers, but now you can do the same with applications like Explorer windows, Excel spreadsheets, Adobe apps, and just about anything else.
It’s really easy to setup and use Groupy, so here’s a quick guide on how to get started!
Setting up Groupy
Start off by downloading Groupy from your Stardock account here. Once you go through the installation and start Groupy, you'll see the configuration window. Here, you can adjust a variety of options. Changing these settings is optional - you can just skip to the section below if you're ready to get started.
The Visuals tab in the Groupy configuration is where you can adjust items like the tab position, window icon, color settings, and other visual options.
The Settings tab is where you can change when and what windows Groupy combines, as well as how you'd like to switch and move tabs.
The Grouping tab is where you can set Groupy to combine windows automatically and adjust other group settings.
Using Groupy
It really can’t get any easier to use Groupy. Just click and drag a window on top of another window that you want to group. That’s it! If you want to remove a window from a group just drag the tab back off.
Groupy is available individually for your Windows PC, but you can get that and more with a low-cost membership to Object Desktop. While you're a member, you'll get free updates, access to all betas, and any new apps for one year. You’ll also get access to other great programs like Fences, Start10, DeskScapes, WindowBlinds, Multiplicity, and more!
Visit the Object Desktop site for more information.
Deck the halls - and your desktop - for the holidays!
Check out thousands of downloads for Start menus, window skins, and dreams on WinCustomize
Tuesday, December 5, 2017 by Tatiora | Discussion: Personal Computing
I’m one of those people. Yep, I’m the kind of person who starts getting all excited for the holiday season well before it even arrives. I’ve got the carols blaring on the radio and the decorations up before Thanksgiving dinner hits the table. My sister always used to say that if it could be decorated for the holidays, then I’d have it decked out and bleeding red and green.
...She’s not wrong, and let me just say that my cat also doesn’t appreciate my enthusiasm:

Until recently, I didn’t realize that the festivities of the season could also extend to my PC desktop. As I’ve said before, I spent a lot of time at my computer - and if everything else is decorated for the season, why shouldn’t my desktop be too?
Since coming to work at Stardock, I’ve been exposed to all sorts of great desktop enhancements through Object Desktop. In particular, I really enjoy applying animated wallpapers using DeskScapes. Have a look at some of my favorites!
Winter View by AzDude
Cold Winter's Night by Cyberslober
Winter Rainbow by AzDude
Winter Splendor by hansulrichveith

DeskScapes was just the start of my holiday rampage, though. I dove into WindowBlinds next so that I could find ways to make this even MORE festive. I’m happy to report that it’s quite possible....
Christmas Fireplace by DaveBax
Merry Christmas by IceBabee
Christmas Flow by Destrohelix
Heck, I even found a few for IconPackager! Check this one out:
CYY Christmas by Yangge

DeskScapes, WindowBlinds, and IconPackager are all contained with our Object Desktop suite. If you want to go a step further with your holiday customization, you can get CursorFX or Object Dock and get some more custom downloads from WinCustomize.com.
From me, and everyone else here at Stardock, we wish you a warm and wonderful holiday season. Happy New Year!
Start10: Using a Custom Start Button Image
Tuesday, November 21, 2017 by Island Dog | Discussion: Personal Computing
Start10 is a popular choice for Windows 10 users who appreciate the look and feel of the classic Windows 7 Start menu. Its range of customizations and options make it an ideal choice to install with the OS. I wanted to focus on one feature in particular today, which is using custom images for the Start button. Start10 already includes several options for you to choose from, and there are many more available for download at WinCustomize.
Changing the Start Button
Achieving a unique look for your Start button is easy! Just click the ‘pick image’ box in the Style section of the Start10 configuration. It’ll open up a window where you can choose from quite a few different images.
In addition to downloading custom buttons, you can make your own to submit to WinCustomize to share with other users. Once you download a Start button image, just place it in the Start button folder in the Start10 directory to access it.
Typically, that would find that directory here: C:\Program Files (x86)\Stardock\Start10\StartButtons
Creating Your Own Button
Start10 Start buttons are pretty easy to make. It’s just one image file with 3 images stacked vertically and saved in a .PNG format.
Here’s an example:

Here are the 3 graphics stacked (40px wide, 120px high - each button being 40px high). The top is the normal state, the middle is the hovered state, and the bottom is the pressed state. Each image represents what the button will look like in each state. When you have your image done, you can place it in the folder mentioned above.
Start10 is available individually for your Windows PC, but you can get that and more with a low-cost membership to Object Desktop. While you're a member, you'll get free updates, access to all betas (check out the beta for Groupy!), and any new apps for one year. You’ll also get access to other great programs like Fences, DeskScapes, WindowBlinds, Multiplicity, and many more!
Visit the Object Desktop site for more information.
Personalize Your Windows Desktop with DeskScapes and Thousands of Custom Dreams from WinCustomize
Check out these 3 tips for downloading, applying, and customizing wallpapers and dreams for your desktop!
Tuesday, November 7, 2017 by Tatiora | Discussion: Personal Computing
Between work and gaming at home, I spend a lot of time on my computers. Because of this, I like to personalize my PCs to suit my style, both organizationally and aesthetically. There are tons of awesome apps for both in the Object Desktop Suite, but I want to focus on aesthetics for today. So, let’s talk about how to get the most out of DeskScapes!
Get DeskScapes here.
Tip #1: Visit WinCustomize
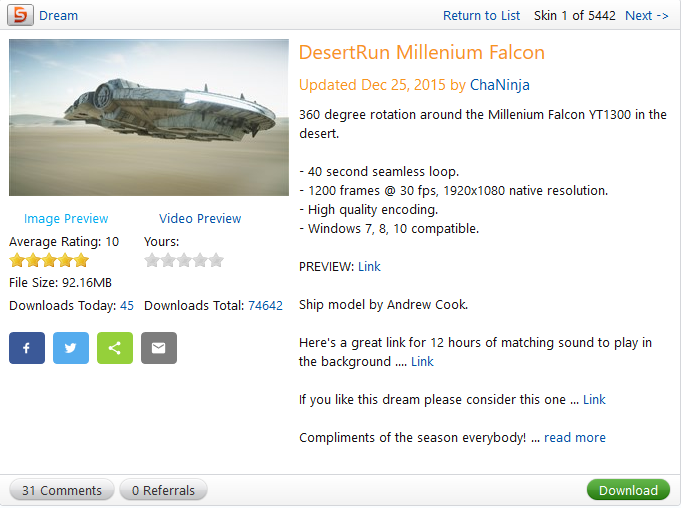
You can actually create your own “Dreams” and wallpapers with DeskScapes (more on that later), but a good place to start gathering some for your desktop is WinCustomize. There are thousands of wallpapers and animated Dreams to choose from there and it caters to a very wide variety of tastes. If you enjoy theming your desktop to certain holidays, there are lots of options for all times of the year!
Start browsing DeskScapes Dreams here.
Downloading a wallpaper or Dream is extremely easy. Simply select the one you’d like and click the download link. Once it’s complete, you can either click on the download itself and it’ll apply to your desktop, or you can find it within your Deskscapes menu, along with some additional customization options.
Pro Tip: To get the most out of WinCustomize, please make sure you create an account! You can subscribe to WinCustomize for no ads, unlimited downloads, and other benefits as well. If you’ve purchased a product that utilizes WinCustomize, you’ll have unlimited downloads for a year.
Tip #2: Adjust the Background Settings
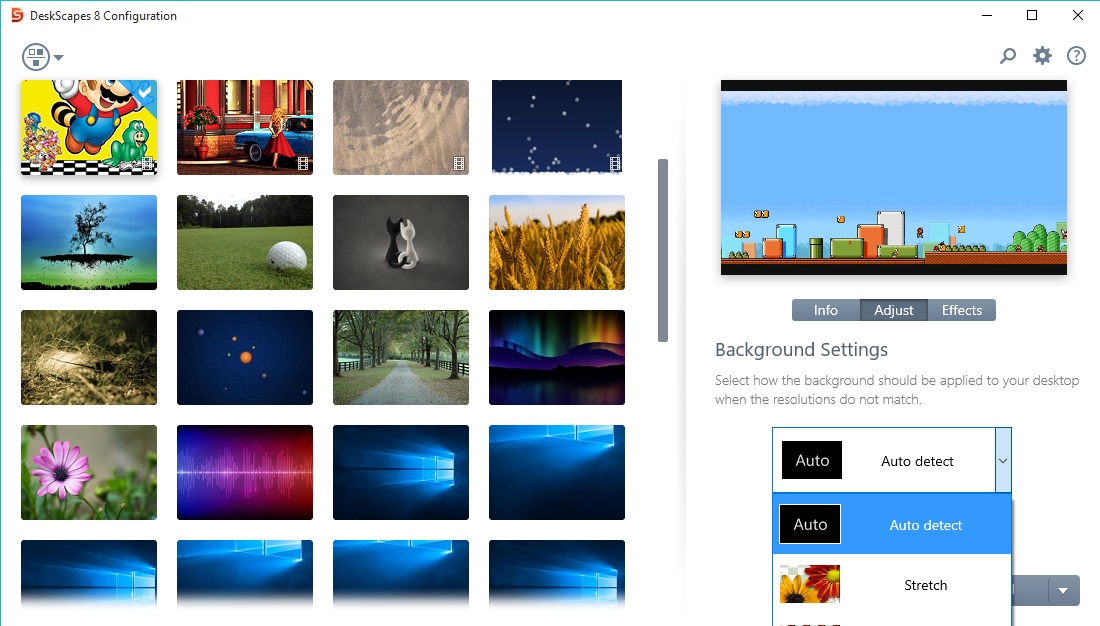
Once you’ve selected a Dream or wallpaper, you can customize it to suit your desktop. Click on the “Adjust” tab in the DeskScapes menu to choose your background settings. You can assign the dream to a specific monitor, meaning that if you can’t decide between Dreams, that’s ok -- you can assign a different one to each monitor for a variety of looks! You can also set how it appears on the screen (stretched, tiled, centered, etc.).
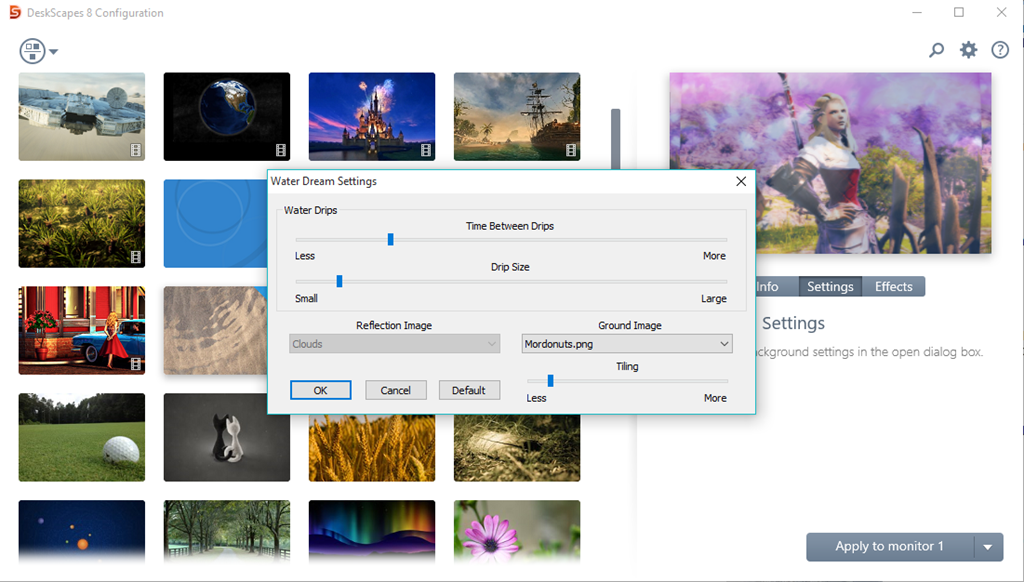
Pro Tip: Some dreams have effects that you can apply your own background to! Instead of an “Adjust” tab, you’ll see one that says “Settings” instead. Clicking on that will lead you to a secondary menu that will let you choose a picture saved on your PC to use with the animated effect. Try it out with “Water Dream” by Stardock Design (it is automatically included in DeskScapes).
Tip #3: Apply Effects
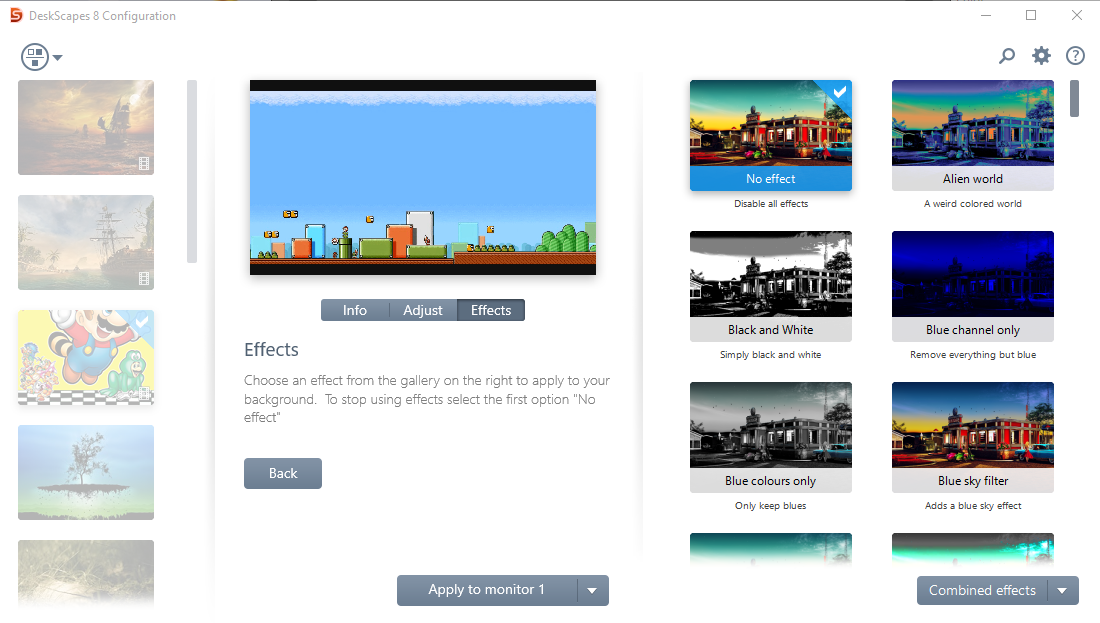
Once you’ve chosen your Dream(s), you can further customize them by going to the “Effects” tab for that Dream. There are dozens of options that will let you alter the Dream to suit your style! You can change it to black and white, add colored filters, textures, mirror effects, and more. If you’ve chosen a wallpaper, there will also be a tab for color adjustment and saturation available.
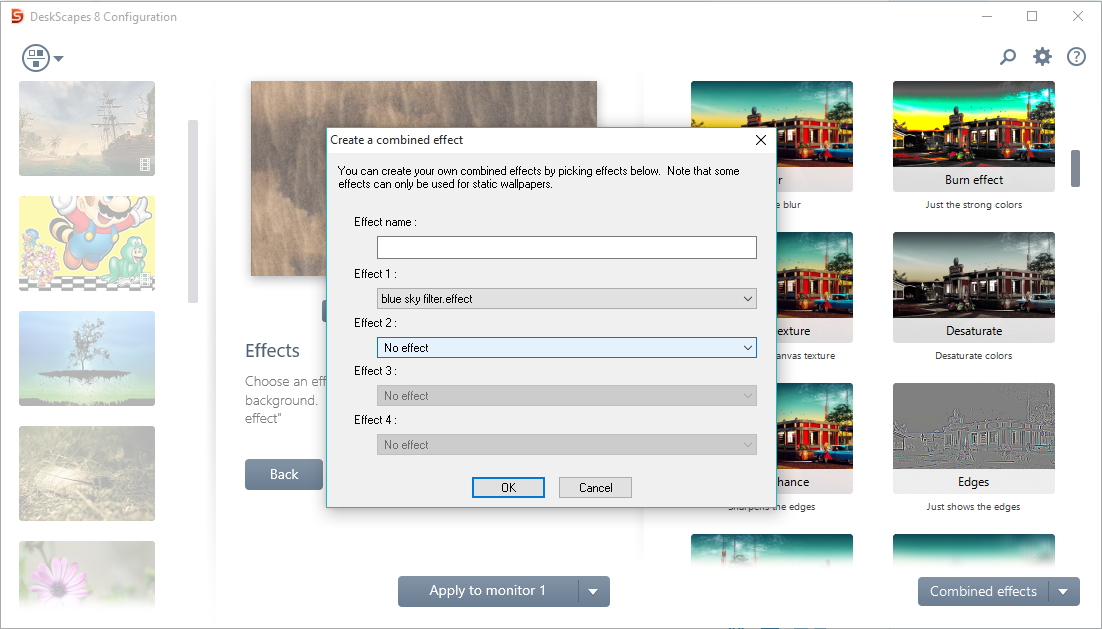
Pro Tip: You can combine different effects to make up your own! Click the “Combine effects” menu at the bottom of the menu, then choose “create new combined content.” Give it a name, choose the effects you’d like to combine, and then save it. It will remain in your menu as an option for future applications.
I hope you get a chance to explore DeskScapes and browse the thousands of options available to you over at WinCustomize! Get access to unlimited downloads on WinCustomize and a bunch of other awesome desktop enhancement programs by becoming an Object Desktop member today.


