


Stardock Releases Groupy 2, Bringing Tabs to All of your Favorite Applications
Wednesday, June 14, 2023 by redskittlesonly | Discussion: Software Blog
Stardock released Groupy 2, an app that brings a universal tab experience to Windows 10 and 11 today. Groupy 2 is a powerful tool for Windows 10 and 11 that keeps information organized by allowing users to drag and drop multiple applications and documents together which combines into a single window, with tabs showing in the title bar.
The new Groupings feature allows the user to save a group of applications together, pin them to the taskbar, and then launch them all at once – tabbed together and ready to go – with just a single click. The new Accents feature simplifies the process of adding a touch of color to a tab, making it easy to associate a specific task or assignment with a particular color.

Multiple tab designs take personalization another step further, allowing users to stylize their experience in a way that best suits their preferences. Groupy 2's updated design matches the Windows 11 interface, providing a sleek and modern look, and its enhanced functionality supports seamless integration with File Explorer.

"After releasing our first beta of Groupy 2, we have been listening to our users and adding new features like the ability to hide the Groupy icon in the tab bar and enabling the mica effect in more locations" said Brad Sams, Vice President of Stardock Software. "Groupy 2 is the easiest way to organize the windows on your desktop and has become an essential part of the modern desktop experience."
Starting today, Groupy 2 for Business is also available. Groupy 2 for Business includes advanced distribution tooling and centralized licenses administration for easier management and deployment.

Groupy 2 is available for $9.99 for use on up to five devices; it’s also included in Object Desktop which includes all Stardock’s productivity applications, for $39.99. To learn more, visit the Groupy website.
    |
|---|
Groupy 2 is Headed to Steam
Add it to your Wishlist today!
Friday, May 26, 2023 by bdsams | Discussion: Software Blog
A few weeks back, we announced our newest application, Groupy 2. Groupy 2 is the easiest way to add tabs to nearly every application and it looks and operates like a native Windows experience. While you can download the app today from our store, we know that many of our customers like to purchase our applications on Steam.
Starting today, you can now add Groupy 2 to your Wishlist on Steam for when the application becomes available on the platform in the coming weeks.
Groupy 2 is the easiest way to manage all of your open windows on Windows 10 and 11. By adding the familiar tab functionality that you experience in the browser to all of your applications, it is easy to keep keep your windows organized.
Looking to make it easier to identify an app at a glance? With Accents, you can add a splash of color that makes it easy to identify a tab quickly by type, task, or deadline. Or if you want to rename a tab, Groupy 2’s personalization options let you configure the tab experience that best fits your workflow.

Groupy 2 is in active development and we are working on additional updates for the application. If you have any feedback about what you would like to see in a future release, make sure to let us know in our forums.
Getting Started with Groupy 2
Adding Tabs to Everything
Wednesday, May 17, 2023 by bdsams | Discussion: Software Blog
Last week, we released Groupy 2 and if you haven’t taken it for a spin yet, you can find all the details about the new app here. Getting started with Groupy 2 is easy as once the app is running it’s a drag-and-drop experience but fine-tuning how the application works best for you can be a bit of a journey.
When getting started with the new application, the configuration panel is where you will find the general options for the application. But there is a secondary location that allows you to configure how each group is displayed and this panel lets you easily add Accents to a tab.
After creating your first group, in the left corner of the Groupy bar, you will see a small Groupy 2 icon with a down arrow. Clicking that arrow will let you customize how a specific group can be personalized.

It is from this dropdown that you can add an accent color to a tab, rename a tab, save a group, pin a group to the taskbar, and a lot more. If you haven’t yet, I highly recommend you add Accents to your tabs as it makes them easy to identify at a glance.
The settings within Groupy 2 are robust but I wanted to call out a couple of them specifically as they are my preferred way of using the application. Of course, how I use it may differ from your desired options, but this is how I get the most out of Groupy 2 for my workflow.
The first option I always change from the default experience is to make it so that Groupy 2 doesn’t try to group apps unless I am holding down a modifier key. I typically use the control button which means that when dragging a window onto another, when I hold control, the Groupy 2 experience lights up and makes it possible to group the apps together.
To enable this feature, in the Groupy 2 configuration panel, go to Grouping settings and the option is under “Manual grouping by dragging settings”.

The reason I prefer this method is that, while the default experience to hold an app over another for a short bit of time to enable the grouping experience is easy, this keeps me from accidentally grouping apps on rare occasions. If you are wondering why we don’t enable this experience by default, that’s because the discoverability of the functionality for onboarding would require more upfront communication.
The other feature that I turn off by default is the “Show a Groupy bar when the mouse moves over the top of a title bar while not in a group”. Keeping this setting enabled is optimal for users who are getting started with Groupy 2 as it notifies the user with a visual cue that the app can be grouped easily but after becoming comfortable with the mechanism, I turn it off.
Once you get used to having tabs for every window on your desktop, you will wonder how you ever lived without them. I find them especially useful when working with productivity apps like Word or Excel but would love to know how you are using Groupy 2.
Microsoft’s Vision for Windows 12 Explains Windows 11
Big changes ahead for Windows
Tuesday, October 18, 2022 by bdsams | Discussion: Software Blog
This past week, Microsoft accidentally shared a mockup of their vision for Windows 12 at their Ignite conference. The mockup, which has the name Windows 11 NV, or Next Valley, is authentic and is likely the direction Microsoft is heading with its OS.
There are three notable items that are worth paying attention to:
- Widgets are now in the top left corner
- System tray is in the top right corner
- Taskbar is “floating” rather than sitting at the bottom of the screen
While we don’t know if all of these features will make their way into Windows 12 (or whatever they are going to call it), it does explain some of the decisions behind Windows 11.
With Windows 11, Microsoft removed the ability to ungroup icons on the taskbar and also defaults to a center-aligned Start menu. Behind the scenes, Microsoft has already said that they rebuilt the taskbar. We also know that the system tray has now been rebuilt and of course, the widgets were rebuilt for Windows 11, too.
I believe that Microsoft has done this is to train the user for the next big transition. To go from Windows 10 to "Windows 12" is a big leap, but with Windows 11, this makes the transition a bit softer. With Microsoft rebuilding much of the interface from scratch with Windows 11, this plays into the narrative that Windows 12 will be another significant change for the OS.
If Microsoft does go this route, and the taskbar becomes more of a dock, it makes sense why the company no longer allows you to ungroup open windows or move the taskbar to the top of the display (both features can be re-enabled with Start11). Out of context, these two changes appear to be a significant regression, and even with the Windows 12 mockup showing the direction, it remains hard to justify why they would remove features that have defined Windows for decades.
While Microsoft is not sharing if this is truly the direction that they will take with Windows 12, there is a lot of evidence to support that this is where they are looking to take the OS. There are still many questions outstanding about if the company will allow for a “classic” OS layout to be re-enabled, but at this point, considering that they were willing to cut things out of Windows 11, I would think that’s not likely.
It's a bit too early to talk about a Start12, but know that once Microsoft does finally share its vision, and more importantly a build of the next major release, Stardock will be looking to do what we do best and make Windows more personal and productive.
Check out what's new with Curtains
With a special guest appearance by Groupy
Thursday, September 17, 2020 by Tatiora | Discussion: Software Blog
If you love a coordinated and stylish desktop, then you really need to try Curtains.
Taking advantage of the groundwork built to support light and dark mode, Curtains will let you apply new styles along the lines of Dark and Light Modes to Windows® 10. It also includes styles that will let you make Windows look like Windows XP, Windows 95, or other operating systems!
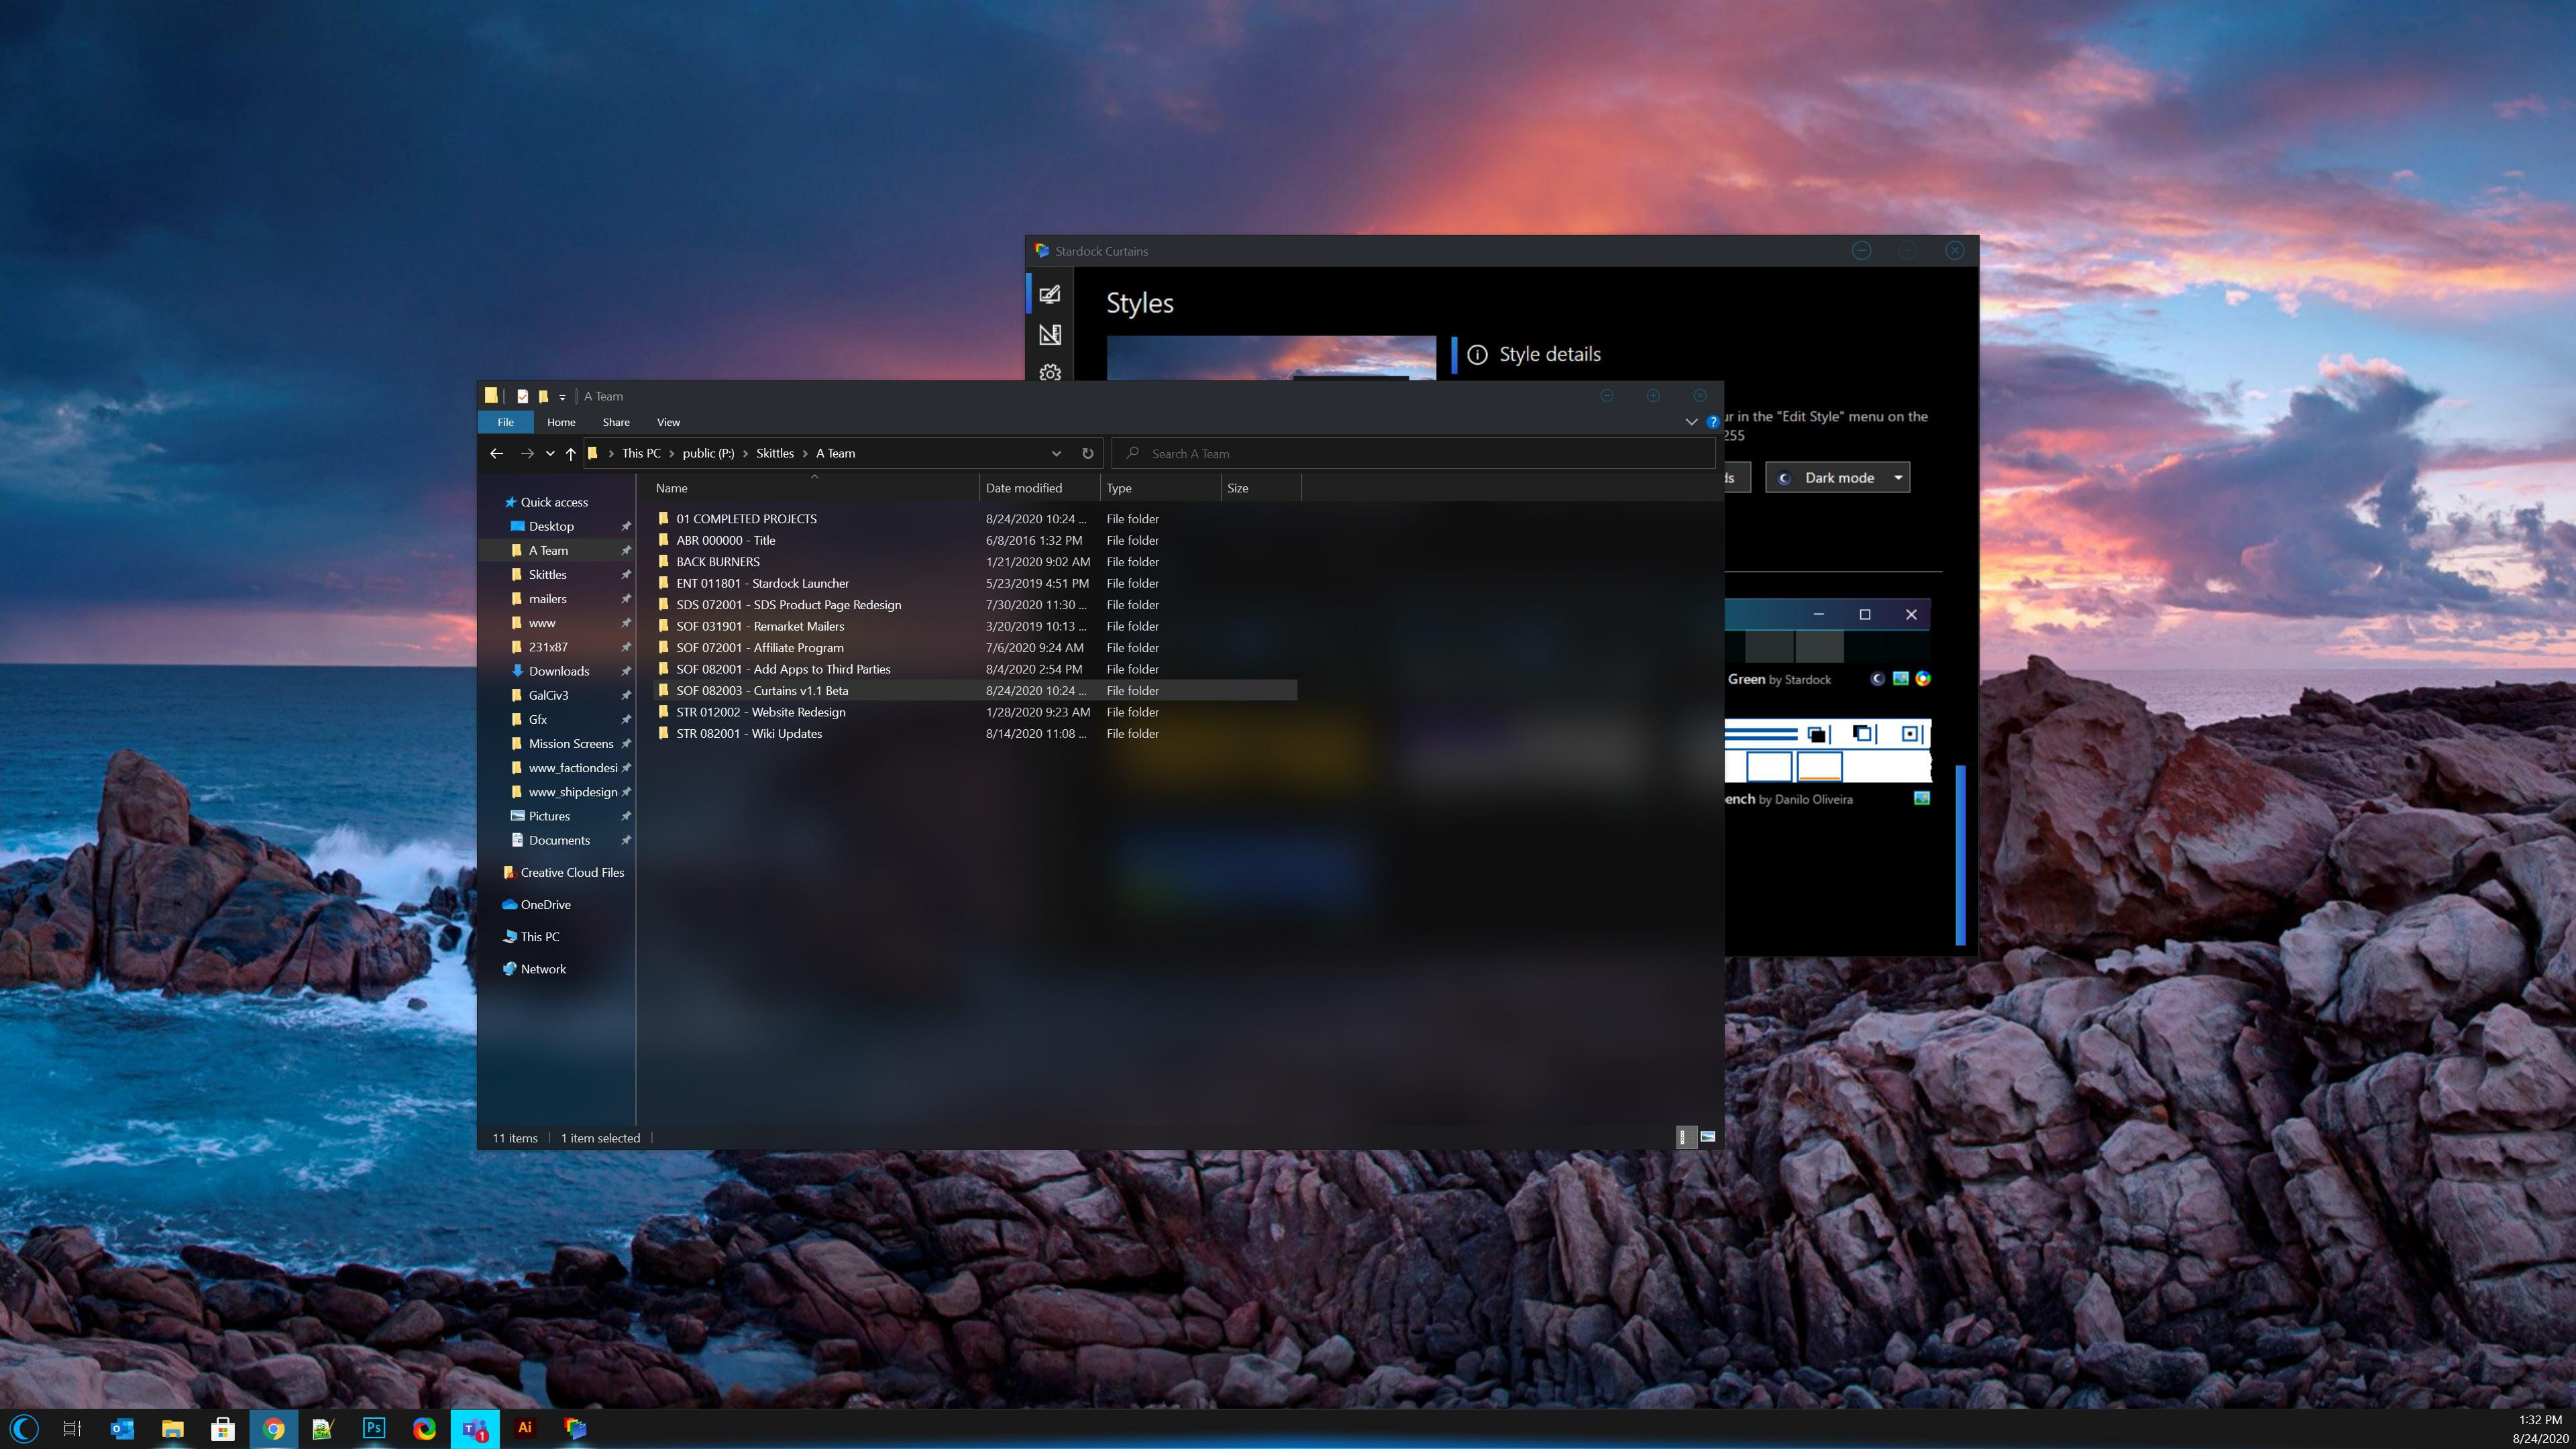
Use the built-in style editor and can create your own Style modes! We just released v1.1 yesterday, adding a big feature: the ability to add blur and transparency effects to your Explorer windows. Certain Curtains styles already come with blur built in - specifically, most of the Fluent styles that you find in the program integrate this feature automatically. In the image below, though, I've taken another style - Cairo Dark - that doesn't have it as the default and changed the option to "Acrylic Blur," which gives the lovely effect you see in the image above.

My favorite thing about Curtains is how perfectly it integrates with Groupy, which you can see in the image above. In order to make them look good together, we made it so that Curtains would automatically select suitable colors anytime you’re using a Style mode without custom Groupy parts. When in dark mode, the tab will remain dark in all apps for the foreground state, and a new “close all” button was added to the far right of the tab.
One of the other new features in v1.1 lets you extend the title bar into the top of the ribbon for Explorer windows. If you love to customize your desktop right down to the smallest detail, then you'll love this feature. Below is an example of an Explorer window with the option turned on (left), and one with it turned off (right).
  |
|---|
Below, you can see how I adjusted the settings on the Cairo Dark style to add the effects I want. I saved a copy so that the original stays unaffected while I tweak the settings on mine to my personal preferences. This gives me an easy way to return to the default if I decide I want to. As you can see, I generally prefer a style that emphasizes more of a Dark Mode feeling - but, if you're a Light Mode kind of person, there's plenty of that in there for you also!

Have you tried Curtains yet? v1.1 is available right now and contains all of the awesome blur and transparency features you see above, along with quality of life improvements and increased style application speed. Give it a try and let us know what you think!
Get Curtains through our store or on Steam.
Don't forget to check out Groupy, too!
Multiplicity KM: Tips and Tricks for Getting Started
Thursday, September 10, 2020 by Tatiora | Discussion: Software Blog
When I first came to Stardock and started learning about all of our software, one program in particular eluded my understanding: Multiplicity. What exactly is Multiplicity? Why on earth would I ever need to use it? It felt somewhat intimidating to me.
However, having spent more time using the application, I've discovered that it's far more convenient and useful than I originally realized. My personal use of Multiplicity is fairly modest, though I know there are plenty of other people who use it far more extensively than I do and they swear by it, too.

What is seamless mode?
First off, let's talk a little bit about Multiplicity KM and what seamless mode actually does. You'll need to have both PCs nearby and within your field of view in order to take advantage of this. If you use a multi-monitor setup with one PC, seamless mode works the same way in concept, except you can do it with 2 computers instead of just one. You'll be able to move your mouse cursor from your main PC's monitor right to your second PC's monitor as if they were the same machine.
You can connect a single PC using multiple monitors to another PC using multiple monitors, too! One of my setups at work has a main PC using 2 monitors, while my secondary PC uses one. I can work seamlessly between them, which makes it so convenient (and leaves extra room on my desk for action figures since I don't have to have a second keyboard and mouse in the way!).

See, what did I tell you? More room for action figures!
Setup Tip: When connecting your secondary PC to your primary PC, make sure the secondary PC has a mouse, keyboard, and monitor connected to it or it won't set up properly (this does not apply for laptops). You won't need to use the keyboard and mouse - you'll be able to control it all with your main set! - but they still need to be plugged in during initial setup (you can remove them later).
What else can I do with the KM version of Multiplicity?
Make working from home much easier

Here's a sample of my coworker Spencer's setup. Check out his blog post on Multiplicity and video streaming!
One of my favorite things about Multiplicity KM is how easy it is to use my laptop when I need to work from home. Forgive me belaboring the term, but it really is seamless. If I need to work from home for any reason, I can set up my work laptop (which has a lot of important files and access to company drives that I use daily) right next to my main desktop and work between both PCs. I prefer to use my desktop for most things, since I have a nice big monitor, but it doesn't always have everything I need on it. Using Multiplicity eliminates a lot of extra work for me when I need to retrieve stuff for work.
Tip: Bring your laptop back and forth from work and home regularly! This will ensure you always have what you need on hand whether you're needing it at the office or at home in your den.
Share sound between PCs

Honestly, it took me awhile before I started utilizing this feature, and I'm mad I didn't do it sooner. I used to switch my headset back and forth between PCs, depending on what I was doing on each and where I needed sound to come from. By setting up my sound properly, I could hear alerts, alarms, music, and everything else from both computers through one headset plugged into my primary PC.
Setup Tip: Did you know you can use a hotkey to toggle this feature on and off? Give it a try when you only need to hear sound from your main computer!
Copy and Paste Formatted Text Between PCs
This one is HUGE for me, since I pretty much live in word documents. Being able to copy something from one PC and move it over to the other as if it were all a single machine really helps me with my workflow.
Tip: If you want to drag and drop files between multiple PCs, you can do that with the KVM version of Multiplicity. You can learn more about that version below.
For many users, controlling 2 PCs with one keyboard and mouse is enough - but what if you're a computer hobbyist and have a bunch of PCs in your home or at work that you'd like to control and manage remotely and/or seamlessly? You'll want the KVM version of Multiplicity for that, which you can learn more about here.
If you're trying to set up Multiplicity and are having any problems, check out our FAQ Guide.
Do you use Multiplicity? Share your stories with me!
A History of WindowBlinds
Let's go aaaallllll the way back to 1999...
Thursday, September 3, 2020 by Tatiora | Discussion: Software Blog
Today we're going to talk a bit about the history and evolution of WindowBlinds, which released all the way back in 1999 (for the mathematically challenged, that's 21 years ago...yikes!). WindowBlinds was the first program that let users customize the look and feel of the Windows GUI and is still widely popular today.
Although the start of WindowBlinds was long before I came to Stardock (I started here in September 2015), I took a dive through the forums and the website to take a look all the way back at the beginning. So, let's start there with version 1.
Version 1
Released September 20, 1999

Version 1 released and rose to immediate popularity with over 1 million downloads on CNET's Download.com before the end of the year. Above, you can see the customized window frames and menu bars, and, if you can say you happened to use version 1, you probably feel a little old right now.

While digging through the WindowBlinds website archives, I found this early Drengin image from the 90's.
The Drengin have also come a long way in the last 20 or so years... but that's another blog. 

Our product UI has definitely changed and improved a whole lot in the last 20+ years.

To be honest, I picked the above image mostly because I liked the rainbow spiral. It showcases a good variety for WinCustomize v1.0, though.
Version 2
Released October 11, 2000

Version 2 added per-window skinning, semi-transparent explorer windows, and skin colorizing.

Check out that retail box! Who even remembers a time when you bought PC software in the store anymore? To be honest, I sort of miss it, though it's hard to argue against the convenience and ease of online purchases anymore.

WindowBlinds skins supported adding buttons and other objects into the frames (such as this stock ticker).

Remember AOL? I sure do, I spent WAY too many hours of my youth on Instant Messenger. That said, I've heard it was a pain to skin - but check out that classic Stardock logo!
Version 3
Released November 13, 2001

Designed with Windows XP in mind, Version 3 was the first version that could skin every part of the Windows GUI. This version took advantage of the new API framework at the time and made its skins "native" to Windows XP.

WindowBlinds 3 loaded a "skin" from the disk and then applied the skin to the Windows GUI. With it, users could customize title bars, borders, push buttons, radio buttons, combo boxes, scrollbars, status bars, properties dialogs, tab controls, header controls, list boxes, and pretty much every other element.

WindowBlinds 3 was more than just aesthetically pleasing! It added a bunch of new usability features, transitioning WindowBlinds from being more of an "eye candy" product into a true productivity tool for Windows users. It could also make Windows look like other OSes...something that received mixed feedback from the community.
Version 4
Released April 8, 2003

Version 4 was designed almost entirely with Windows XP in mind.

WindowBlinds 4 skinned virtually every aspect of the Windows GUI, including things that were previously thought to be unskinnable like logon/logoff dialogues, the "please wait" dialogue, backgrounds in the Control Panel, and more.

Man, I miss the GameCube. From what I could find when digging through old website and archives, it seems like some companies partnered with us to create skins for Windows using some of their IPs, which is pretty cool.

Options, options, options...so many of them!
Version 5
Released November 29, 2005

WindowBlinds 5 was designed to support per-pixel alpha blending, toolbar button changing, progress animation improvements, animated per-pixel Start menus, title bars, and tons more.

When Version 5 released, WindowBlinds was the most popular desktop-enhancement utility of all time, according to CNET's Download.com. We had over 8 million users worldwide and had passed the 9 million downloads mark.

Remember how I mentioned skins featuring different IPs? Yep, found one for World of Warcraft!
Version 6
Released October 2, 2007

WindowBlinds 6 added the ability to apply effects like Gaussian blurs to skins in real-time. The new configuration was, perhaps, the biggest change.

Anyone remember a little game called Elemental? Check out this WindowBlinds 6 skin themed after it.

This version of WindowBlinds also added advanced animation support for skins, which allowed our user base to do some pretty wild things.
Version 7
Released November 17, 2009

I'm told this was a coincidence and not at all intended, but WindowBlinds 7 happened to be ready just in time for the arrival of Windows 7. In this version, we introduced a new type of skinning format called UIS0, which allowed users to just modify the existing Aero skin. This made WindowBlinds a lot more popular for people who liked Aero, but wanted a bit nicer look and feel to it.

WindowBlinds 7 included a new configuration program that made it easy to access the new features of the program, like adding textures to existing skins.
Version 8
Released June 19, 2013

Version 8 was mostly about getting WindowBlinds to work on Windows 8. This version worked on Windows 7 also, and included SkinStudio for free, which would allow users to design their own skins.

SkinStudio made it easy for inexperienced users to create a great skin quickly, while advanced users could still enjoy designing every aspect of the windows interface.
Version 9
Released...never!
Because I was trying to be as thorough as possible with this recap for WindowBlinds,
I spent entirely too long last night digging for the history of Version 9.
Except, there is no Version 9. We skipped 9 and went straight to 10, like Windows.
Don't ask me why the number 9 seems to get no love, I couldn't tell you.
Version 10
Released March 15, 2016

A year after I arrived at Stardock, WindowBlinds 10 made its debut. We needed to make sure we had a product that was fully compatible with Windows 10, and of course it came with a shiny new UI and plenty of never-before-seen skins that offered a broader customization experience for our users.

As you can see, better looking versions of old OSes are still pretty popular. Re-live the good old Windows 7 days!

WindowBlinds 10 still has plenty of customization options - far more than ever before - so that you can tweak your desktop down to the most minute of details.

I think one of my absolute favorite features of WindowBlinds 10 is the randomization. If I like a bunch of skins, I can use this option to have my computer cycle through them at random intervals, giving me a fresh look and a bit of a surprise every time I boot up. The per-application skinning is great for variety, too - I can use one skin for my word processing software, and use a different skin for something like Premiere.
So, that's the history of WindowBlinds - phew! How long have you been using the program and what are some of your favorite skins?
Don't have WindowBlinds yet? Get it now!
Download thousands of skins and styles for WindowBlinds and
our other customization apps at WinCustomize.com
Remember RightClick? I tried it on Windows 10
Thursday, August 20, 2020 by Island Dog | Discussion: Software Blog
In one of my last blogs, I downloaded and tried out ObjectBar on my Windows 10 laptop. It was a fun experiment, and I enjoyed reading your comments on whether we should try to bring back ObjectBar. Since that got such a good response, I'd like to take a look at another app that was quite popular many years ago. It's one of my personal favorites: RightClick.
RightClick was first released somewhere around 2005, and was made in order to let Windows XP users greatly enhance the right-click desktop menu. The custom menus would let you add items such as shortcuts, system commands, tasks, and much more. You could even add DesktopX widgets to the menu!
Of course it was also skinnable, and even worked with WindowBlinds. We had a gallery on WinCustomize for RightClick skins.

Unfortunately, Windows 10 did not seem to work very well with RightClick. It took some time to get installed, and then only the menu editor would work - and that was about all I could do with Windows 10. I was a bit disappointed I couldn't get it to work, but it got me thinking about what I could possibly use it for now.

I used to setup my right-click menu to have quick access to a favorite folder, commonly used apps, and a widget or two. I also would use RightClick to completely replace the start menu for when I wanted a really minimal desktop.

Did any of you use RightClick back when it was available? What did you use it for, and what would uses do you think it should have for Windows 10?
We definitely want your feedback, so let us know in the comments below!
Make your next video stream seamless with Multiplicity
Tuesday, August 11, 2020 by Island Dog | Discussion: Software Blog
Video streaming and video content creation have risen greatly in popularity over the past few years. Video game streaming alone has turned into a multi-million dollar industry, and even just hobbyists are getting in on the action. Video creators like vloggers and many other channels on YouTube have created an amazing resource of educational and entertainment content.
If you're a streamer or content creator, you can use Multiplicity to help increase your productivity and delegation of your workload to multiple PCs.

Multiplicity can help by letting you control multiple PCs with one mouse and keyboard. Use those other PCs to do all those other tasks to free up your main computer for your streaming or editing. You won't have to worry about using hardware to control them; just setup Multiplicity on your PCs and you can seamlessly work across multiple devices easily. Here's a quick video on how it works:
If you are streaming a game or doing some serious video editing, then you are most likely using your main PC rig to handle all of that needed power. Of course while you're doing all that, there's still work to be done with another PC (or PCs). For example:
-Managing your online community
-Posting updates and monitoring social media accounts
-Researching and gathering media assets
-Chatting with other players and viewers
-Moving and managing files and documents
With Multiplicity, you'll also be able to copy and paste text and images between computers, drag and drop files and folders (KVM version), listen to audio from multiple PCs through one PC, and much more. Give Multiplicity a try on your next stream or content project, and see what a difference in productivity it can make!
Learn more about Multiplicity here.
Change Icons in Windows 10 with IconPackager
Friday, July 10, 2020 by Island Dog | Discussion: Software Blog
Changing the default icons is one of the earliest and most popular ways to customize the look and feel of Windows. Whether users were trying to emulate another operating system (like MacOS) or just trying to create a particular theme, changing the Windows icons has been a key part of desktop customization for quite some time.
IconPackager was introduced to make the process much easier, allowing Windows users to change nearly an entire set of icons with just the click of a button.
How to Change Entire Sets of Icons
One of the nicest things about IconPackager is that it's super easy to use. Open the program, scroll through the list at the bottom of the window to see all of the installed icon packs, then select the one you want and click the preview button to see a larger preview of the icons.
When you are ready to apply, just click ‘Apply icons to my desktop’. That's it! You can enjoy the icons from there, or customize them further using the color option in the IconPackager configuration window.

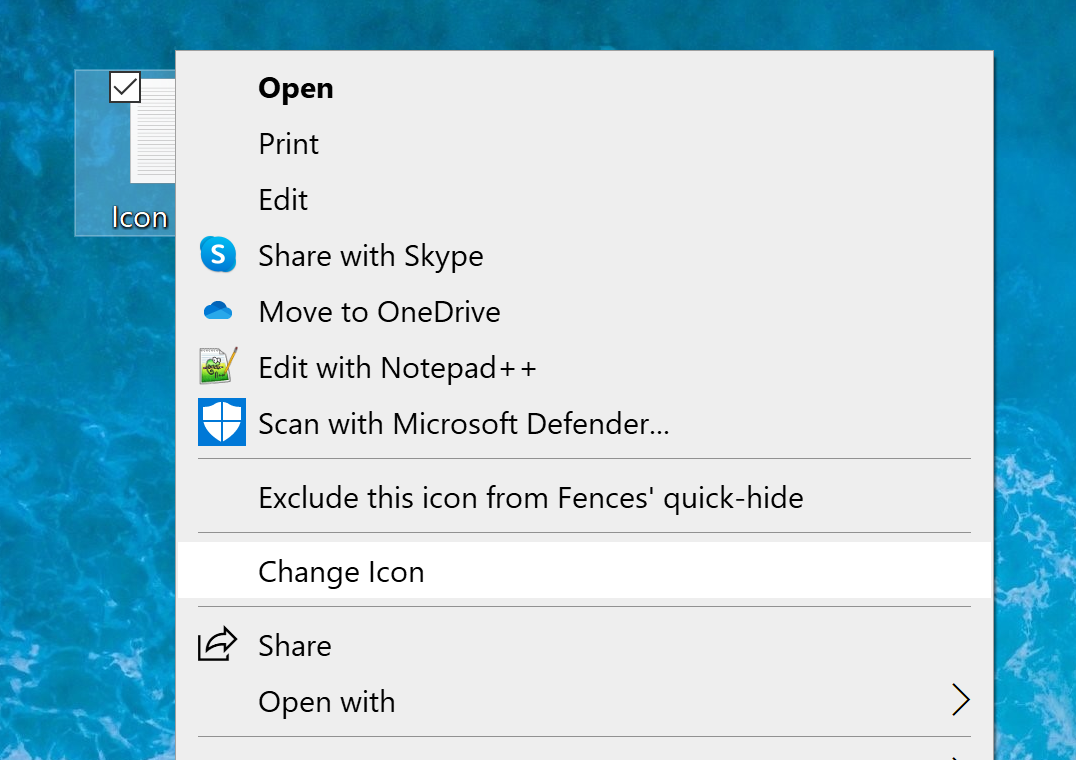
Changing Individual Icons from Properties Window
Changing all of the icons at once is great, but if you don't want or need to change all of them, you can select and alter individual icons using the properties page. Simply select an icon you want to change and right-click to bring up the menu. Then, click 'change icon' and you'll have a window come up that will show available IconPackager theme icons. Just pick the icon you want and hit apply!

Alternatively, you can also change individual icons directly through the IconPackager configuration under the Customization tab.

Getting More Icon Packs
WinCustomize.com has a gallery just for IconPackager themes! There are over a thousand custom created icon themes in the gallery that come in nearly every color and design you can think of.
Get more IconpPackager themes here!

IconPackager 10 is individually available for your Windows PC, but you can get that and more with a low-cost membership to Object Desktop. While you're a member, you'll get free updates, access to all betas, and any new apps for one year. You’ll also get access to other great programs like Start10, DeskScapes, WindowBlinds, Multiplicity, and many more!
Visit the Object Desktop site for more information.