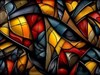


Pantheon Premium Suite Walkthrough
Video of the Pantheon premium suite!
Monday, March 5, 2007 by Island Dog | Discussion: OS Customization
The Pantheon suite includes:
- Visual style
- Stylish icons
- Matching wallpaper
- Logon screen
- Boot Screen
- Clock, calendar and weather gadgets
The Pantheon premium suite requires Object Desktop or IconPackager, WindowBlinds, and Theme Manager to be installed, and there is a discount for Object Desktop subscribers.
So instead of showing you the suite with a bunch of screenshots, I made a video walkthrough to give you a good idea of how the Pantheon suites looks "in action".
This Week in Skinning - March 2nd
Skin Roundup for 3-2-07
Friday, March 2, 2007 by Island Dog | Discussion: Community
It's March already? The time is flying by and so much is going on, but there is always time for "This Week in Skinning". I wanted to remind you that when you create your desktop with whatever combination of skins you like, to post them in our monthly desktop screenshot thread. Well as I said in previous weeks the submissions have been fantastic, and this week is no exception.
Terranove for CursorXP
by TYCUS
This is a really awesome cursor with smooth and cool animations, but still very usable. If you have CursorXP, you need to download this.
SD Tasks Scheduler for DesktopX Widgets
by Vad_M
This widget will allow you to executive system commands, open urls, and more. It's a great addition to the rest of the series. Nice work.
Leuchturm for DeskScapes
by peter22
When I saw the preview for this Dream I wasn't sure what to expect, but after I tried it out, it will stay on my Vista desktop for a while. It's a very nice, seamless animation of a lighthouse over the water. It looks very cool on the desktop.
All Night Long Logon for Logons
by boss0190
A nice looking logon for Windows XP. The wallpaper is also available on WinCustomize, and it's a great choice as well. Nice work.
Ambre (blue version) in Wallpapers
by Richard Mohler
This one is kind of hard to describe, but that doesn't matter because it's a great pick for this week. There is also another color version available. Good job!
Y.S.T for Windowblinds
by lypnjtu
A nice clean skin that works well with a variety of wallpapers. Be sure to check this one out.
Remember if you would like to recommend a skin please feel free to e-mail and let me know why you think it should be featured. Thanks again to all the skinners for their hard work, and we all look forward to more great submissions. See you next week!
DeskScapes Status Report: March 1
v1.01 in development
Thursday, March 1, 2007 by Frogboy | Discussion: Animated Wallpapers
Stardock is working on DeskScapes 1.01 which is now internally being tested. The next public release will include dynamic and triggered content with it to help get the ball rolling on that kind of content.
Stardock will also be releasing an updated DreamMaker which will make it easy (full GUI) to create your own triggered DREAMs.
Regarding Microsoft's Windows DreamScene, we don't have any official word but Microsoft is aware that some users have run into problems when the default MPEG encoder has been replaced by a different one due to installation of third-party video players. This should not be a problem in the final version of Windows DreamScene.
Also, we should also mention that Microsoft will be releasing a number of DreamScenes when Windows DreamScene is officially released. We don't have any official dates from Microsoft on the official release of Windows DreamScene.
For dynamic content, Stardock DeskScapes will still require that Windows DreamScene is installed. In our tests so far, dynamic content (at least the type we've created) is using less than 4% CPU on average on a mid-range PC.
DeskScapes 1.01 will be available in beta hopefully within the next week or so for users of Object Desktop via Stardock Central. Stardock will also be releasing a premium DREAM on Stardock Central for Object Desktop users as well.
Once 1.01 has been tested, it'll be released with the updated DreamMaker and Dynamic Dream SDK including source files to create your own dynamic content.
If you have any questions, feel free to comment here and we'll do our best to answer them.
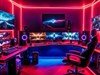
Windows Sidebar: Quick Tour
First impressions of Windows Sidebar
Wednesday, February 28, 2007 by Island Dog | Discussion: Windows Sidebar
Windows Sidebar in Vista has had a lot of attention over the past year or so. Some people seemed to hate it, and some people seemed to love it. Some are even using DesktopX to create their own version of Sidebar so it they can use it on Windows XP. I never personally liked it much during the testing process, but I believe that was due to the fact that I had a smaller monitor and that it just took up too much desktop real estate for my liking.
 Now
that I have widescreen monitors I have grown to like the Sidebar more, and with
the ability coming for
DesktopX 3.5 to export to Sidebar Gadgets, I find myself using it quite
often now. My biggest complaint so far is there is no way to auto-hide the
Sidebar. It would be nice to be able to activate it on mouse-over, but
that is not a feature available, and Microsoft told me there is no immediate
plans to do so.
Now
that I have widescreen monitors I have grown to like the Sidebar more, and with
the ability coming for
DesktopX 3.5 to export to Sidebar Gadgets, I find myself using it quite
often now. My biggest complaint so far is there is no way to auto-hide the
Sidebar. It would be nice to be able to activate it on mouse-over, but
that is not a feature available, and Microsoft told me there is no immediate
plans to do so.
I think most people know what the Sidebar in Vista is, but if not it's basically a pane on the side of your Vista desktop to keep your gadgets organized, and gadgets are mini-applications that can display information such as weather, CPU usage, news feeds, etc. We have already added a couple of galleries to WinCustomize for the Windows Sidebar, one for Sidebar Gadgets and one for Sidebar Styler. Sidebar Styler lets you customize the appearance of the Windows Sidebar.
Adding a Gadget to the Windows Sidebar is pretty simple. Gadgets have the file extension .gadget, and the two best places to get new gadgets is from WinCustomize.com or the Microsoft gallery. Once you download a gadget simply double-click to install, and it should show up immediately in your Sidebar. If you click the "+" button at the top of the Sidebar it will bring you to your installed gadgets, and from there you can search, add/delete, or find out more information about an installed gadget.

I just wanted to give a quick tour of the Sidebar, and I will visit it again after more extensive usage, and I'd also like to hear your views on it as well. So what is your opinions of the Windows Sidebar? Do you use it, and do you plan on creating some gadgets for it?
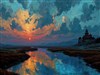
Animated Wallpapers: First Impression
My First Impressions of Dreams
Monday, February 26, 2007 by Island Dog | Discussion: Animated Wallpapers
When I first learned of DreamScene and Stardock DeskScapes I was pretty excited, but I also had some reservations about it. The idea has always been around for a while, but nothing ever practical came out of it until now. At first thought an animated wallpaper sounds cool, but will it hold up under daily use, or interfere with my productivity?
Those were just a few of the questions I originally had, and after being able to work with DeskScapes for a while, I have to say I was quite impressed. My first original concern is that an animated wallpaper would be too distracting, but after working with it for a few days straight, the answer was a definite no for me. While a few of the Dreams I tried could be considered very "busy", I tried to stay with animated wallpapers that were more subtle in nature.
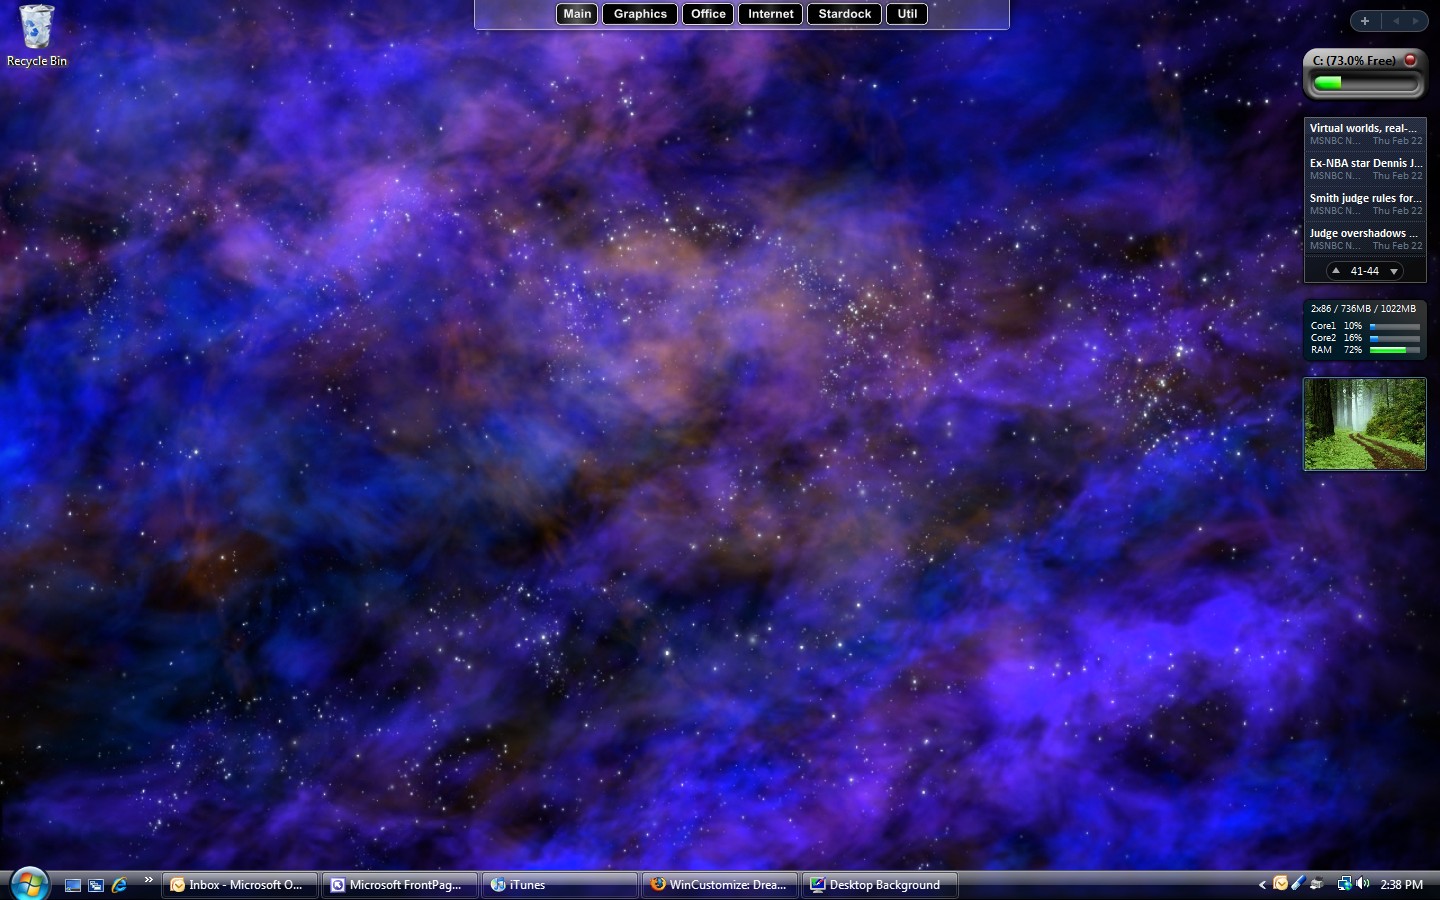
The first one I used was Nebula by Stardock Design. This is a very subtle animated wallpaper with a beautiful space scene complimented by "twinkling" stars. This image is great as a static wallpaper, but the simple animation really brings it to life.
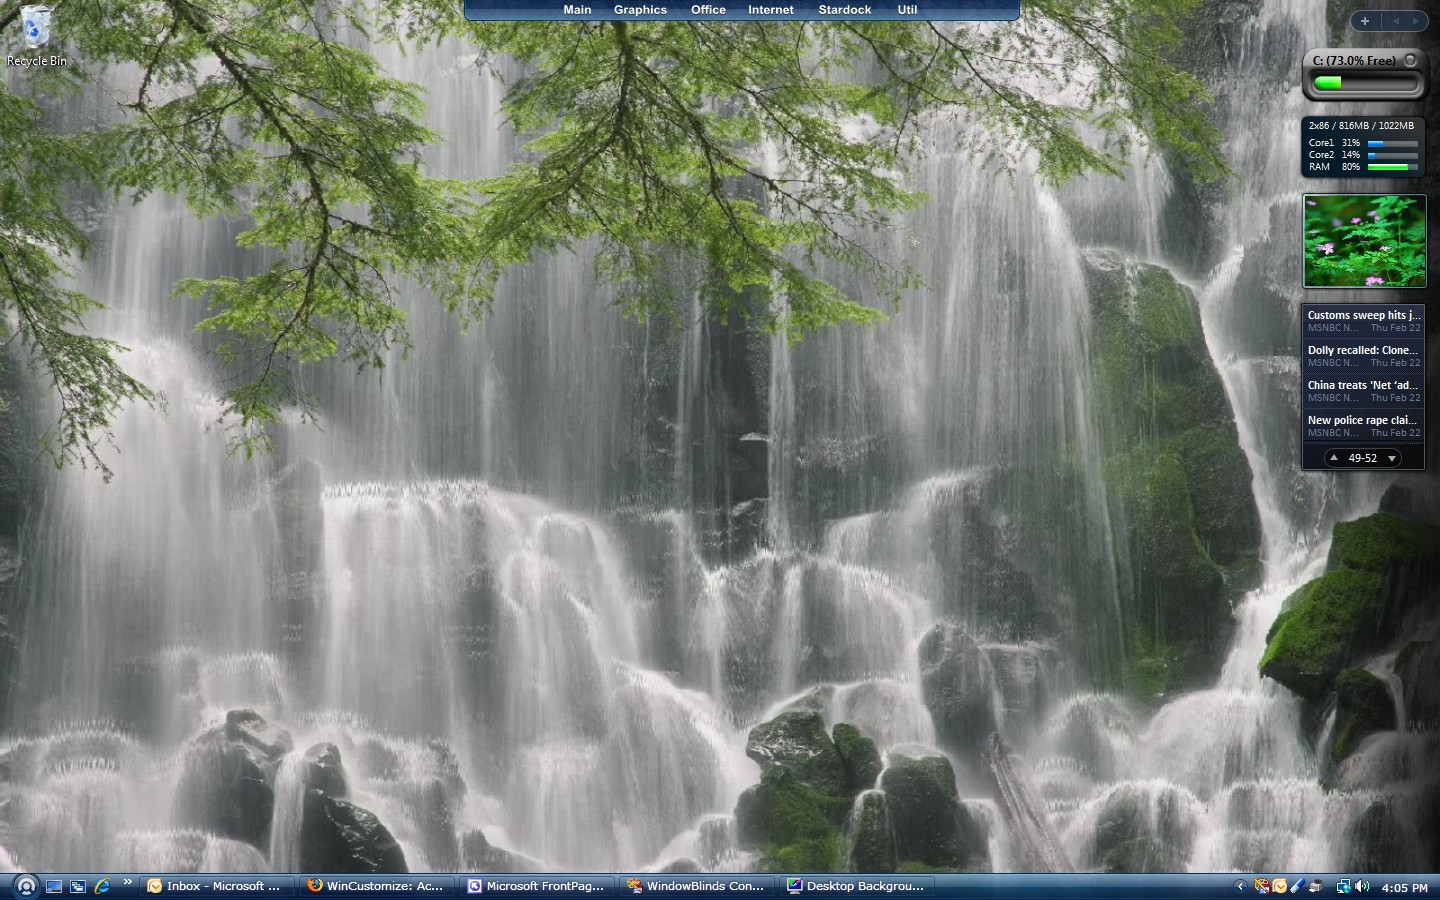
Next up I tried Wasserfall by peter22. This is a very relaxing scene of a waterfall with the water animated. This is a little more busy than something like Nebula, but it fits right into the desktop and has been one of my favorites.
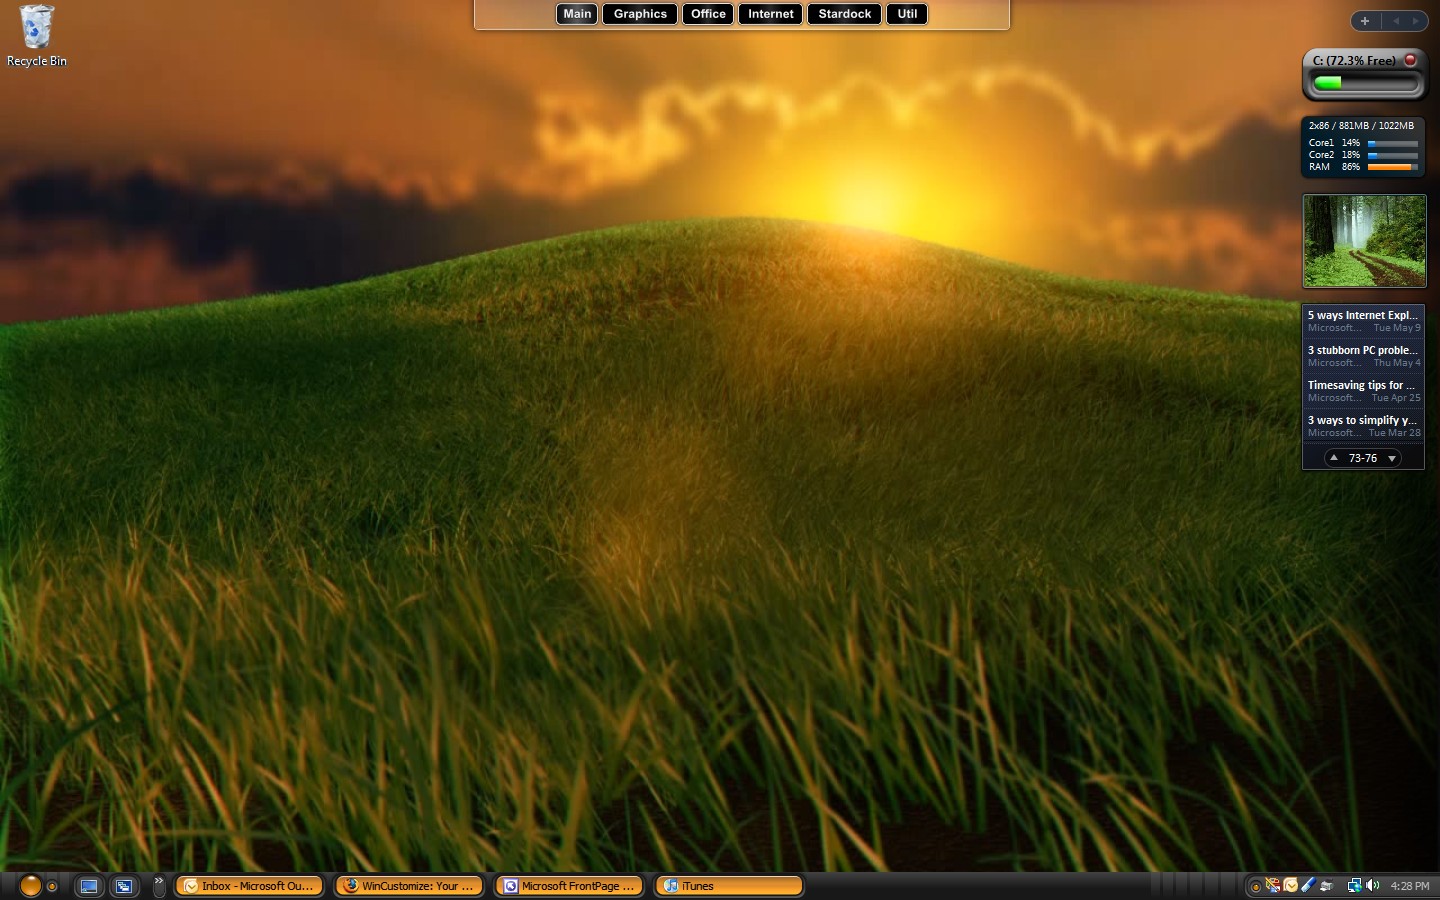
Next was Blissful Sunset by Stardock Design. Grass swaying in the wind as the sun sets in the background, very nicely done. This is another "relaxing" Dream that you really need to see for yourself. This was very easy on the eyes without any distraction, so this was my favorite so far.
After working with DeskScapes over the past week I am pleased to give it a big thumbs up. I had used Dreams here and there for a while, but never worked with them on a full-time basis. My real first impressions were very positive, the animated wallpapers looked good, and they work quite well on my system. Now I'm waiting for the next step which will be dynamic content and triggers in DeskScapes. I think those alone will take animated desktops to a whole new level.
Why Vista? Why 64 Bit? The Answers Are in the Questions!
Sunday, February 25, 2007 by Gideon MacLeish | Discussion: Personal Computing
The question was asked on another blog about why anyone would insist on 64 bit computing at this time when the technology is so new and computers are problematic. The same question, honestly, could be asked about Windows Vista, as a replacement for XP, which is a capable operating system, despite what I may usually think about it.
Now the question may be valid for the average end user, but for IT pros, it's a no brainer. The simple truth is, while you may make purchasing suggestions, usually it is someone else who ultimately makes the decisions, and if you're not on top of the game, you'll find yourself pretty quickly obsolete. There are a lot of business owners who haven't forgotten the insane 90's when a computer was obsolete as soon as it popped out of the box. They don't want to repeat that debacle with their networks today, and as soon as a contemporary mentions the hottest buzzword, they are asking questions, questions an IT pro needs to be able to answer.
As a support technician, my workplace has not upgraded to Vista. If I didn't have a working computer elsewhere (school) loaded with Vista, I'd be drawing a blank when users call in with Vista related questions. End users don't HAVE a choice in operating systems, or at least not one they are aware of, when they purchase their computers. They basically get whatever the manufacturer loads, and you can't find manufacturers loading their machines with XP. Getting a new machine loaded with LINUX is actually easier than getting a new one loaded with XP.
Because I've used both operating systems, I can make an informed decision. The same can be said of 64 bit computing. If you haven't worked with it, it's hard to give the kind of decision that a manager n eeds; the kind of decision that will give them confidence in decisions that you make in the future.
By the end of the year, I should have a home network with at least 5 computers (and hopefully a server...we're in negotiations...lol!) I hope to run a variety of platforms, and a variety of different hardware configurations, from my "dinosaur" PIII Linux machine on up to my TRS-80 case mod (it's gonna be HOTT! Man!). As I peruse IT employment sites, I see a lot of demand for cross platform experience. And I intend to meet that demand (but Mac still sucks! LOL!)
Learning DX Step-By-Step - #3
Tutorial #3 - Attack of the Clones
Thursday, February 22, 2007 by RomanDA | Discussion: DesktopX Tutorials

 |
|||
| Step-by-Step Tutorials |
#3 - Attack of the Clones |
||
|
A series by RomanDA |
|||
|
Listing of other DX Tutorials: Click here Today's Lesson: "Attack of the Clones" In this lesson we will cover how to create a clone from an object, so we can have multiple items on the screen linked to a Folder, a Program and a web URL. In order to use this tutorial, you will need to first go thru Tutorial #2 (and download the zip file from there as well). I will assume you downloaded the zip of the png files, followed the Tutorial #2, and are ready to take your Lightbulb and make a new one that will point to a Program and another to a URL. For this and all the Step-By-Step DX Tutorials you will need to purchase DesktopX for $14.95 from Stardock. Lets get started. |
|||
| STEP 1 - Cloning the Lightbulb | |||
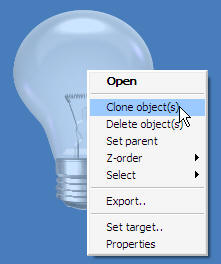
Again, I know this is
redundant but you need to have completed Tutorial #2 before you attempt
this one. That said, we will take our lightbulb and make a clone:
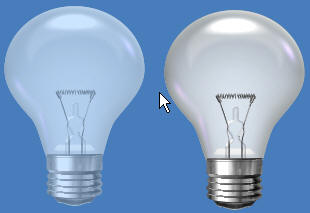
You have just created a CLONE!! *** Repeat this step one more time so that you end up with 3 lightbulbs *** |
|||
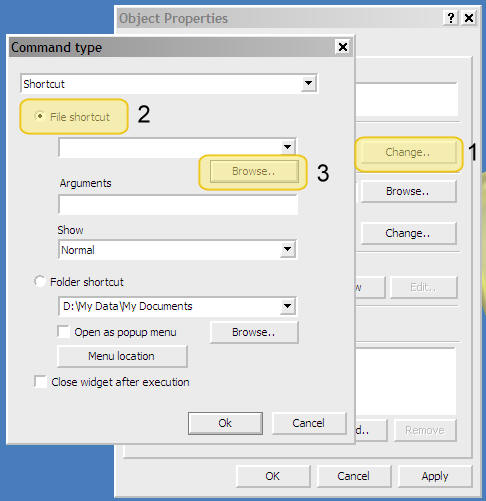
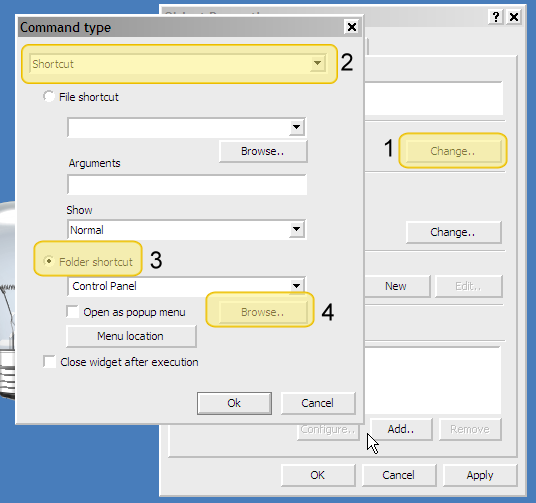
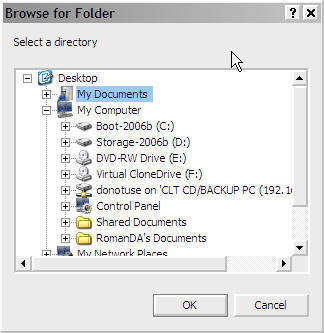
| STEP 2 - Point your Clone to a Program | |||
|
|||
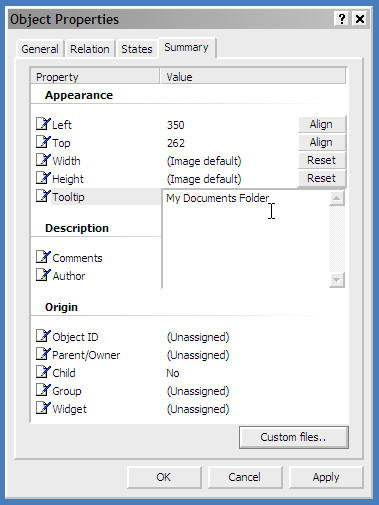
| STEP 3 - Adding a TOOL-TIP to these so you know which one is which | |||
Ok, you have 2 identical
(well 3 really) clones on your desktop. So that you can know which
one does what, we are going to add a TOOL-TIP (the text that shows up
when you mouse over something) to each.
|
|||
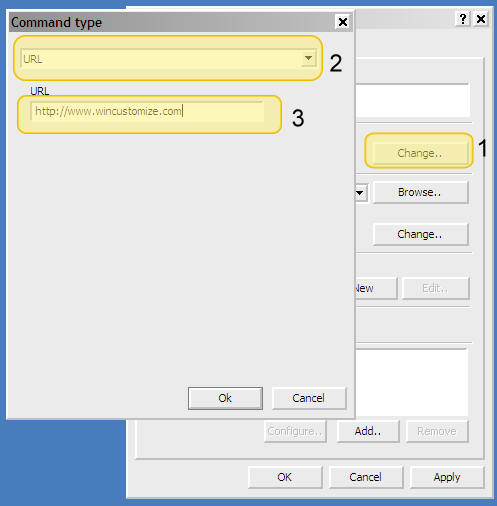
| STEP 4 - Making a URL Linked Object | |||
|
|||
| CONCLUSION | |||
|
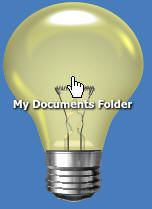
Ok, That wasn't hard was it? Ok, yeah so now you have these 3 HUGE lightbulbs on your desktop, and they suck, well make your own images, and change them! Changing them is simple, go back to Tutorial #2, look at step #3 and just pick your own images for "mouse over" and "mouse away" states. You can even download from the MISC Icons library and use them for these states. Check back as I add new Step-By-Step Tutorials on how to make this a link to a folder, web-site, or just about anything you want! I hope you have enjoyed this step into DX, and look forward to the next installment..
|
|||

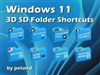
Learning DX Step-By-Step - #2
Tutorial #1 - Folder Object
Thursday, February 22, 2007 by RomanDA | Discussion: DesktopX Tutorials
|
|
||
| Step-by-Step Tutorials |
#2 - Folder Object |
|
|
A series by RomanDA |
||
|
Listing of other DX Tutorials: Click here Today's Lesson: "Folder Object" In this lesson we will cover how to create a simple object that you can use to open a folder. (We will be using this in the next one to create a Program and a URL Shortcut. To use this tutorial you will need these 2 PNG files - click HERE to download - (yes, they are lame, but i wanted something simple to use). For this and all the Step-By-Step DX Tutorials you will need to purchase DesktopX for $14.95 from Stardock. Lets get started. |
||
| STEP 1 - Load DesktopX | ||
|
Once you have DesktopX
installed, look in your Start Menu for "Object Desktop" then for "DesktopX",
click it to load the program.
You will see the DesktopX
STARTUP Screen
(yours wont say PROFESSIONAL unless you purchased PRO)
It will load the DesktopX
SETTINGS Window:
We just wish to get these screens out of the way for now, we are not going to use them. Click "CANCEL" on the SETTINGS window, and DONE on the STARTUP Screen. You should have a blank
screen now with a new icon in your system tray:
|
||
| STEP 2 - Create an object | ||
|
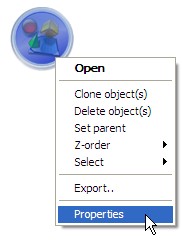
RIGHT CLICK on the
|
||
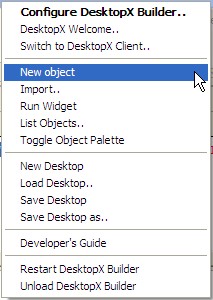 |
You will need to select the "NEW OBJECT" item on this menu. | |
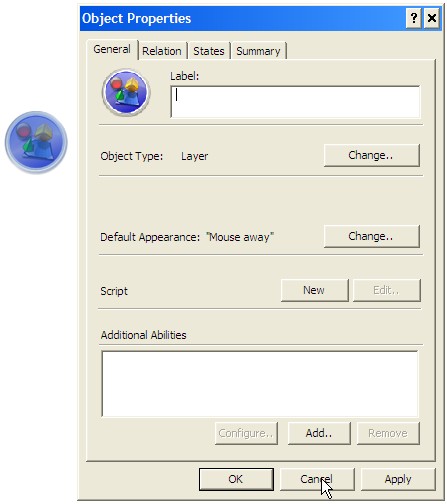
|
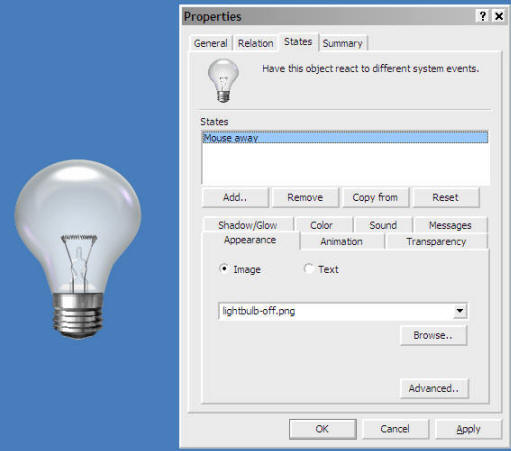
You will see the OBJECT
PROPERTIES window below (as well as the object itself).
This window will be referenced over and over in these tutorials.
IE: Open Properties / Select States
(which would mean to select the States TAB in the
Properties window)
You can access this
properties window at any time by RIGHT-CLICKING on the object and
selecting PROPERTIES.
|
||
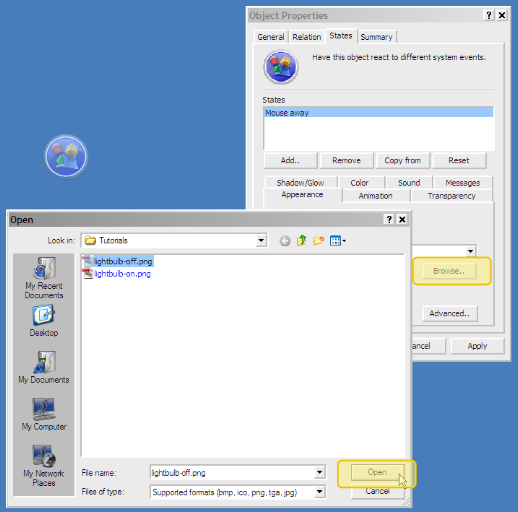
| STEP 3 - Adding Images into the Object | ||
When you added the object,
it brought up the PROPERTIES window, now select the "STATES" tab to
change to this TAB.
|
||
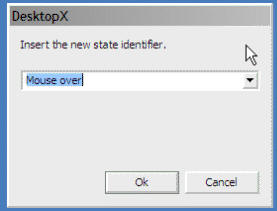
| STEP 4 - Making your Lightbulb DO something. | ||
|
||
| STEP 5 - Changing the CURSOR on the Lightbulb | ||
|
||
| CONCLUSION | ||
|
This is a pretty simple
Tutorial, I was going to continue this and make several clones of the
lightbulb for a program and a url, but I want to split that into the
next Tutorial. I will post that at the same time I post this, so
you can continue with
Tutorial #3 - Attack of the Clones Check back as I add new Step-By-Step Tutorials on how to make this a link to a folder, web-site, or just about anything you want! I hope you have enjoyed this step into DX, and look forward to the next installment.
|
||
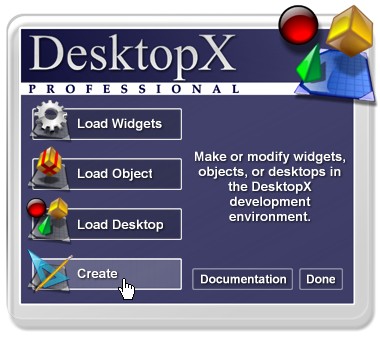 One you see this screen,
click on "CREATE" because we want to CREATE a new Widget.
One you see this screen,
click on "CREATE" because we want to CREATE a new Widget.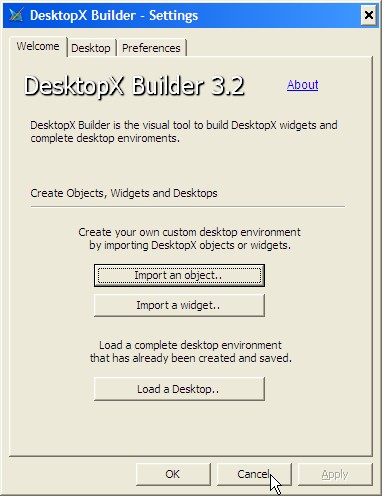
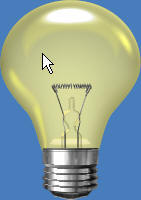
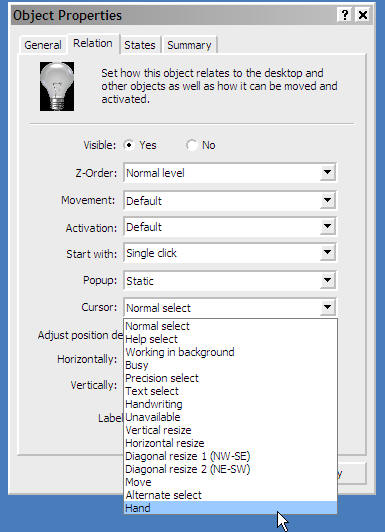
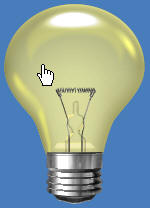 - Notice the HAND Cursor
What is the .DREAM format?
Animated wallpaper format
Thursday, February 15, 2007 by Frogboy | Discussion: DeskScapes
This topic is touched on in this article. But it's an inevitable question -- why did Stardock develop the .dream format?
A little history here -- Microsoft has created a cool new feature in Windows Vista Ultimate called Windows DreamScene. Concurrently, Stardock was developing its own animated wallpaper program called DeskScapes. Early in development, it was decided it made a lot more sense to team up.
Windows DreamScene allows users of Windows Vista Ultimate to play video as animated wallpapers. The concept is very straight forward -- .MPEG or .WMV as animated wallpaper.
Stardock's view was that we wanted to take it one step further and address potential problems that might come up.
Giving artists credit...
For instance, look at your wallpaper choosing dialog in Windows Vista (or even XP). There's no credit or author info on who made the wallpaper. Maybe that wasn't an issue back in the day of making bitmaps for wallpapers that didn't require effort. But believe us, creating a decent animated wallpaper can take weeks. We strongly believe that artists would want to get credit for what they've done.
Finding the stuff...
Trying to find an animated wallpaper on the Internet? Good luck. Look for .WMV or .MPEG? Or maybe type in "animated wallpaper" and find all sorts of weird stuff. People who make this stuff are going to want to find it. That's one of the reasons we wanted to create a specific extension for animated wallpapers so that people would be able to know that THIS was created to be an animated desktop and isn't just some random video.
Extending the capability...
This has been discussed elsewhere but playing video as the wallpaper is just the beginning. The natural next step is dynamic content. DeskScapes provides that capability. Same for triggers (events that change what is being played as the wallpaper). In the coming weeks, we'll begin posting the documentation and examples on creating this sort of thing along with samples.
Providing a community site...
Another thing that is important that I don't know if most people realize is that for this sort of thing to take off, you need stable, reliable, trustworthy sites to host and provide a base for this kind of thing. 100,000 people downloading a 50 megabyte file is simply beyond the capability of most sites. And while torrents and such might solve some of that, you're still stuck with having to hunt and peck for things rather than see what you're getting and talk to the people who made them directly.
So that's why we created the .dream format. It does create some confusion initially that it's not part of Windows DreamScene. That may change in the future as the format matures, but obviously initially the extra step of downloading DeskScapes can be a hassle for some but on the other hand, because we're not Microsoft, we have a lot more latitude on what we can do in the short-term.
As for us at Stardock, we're just jazzed that animated wallpapers are finally a practical reality (they've been around in impractical forms for years -- even on OS/2 <g>).
Omega Premium Suite Walkthrough
Take a look at one of our newest Premium Suites!
Wednesday, February 14, 2007 by Island Dog | Discussion: OS Customization
 The
Omega Premium Suite,
done by Treetog for Stardock Design
was recently launched and has been getting great reviews from the community.
For those of you who might have missed the launch or just wanted to see a bit
more I am going to take you on a walkthrough of the Omega suite.
The
Omega Premium Suite,
done by Treetog for Stardock Design
was recently launched and has been getting great reviews from the community.
For those of you who might have missed the launch or just wanted to see a bit
more I am going to take you on a walkthrough of the Omega suite.
The Omega suite contains the following items:
- WindowBlinds Visual Style
- Icon Package
- Wallpaper
When you download the suite you will also get a pack of extras in a .zip file. These include:
One thing that is important to me, and I know is important to users also, is if the skin is usable on a day-to-day basis. I have been using Omega for a few days now, and apart from being a beautiful skin, it's also very usable.
When purchased you will receive a link to download the suite. Just unzip the contents and double-click the omega .suite file to apply it. When you use Theme Manger to apply the Omega suite note that you can specify what size wallpaper to use, if any, and you can choose specific components to use if available for that suite.

Once you are happy with the settings then just hit "Yes" and Theme Manager
will download and apply the suite. Now that the technical stuff is out of
the way, let's take a look a closer look at the Omega suite with some
screenshots and video.
 |
 |
The Omega Premium Suite is available now, and don't forget that subscribers to Object Desktop get a discount! To use the Omega suite you are required to have Object Desktop or IconPackager, WindowBlinds, and ThemeManager to be installed.